

 100% Security Verified | No Subscription Required | No Malware

 ChatGPT
 Perplexity
 Gemini
 Claude
 Grok
Grok
Scroll through social media for a minute and you'll likely spot a clip that repeats seamlessly, like it never actually ends. That's a looping background animation, one of the most sought-after effects in video editing right now. Creators love it because it keeps eyes engaged without stealing focus from the main content.
Think of a good loop like wallpaper: it plays behind a product shot, logo reveal, or presentation slide and adds life without taking over. That's why you see loops everywhere, motion reels, app intros, YouTube banners, Instagram story backgrounds.
The catch? Making a loop look clean is harder than it sounds. The start and end points need to align almost perfectly, or your brain instantly catches the jump and the illusion breaks. Most beginners try copy-pasting the clip, hit that obvious seam, then go searching for a better approach.

In this article
What is a Looping Background Animation?
A looping background animation is a video or motion graphic that plays continuously without a visible cut or break. It repeats smoothly, over and over, so viewers never once notice where one cycle ends and the next begins. The whole point is that it just keeps going, quietly and effortlessly, like it was always meant to run forever.
You see it everywhere once you start looking. Behind product shots where a brand wants just a little movement without making the product feel busy. Inside app interfaces where a gentle animated texture keeps things feeling alive between interactions. Across social media feeds where creators want their content to stand out without throwing a full motion picture at their audience. It is one of those effects that works precisely because most people do not realize it is even there.
Common Use Cases for When to Utilize Looping Background Animations
Once you know what a looping background animation is, you start spotting it absolutely everywhere:
- Motion reels: Use loops to fill space between segments and keep the energy flowing without dead air.
- App intros and loading screens: A short, clean loop makes the interface feel premium and alive even when nothing is technically happening yet.
- YouTube banners and channel art: Subtle animated movement makes a creator's brand feel more dynamic and professional than a flat static image ever could.
- Instagram and TikTok story templates: Moving backgrounds instantly elevate even the simplest text overlays and posts.
- Presentation slides: Loops add more visual energy to keep an audience engaged and paying attention.
- Product and brand videos: A loop adds beautiful depth and atmosphere behind a logo or hero shot without pulling focus away from what actually matters.
Common Tools for Creating Loop Animations
There is no single best app for every person. Each tool below fits a different skill level and project type.
Filmora
Filmora has quietly become one of the most impressive tools for anyone who wants professional looking results without the professional level headache. The drag and drop workflow feels genuinely fun to use, and the motion features are deeper than you'd expect at this price point.
Highlights:
- Loop & Ping Pong modes let clips play forward or bounce back and forth automatically, no manual trimming needed.
- Trim Path presets make animated logos and stroke outlines look polished in seconds.
- Path Follow controls let you glide objects along any curve you draw with the pen tool.
- About $50/year with a perpetual license option, offering outstanding value.
After Effects
After Effects remains the industry standard for motion graphics professionals. It gives total control over every keyframe and supports expressions that can build a true After Effects background loop without manual trimming. The tradeoff? It takes weeks, sometimes months, before it really clicks.
Highlights:
- Expression driven loops that run automatically with zero manual trimming.
- Total keyframe control for frame perfect animation.
- The undisputed industry standard for motion graphics professionals.
- About $55/month via Adobe Creative Cloud.
Blender
Blender is genuinely remarkable. It's completely free, open source, and capable of things that would cost thousands of dollars in other software, including 3D product renders, orbiting particle fields, and complex character rigs. The motion path tools go far beyond flat 2D animation.
Highlights:
- Completely free and open source, with no catch.
- Handles 3D loops that no other tool on this list can match.
- Active, passionate community with endless tutorials.
- The interface takes real, dedicated time to learn.
Canva
Canva is the friendliest starting point on this entire list. You pick a template, it loops on its own, and you're done. It's genuinely magical for quick social posts and presentations where speed matters more than customization.
Highlights:
- Ready made animated templates that loop automatically.
- No learning curve, seriously almost none.
- Free tier available; Pro runs about $120/year.
- Motion path control is very limited, so you'll outgrow it if you're ambitious.
Figma
Figma isn't trying to be a general purpose animation tool, and that's actually what makes it great. It fills a specific, important niche: letting designers preview how buttons, icons, and loading states will actually move inside an app before a single line of code gets written.
Highlights:
- Excellent for UI/UX animation previews and prototyping.
- Collaborative by nature, making it great for design teams.
- Free tier available; Pro costs about $144/year.
- Not built for video, social content, or 3D.
Maya
Maya is what animation studios use to make the films and games you grew up with. It handles complex character rigs, long form motion work, and production pipelines at a scale none of the other tools here can touch. It's extraordinary, and it's almost certainly more than you need.
Highlights:
- Professional 3D animation at the highest level.
- Built for complex rigs and large scale production work.
- Steep learning curve and a steep price tag to match.
- Licensing costs put it firmly in studio or serious professional territory.

 secure download

How to Create a Loop Animation in Minutes
Using Filmora V15.6, the process is short enough to finish during a coffee break.
- Draw a path. Open the pen tool and sketch the route you want an object or stroke to follow inside the preview window.
- Apply an animation preset. Head to the Animations tab and pick a ready-made preset, or build your own using Trim Path and Path Follow.
- Choose Loop or Ping Pong. Decide whether the motion should repeat forward only or bounce back and forth for a smoother feel.
- Export. Pick your resolution and format, then render the final clip.
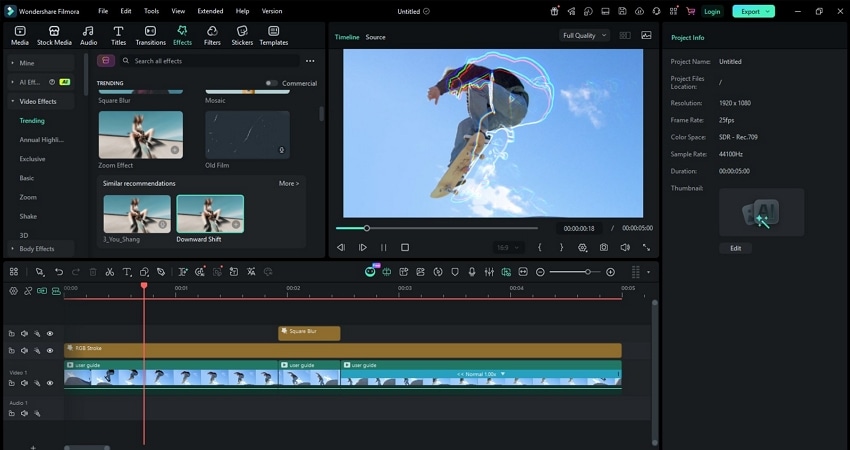
A few tips help any loop look more polished. Keep the movement speed steady near the start and end of the clip so the bounce point does not feel sudden. Use a transition or crossfade to hide any visible seam. Always preview the loop at full speed before exporting, since a slow scrub through the timeline can hide small jumps that show up at normal speed.
Which Tool Is Best for Most Users?
If you're new to this or just messing around for fun, pick Filmora or Canva. Everything is preset and drag-and-drop, with almost no learning curve. You can have something ready in twenty minutes instead of spending a week fighting tutorials. Filmora is the go-to for people who pump out daily content because the export options are already set up for Instagram and YouTube Shorts.
If you are designing apps or websites, Figma is the obvious choice. You can preview how the interface actually moves without jumping between different programs, so you get a much clearer sense of how your design works in real use.
If you want total control and care about exactly what happens on every frame, you are probably using After Effects or Blender, or you should be. They take longer to learn, and that is the tradeoff. With these tools you can fine tune motion and timing in ways the simpler apps cannot match.
None of these choices are wrong. It is not about which tool is best in the abstract. It comes down to what fits the work you want to build.
Tips, Best Practices, and Common Mistakes
A few small habits separate a clean loop from a clumsy one. Here are some tips and practices for common mistakes you may experience when creating your next video:
- Check composition length before exporting because a loop cut short will jump awkwardly.
- Avoid a hard cut at the restart point. Blend the seam with a short transition to make the loop feel continuous.
- Keep your frame rate steady for the whole project. A mismatched frame rate can cause stutters when the loop repeats.
- Test the loop at real playback speed more than once. Fatigue makes small flaws easy to miss the first time you watch.
Conclusion
A strong looping background animation comes down to one simple idea: hide the seam where the clip ends and begins again. When that seam is invisible your background feels endless and natural, which keeps attention on your content instead of on a distracting jump.
If you are just starting out or need quick results for social posts or a website hero, Filmora is a friendly option. Its Loop and Ping Pong modes plus easy path tools let you experiment fast and get a satisfying result with minimal fuss. If you are a professional chasing full creative control over every element, After Effects or Blender still offer the depth you need, though they require more setup and planning. Whatever tool you pick, think about smooth motion, subtle transitions, and an export that looks clean at the final playback speed.
secure download FAQs About Looping Background Animations
-
Why use looping animations instead of static backgrounds?
Looping animations add visual interest and motion, making content feel more engaging and modern. They can also subtly guide user attention without being distracting when done correctly. -
Can I create looping animations without design skills?
Yes. You can use beginner-friendly tools, like Wondershare Filmora. The Trim Path feature allows you to create loops in just a few clicks. You don’t need to know advanced design techniques and methods. -
How long should a looping animation be?
Most effective loops are between 3 to 10 seconds. Shorter loops are easier to make, especially with tools like Wondershare Filmora. They also appear more seamless and load faster. Thus, they are better for projects like websites.
