
Imagine you need to create a high-stakes presentation for a big client. Now, this isn't your run-of-the-mill slideshow—it has to be professional yet visually engaging, and something that would leave an impression on your prospect.
With terrible design skills, zero creative juice left, and time running out, you're starting to panic.And that's when you stumble on Gilisoft Video Editor Pro while searching on Google for alternative solutions. And it clicks; you could add GIFs from your product and marketing videos. This way, you don't need to spend hours designing or searching for fitting images and videos online.

Just like several other video editing tools, Gilisoft isn’t just a typical video editor—it is packed with features that come in handy in non-video-editing projects, especially when you need to get a task done without the hassle of complex tools.
This article will be a review of some favorite features of Gilisoft Video Editor, how to use Gilisoft for non-video editing projects, other features you should explore, and how to run the software without a PC installation.
In this article
Part 1: How To Maximize the Use Of Gilisoft
Gilisoft Video Cutter is an efficient editing tool and it’s easy to regard it as just another video editing software for clipping and cutting videos. However, this software stretches far beyond traditional video editing; you can create GIFs, convert files, or even work with 3D content on all kinds of creative projects. Here are some of Gilisoft’s most useful non-video-editing features and how to use them.
GIF Converter
The GIF maker converts videos and short clips to short, shareable GIFs. It is effective in making reaction GIFs for social media or even meme marketing materials and can create animated GIFs, banners, and slideshows from a sequence of images.
Here’s how to create a GIF with Gilisoft GIF Converter.
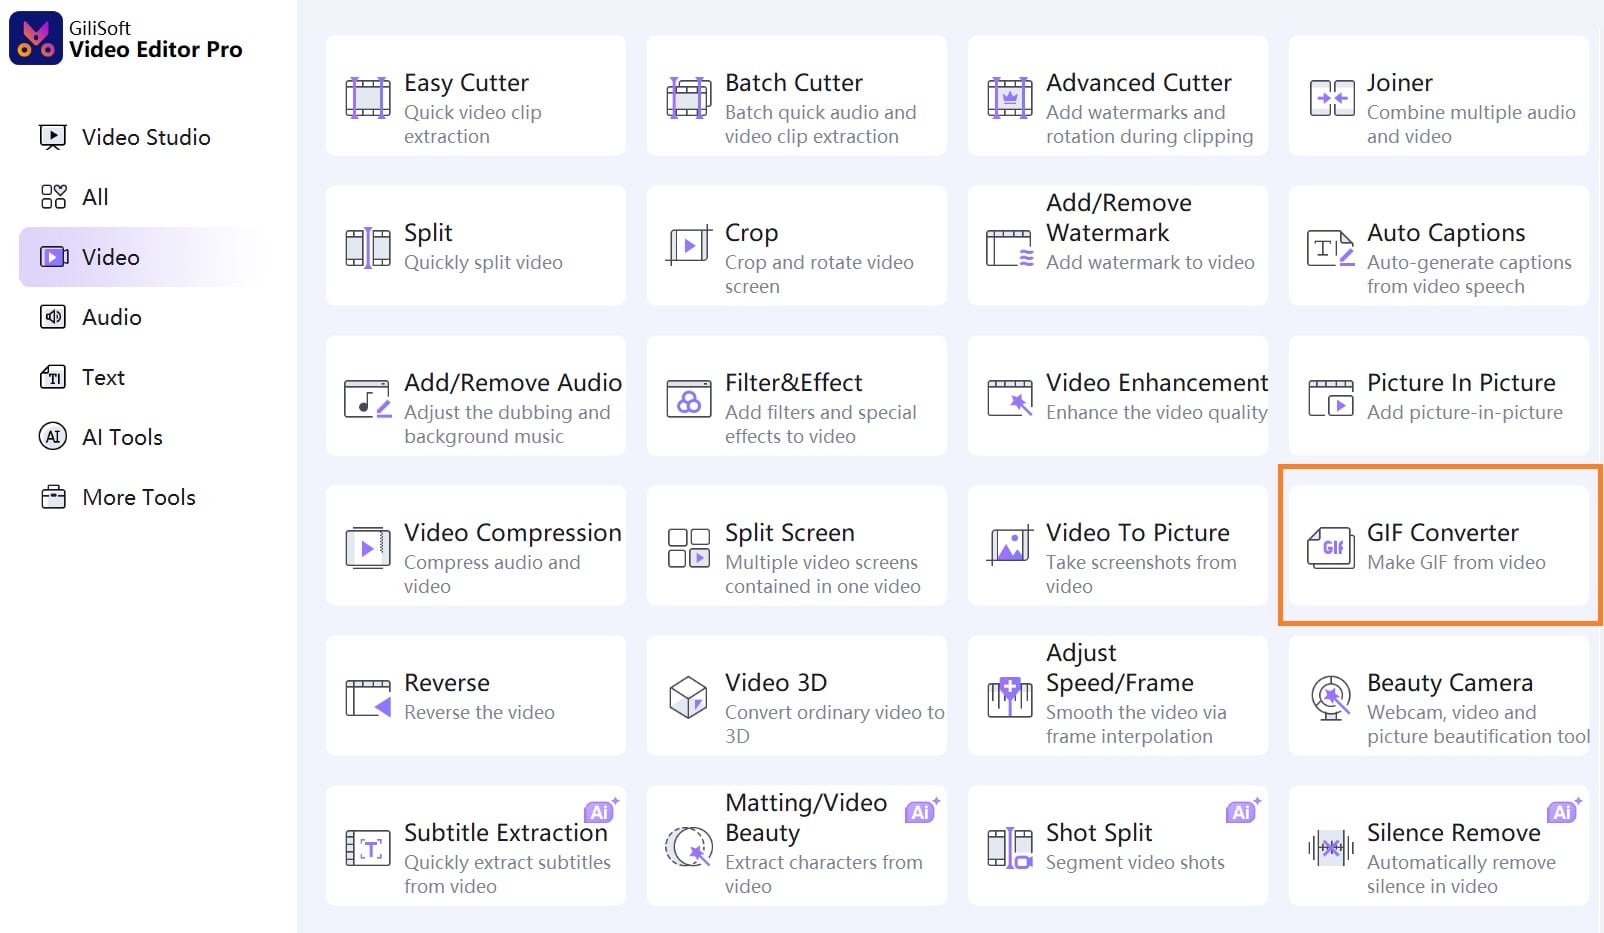
Step 1: On the Gilisoft home screen, Go to Video > GIF Converter.
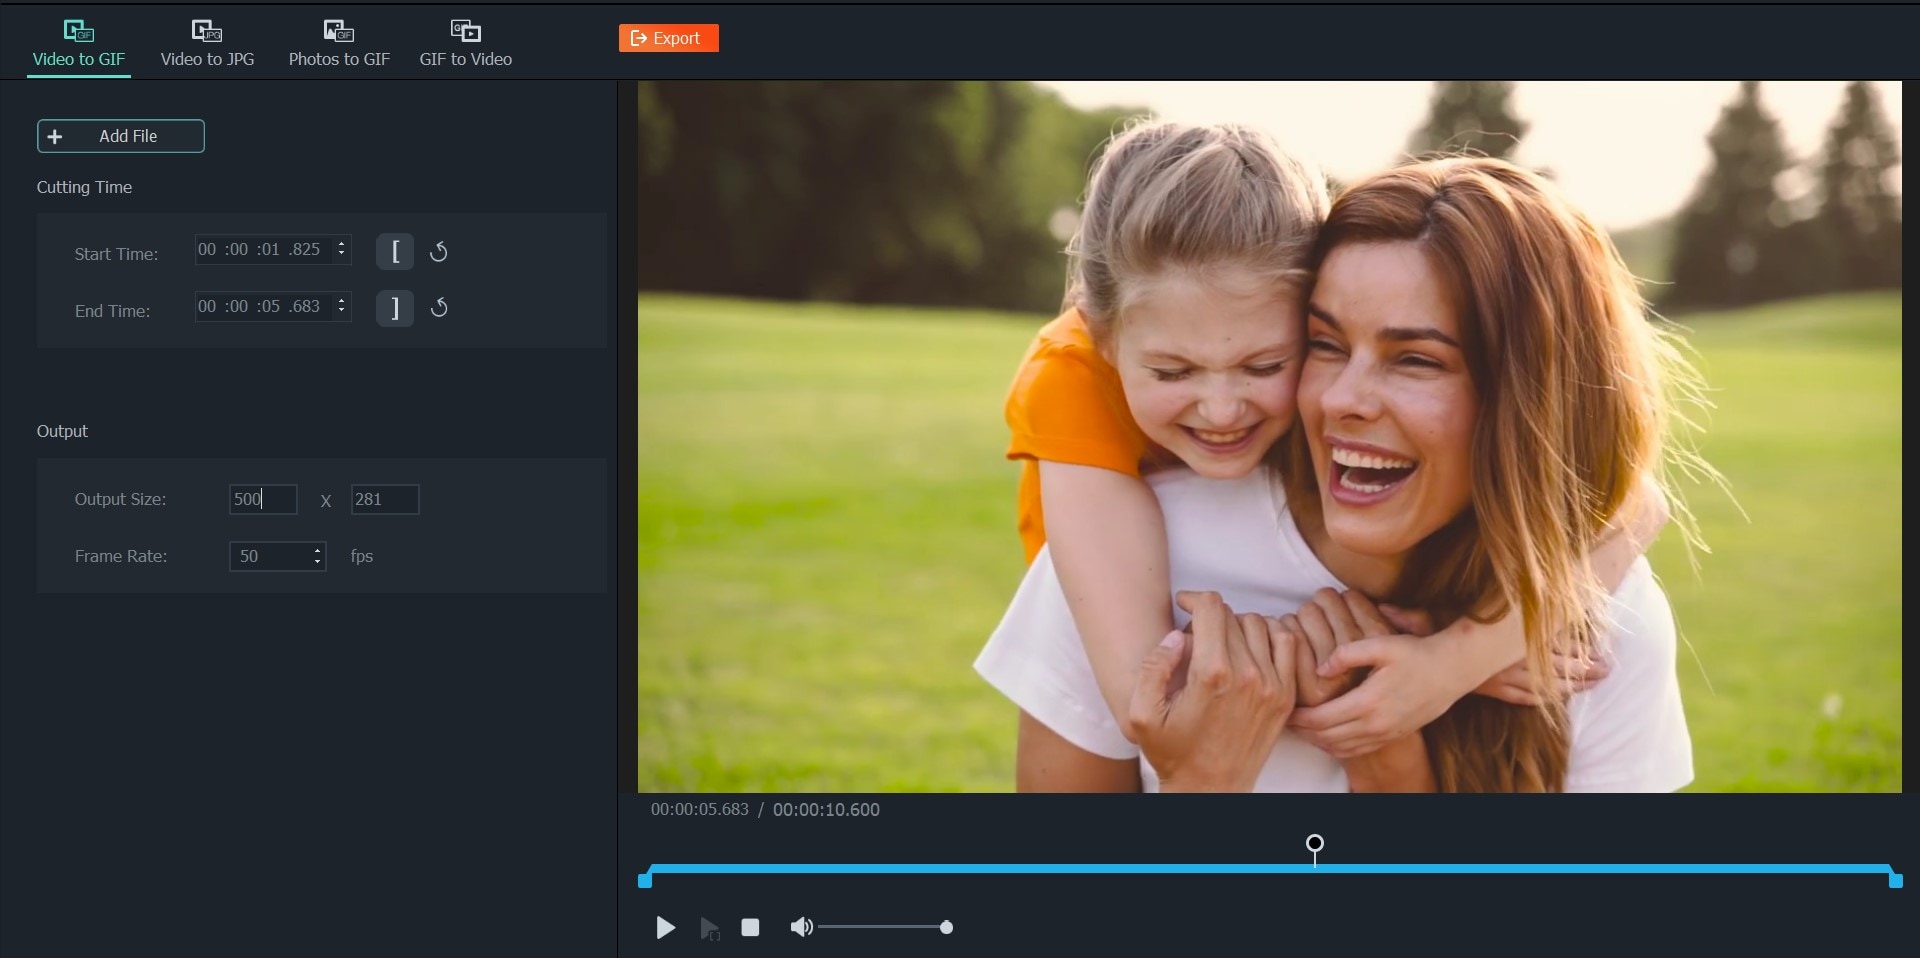
Step 2: Upload the video file from which you want to create GIFs.
Step 3: Add the points you want to cut to create your GIF to the editor panel. Customize your final GIF video size in the Output Size editor. Click on Export.
Video to Photo
Sometimes, all you need is that one perfect frame from a video. So instead of just taking a screenshot which may turn out blurry, use Gilisoft’s Video to Picture tool. This tool captures perfect frames from your videos, which is great for creating high-quality thumbnails, snapshots, or still images for documents and presentations. It works just like the GIF maker.
Here’s how to create still JPGs from videos using Gilisoft Video Editor.
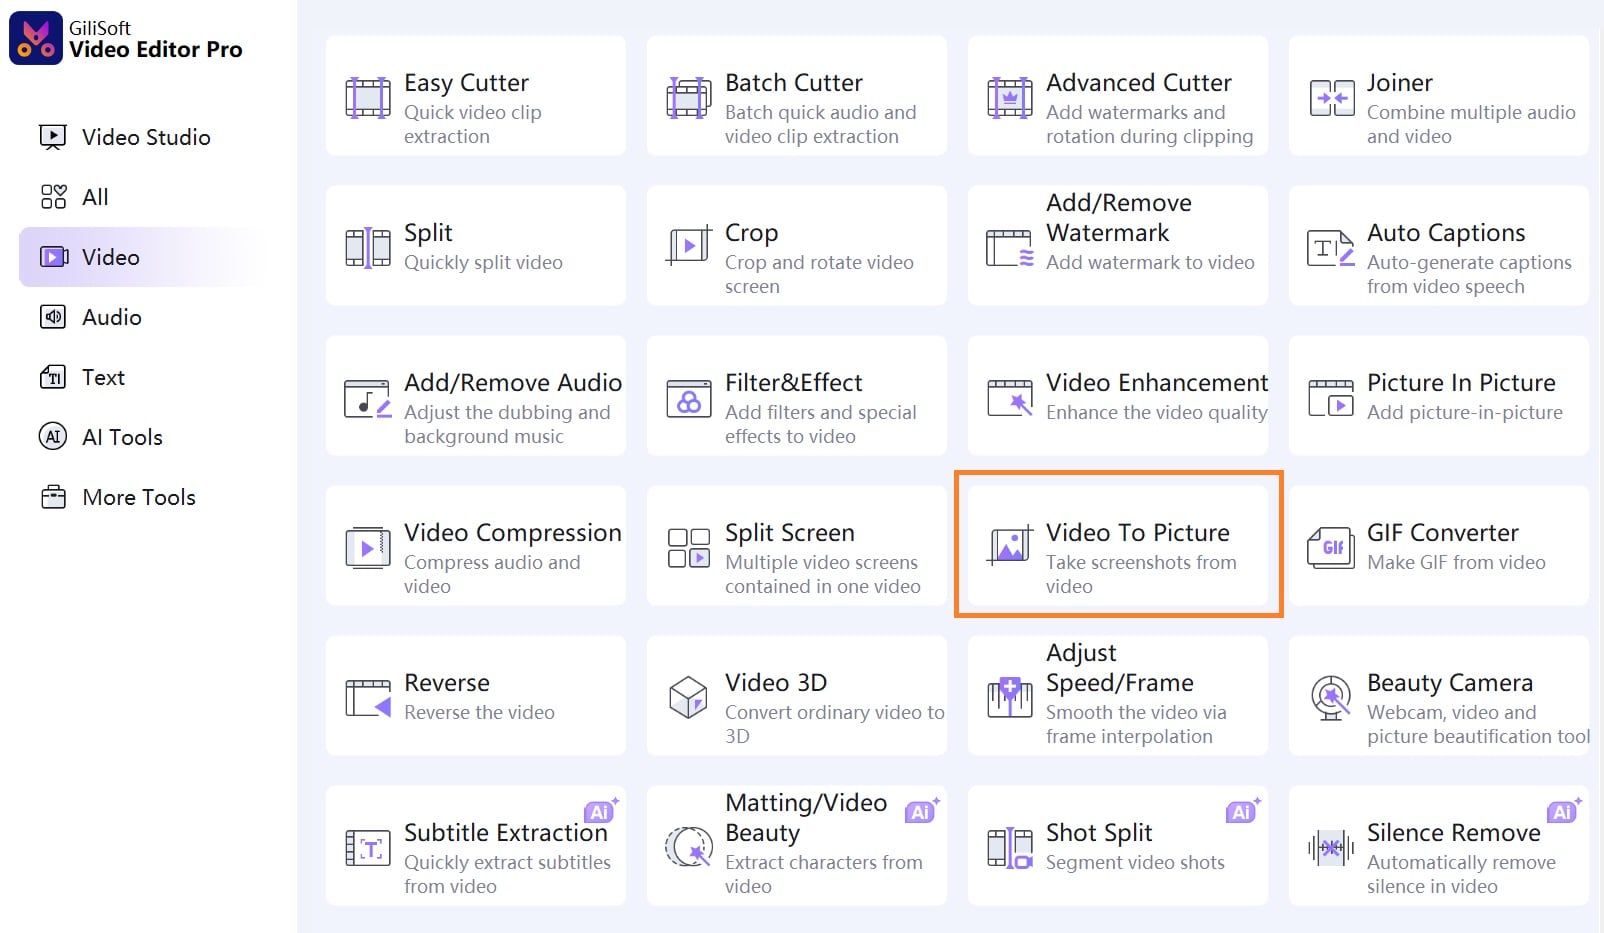
Step 1: On the Gilisoft home screen, Go to Video > Video to Picture.
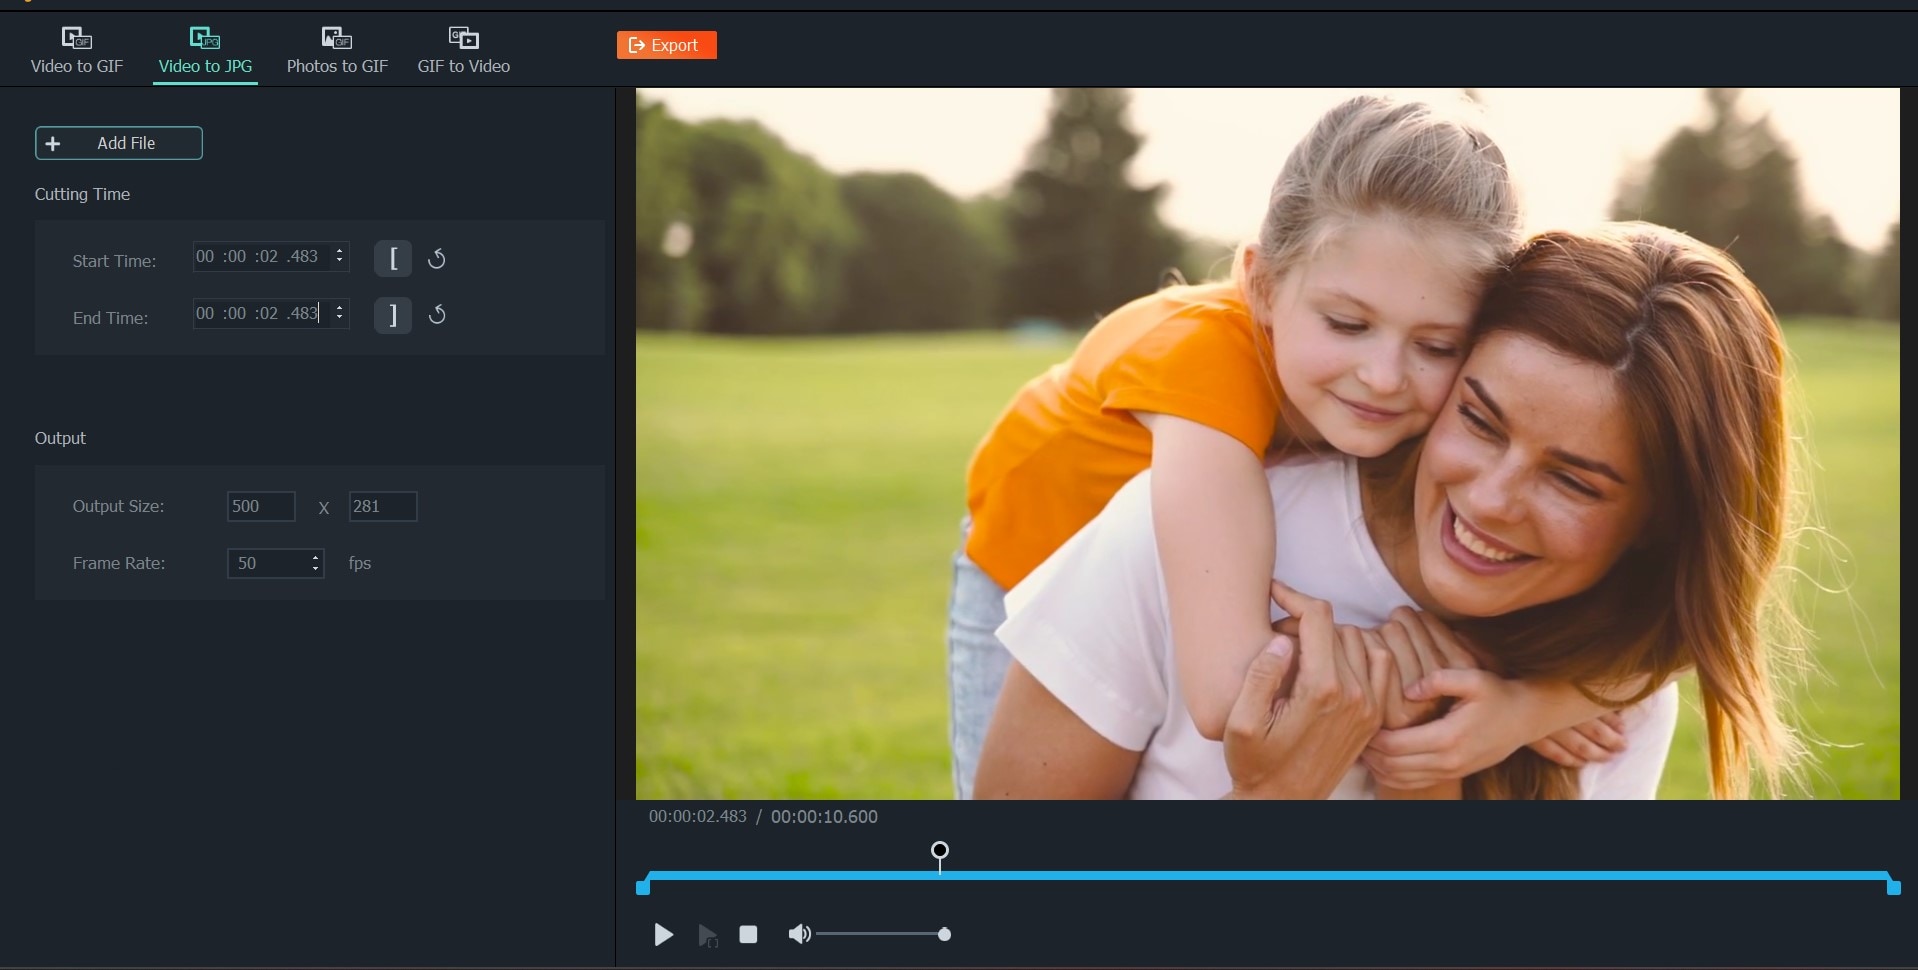
Step 2: Upload the video file from which you want to create still images.
Step 3: Add the points you want to cut to form your image to the editor panel. Customize your final image size in the Output Size editor.
This is perfect for creating thumbnails, snapshots, or reference images for reports.
2D to 3D Video Converter
With the growing popularity of 3D content, the 2D to 3D Video Converter transforms regular videos into 3D content. This is great if you want to add extra visual depth and immersion to their projects or simply want to jump on the 3D video trend.
Here’s how to create still JPGs from videos using Gilisoft Video Editor.
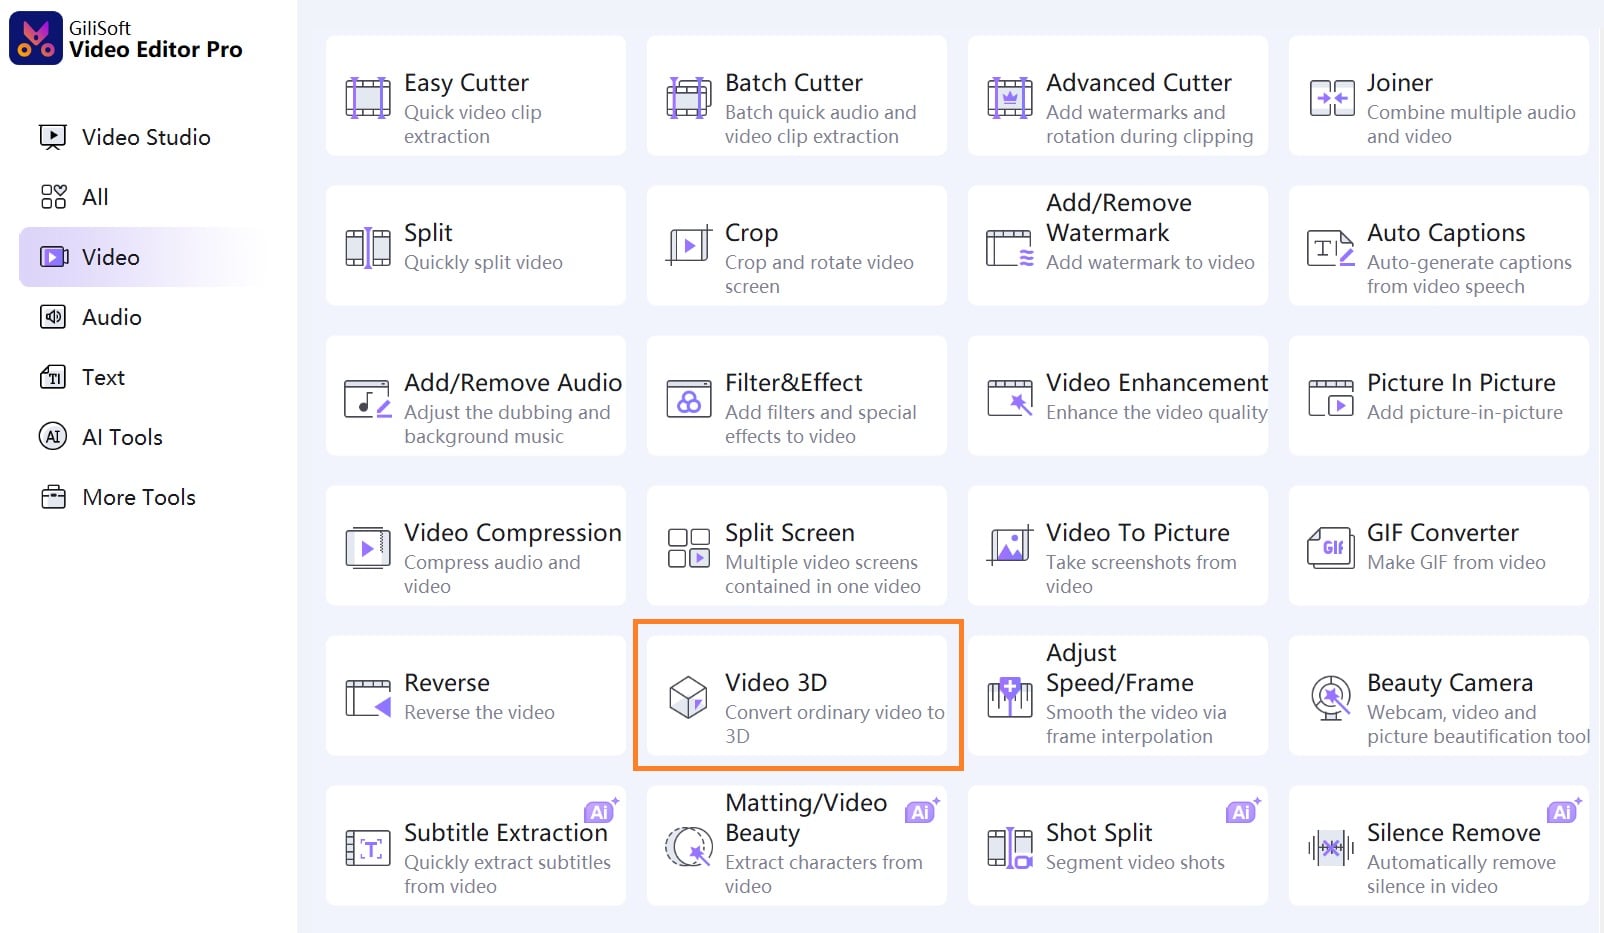
Step 1: On the Gilisoft home screen, Go to Video > Video 3D.
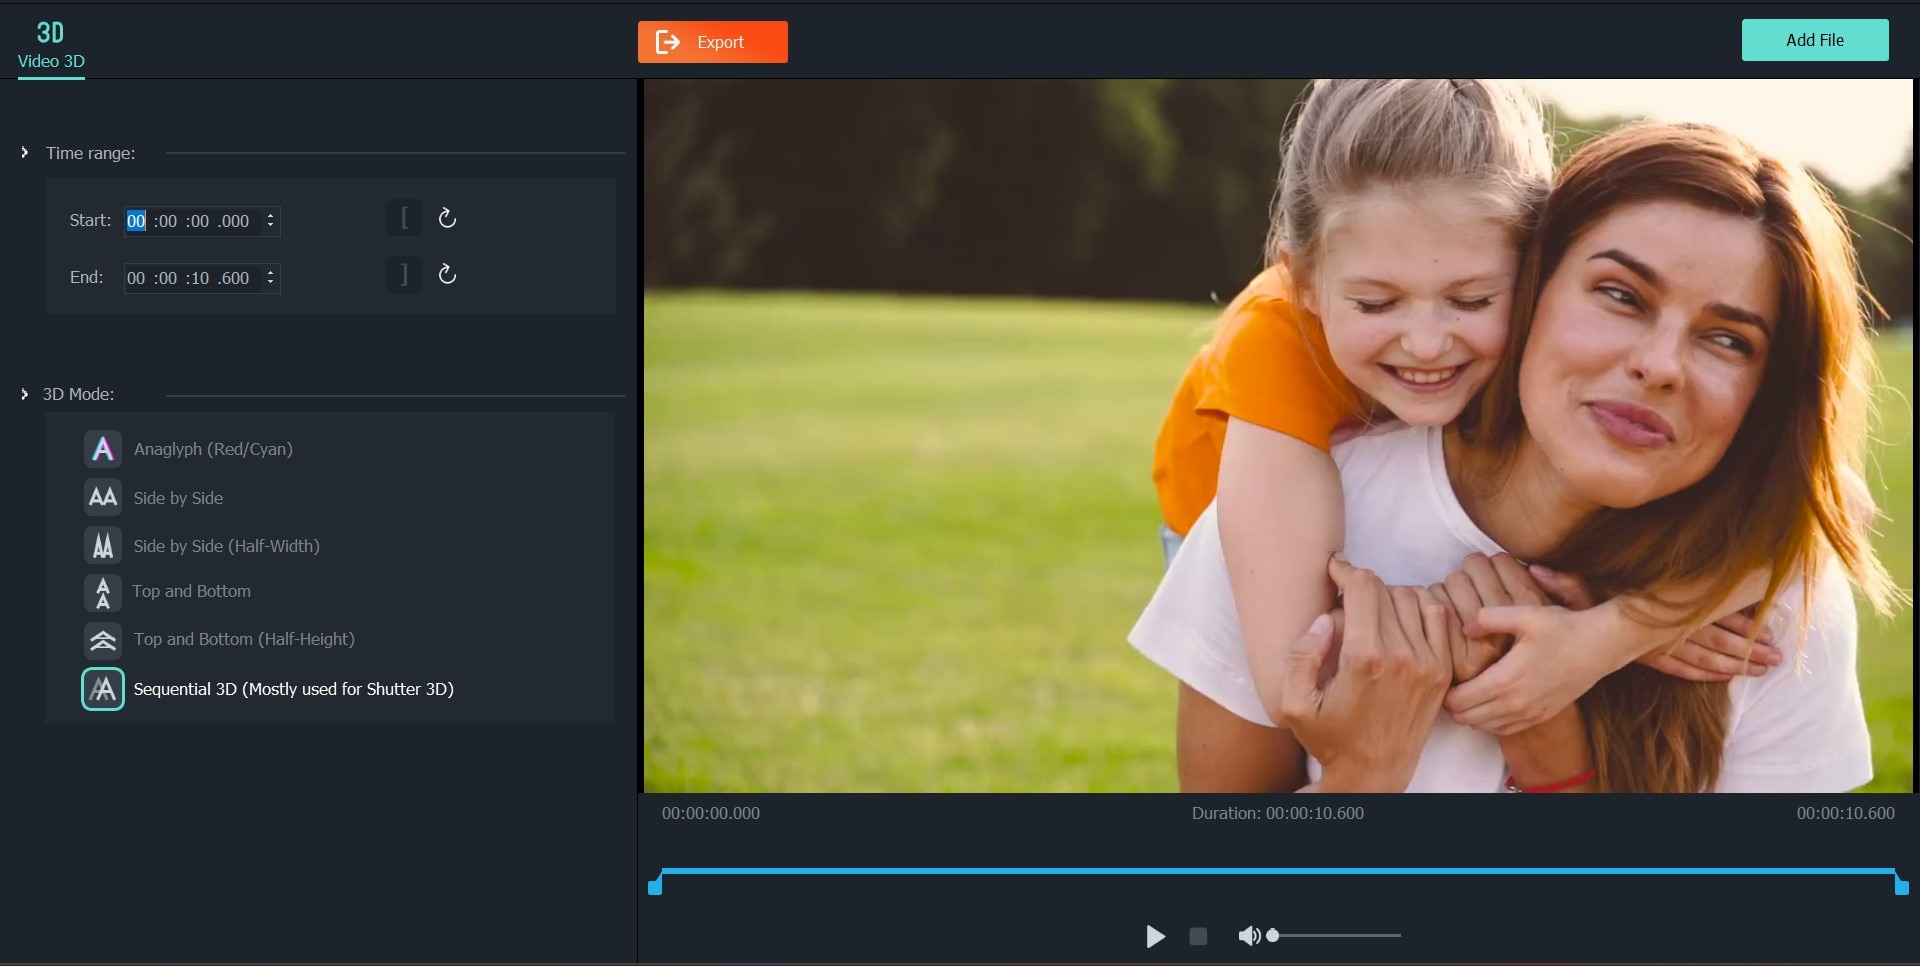
Step 2: Upload the video file you want to create, and add the time range of the video you want to convert to 3D. Choose the 3D mode you want to save your video in and Export.
PPT to Video and Doc to Video
Imagine converting a lengthy report or document into a video presentation—perfect for team meetings or client reviews. You can add animations, voiceovers, and other video clips to cement your points. This feature may be useful if you’re looking for a way to create presentation slides that don't require your recipients to have PowerPoint installed.
Here’s how to convert your documents and presentations to videos with Gilisoft Video Editor.
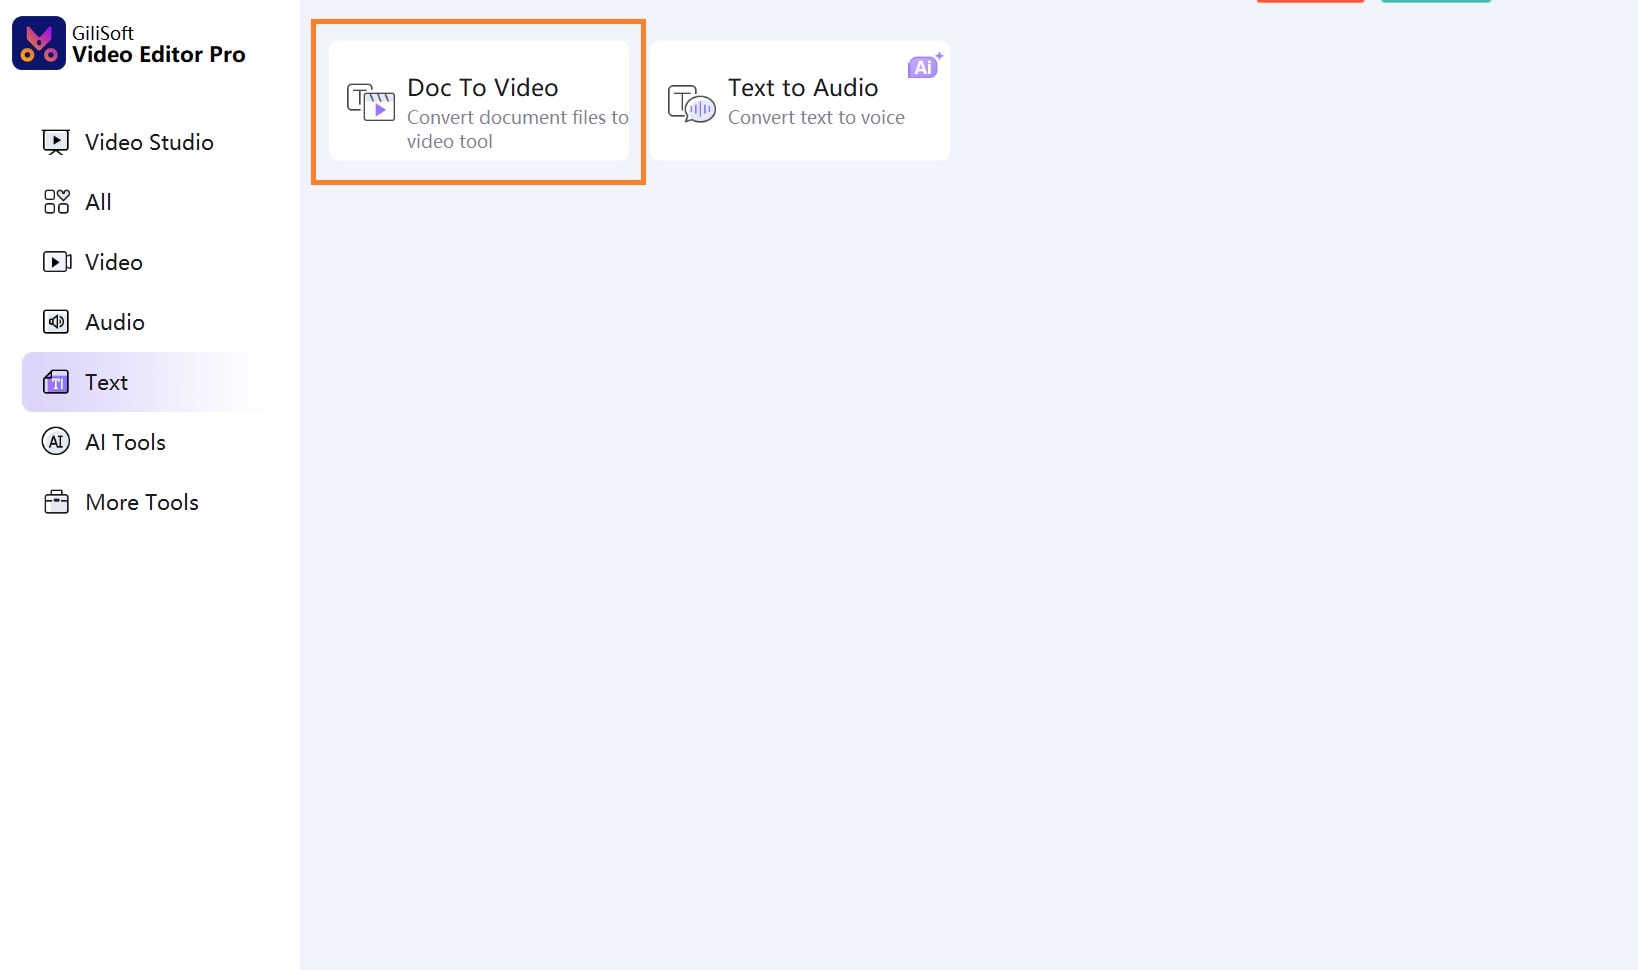
Step 1: On the Gilisoft home screen, Go to Text > Doc to Video.
Step 2: Upload the document you want to convert to video, customize the video by setting the duration based on each slide or section of the document, and Export.
Text to Audio
One of my favorite tools in Gilisoft is the Text-to-Audio feature. This feature converts written text into audio clips you can add as voiceovers to your videos. It’s an excellent solution for content creators and business professionals who want to add narrations and voiceovers to their projects but don’t have the time or tools to record good voice overs.
Here’s how to create voice overs from texts using Gilisoft Video Editor.
Step 1: On the Gilisoft home screen, Go to Text > Text to Audio.
Step 2: You may receive a prompt to install the module first. That’s okay! Go ahead and download the Text-to-Audio module. If you do not, proceed to edit your document.
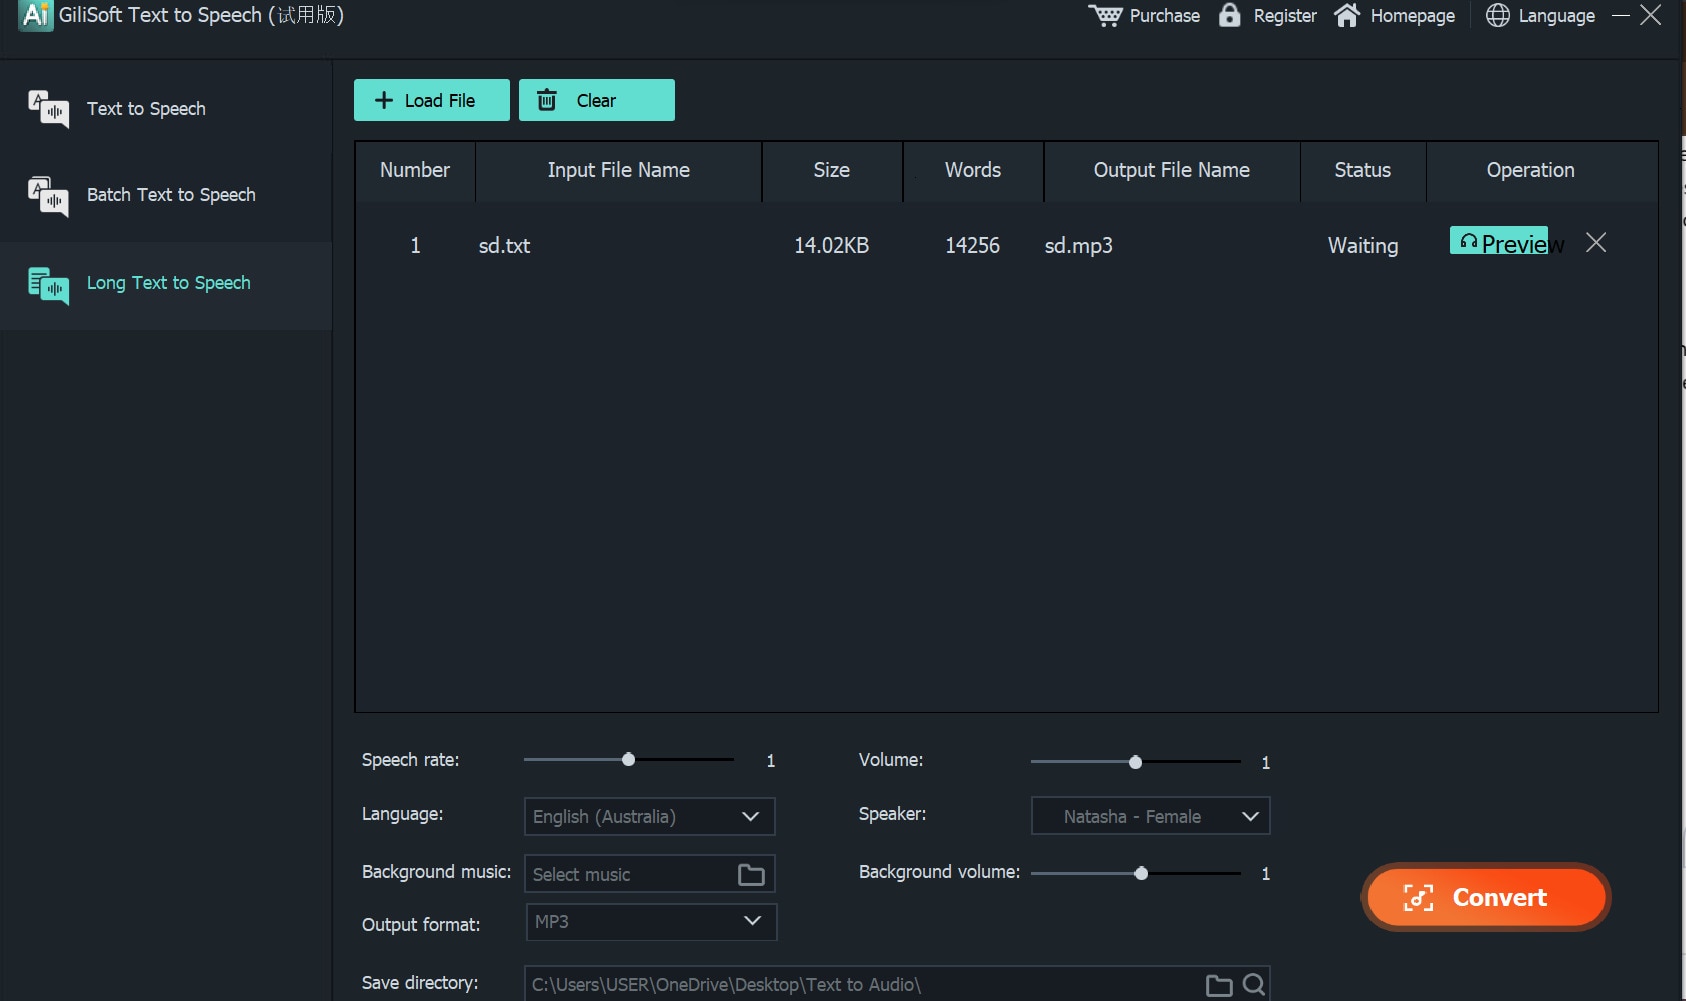
Step 3: Upload the text you want to convert in TXT format. Adjust the Speech Rate and Volume. You can add Background Music and save your audio in MP3 or WAV formats.
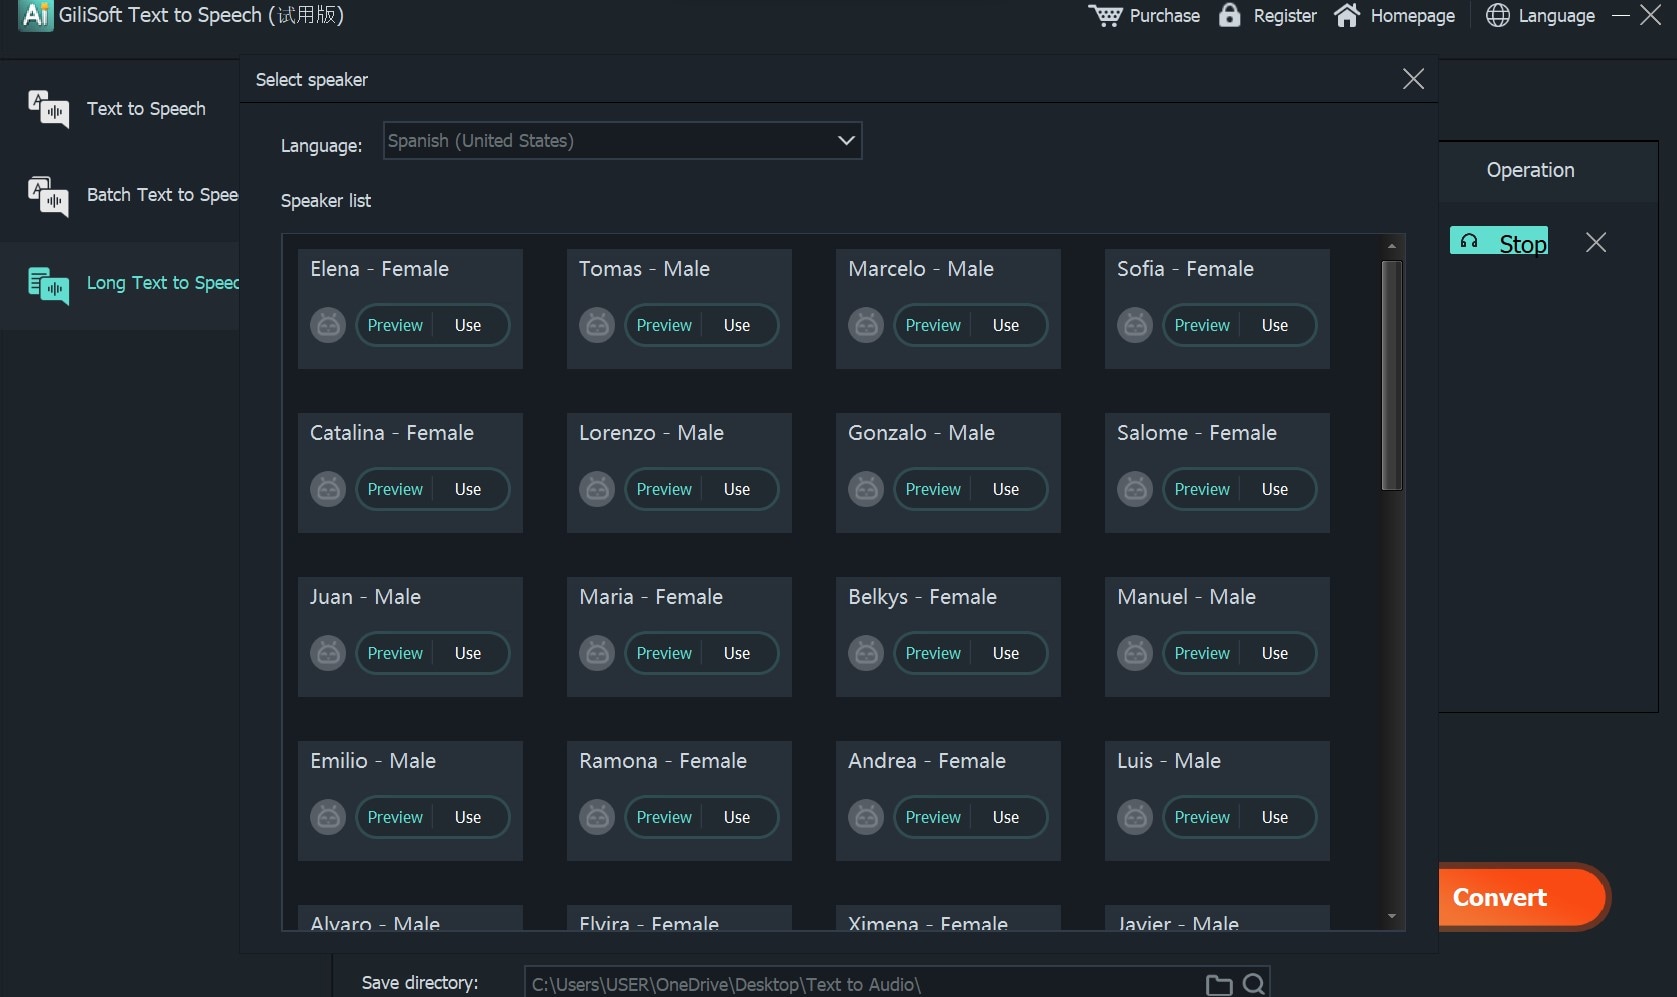
Step 4: Select the speaker’s voice and the language you want your audio in. Click Convert.
With the Batch Text to Speech option, you can convert multiple documents to audio. The Text to Speech option allows you to copy, paste, and convert small amounts of text to audio.
Improve your Gilisoft Projects with Filmora
If you want to improve your final edits, consider uploading your GIF to Wondershare Filmora. There, you can edit it or add text, making your simple GIF more suitable for public sharing.
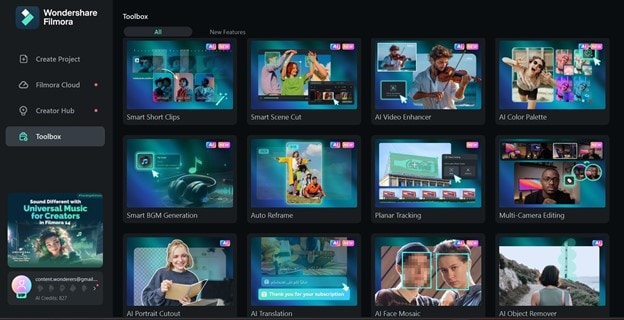
Filmora is video, audio, and text editing software that creates professional-grade visuals and easily improves existing content.
- Superb video stabilization with low distortion.
- Vast video/audio effects and creative assets.
- Powerful AI for effortless content creation.
- Intuitive, professional yet beginner-friendly.
- Works on Mac, Windows, iOS, and Android.

After extracting images with Gilisoft’s Video to Photo editor, you can add text overlays, graphic effects, or even color corrections, with Filmora, to make them pop.
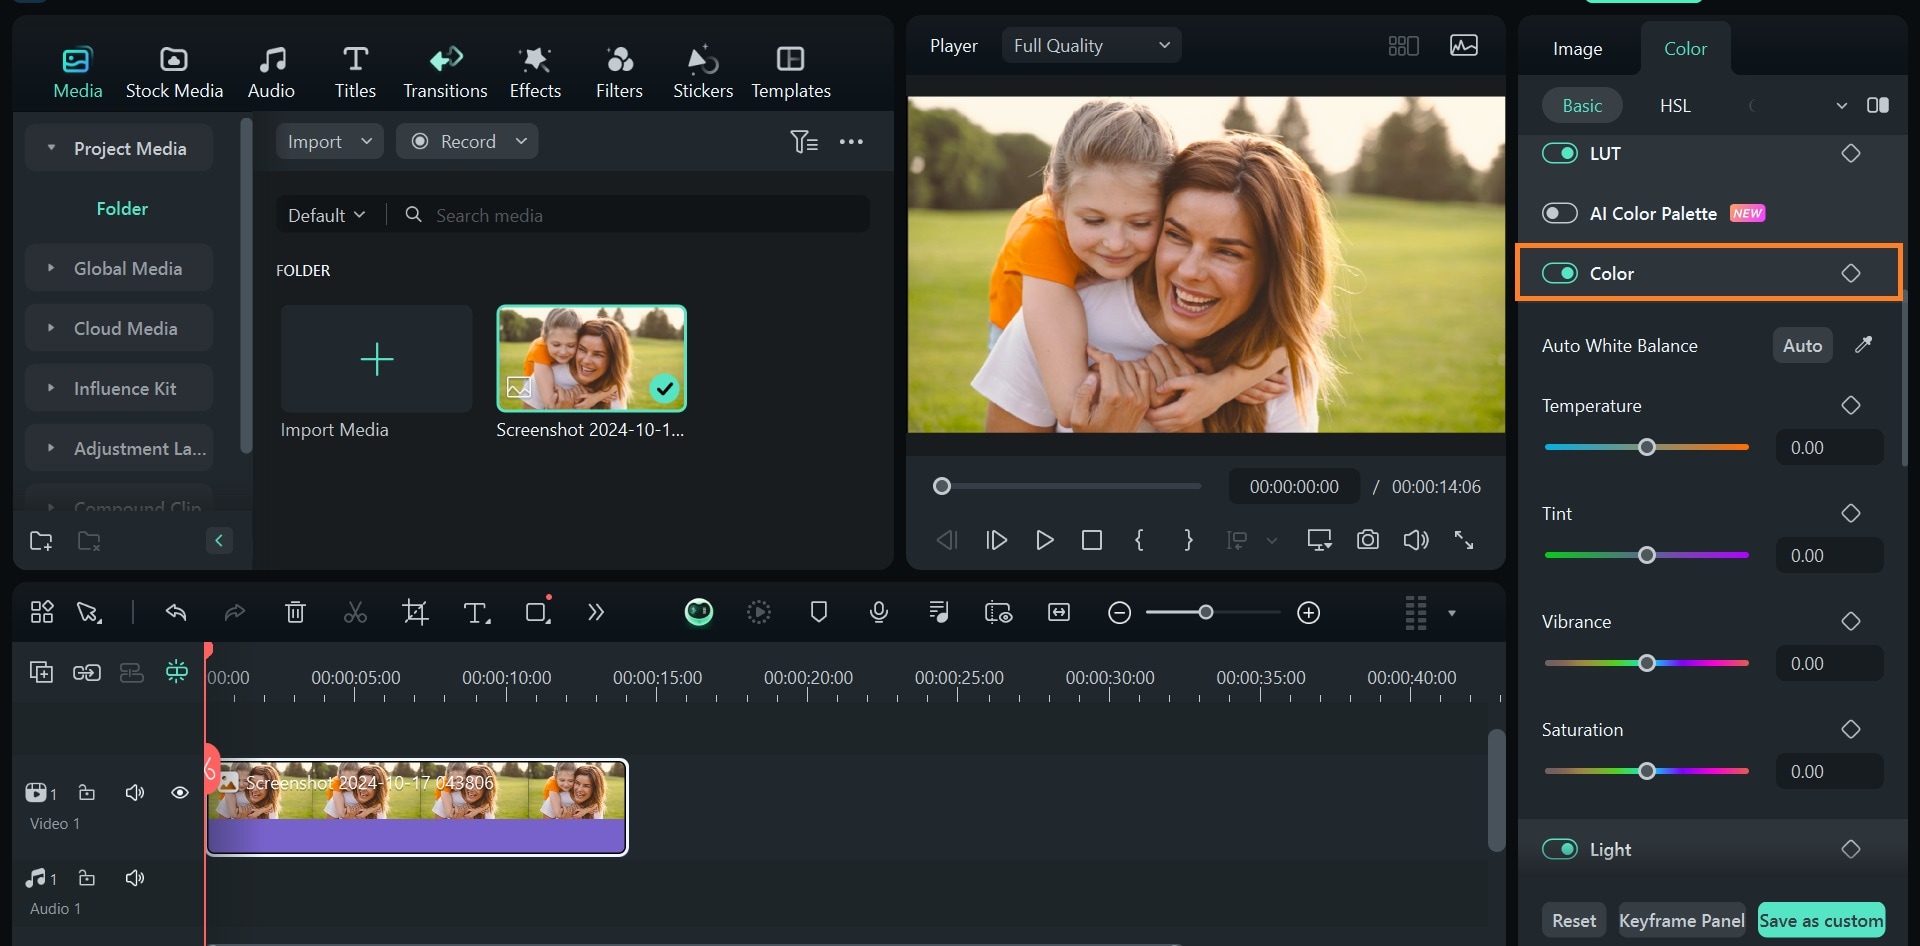
Simply upload the photo to Filmora. Select the image clip on the timeline and go to Image > Basic on the Property Panel. Enable Color and adjust the image Saturation, Temperature, and Tint. You can adjust the image's Contrast and Brightness on this editor panel.
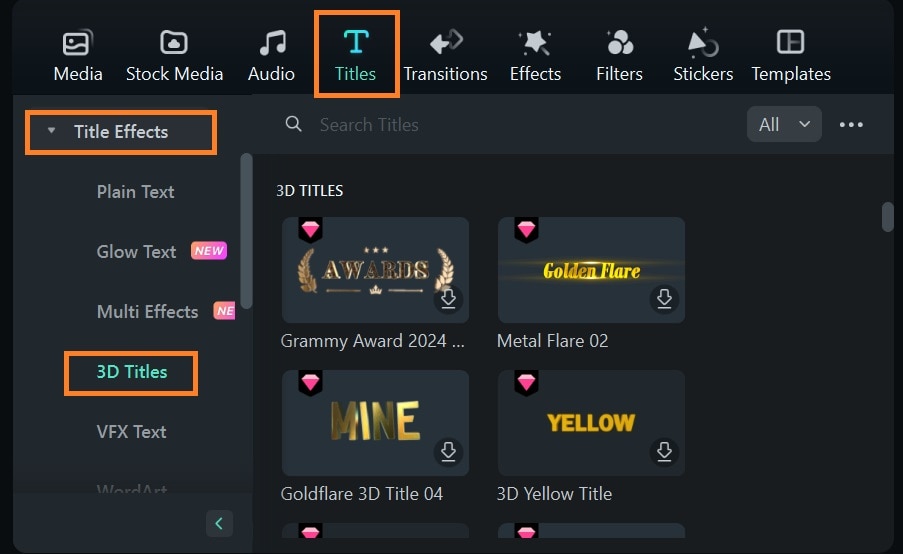
For 3D videos, once you’ve converted your video, you can spice things up by adding an animated intro or a 3D text in Filmora. Upload your video on Filmora, then go to Titles > Title Effects > 3D Titles.
Select the ideal text template to use and add it to your video.
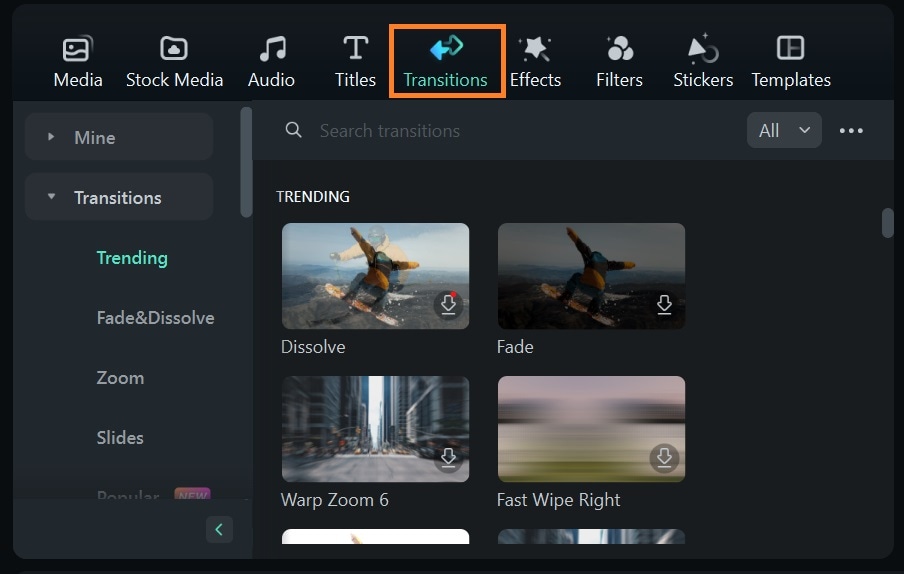
After converting a document into a video, you can add transitions using Filmora. Simply upload your video to Filmora, then go to Transitions on the toolbar. Select your chosen transitions, then drag and drop them on the timeline at different points of your video.
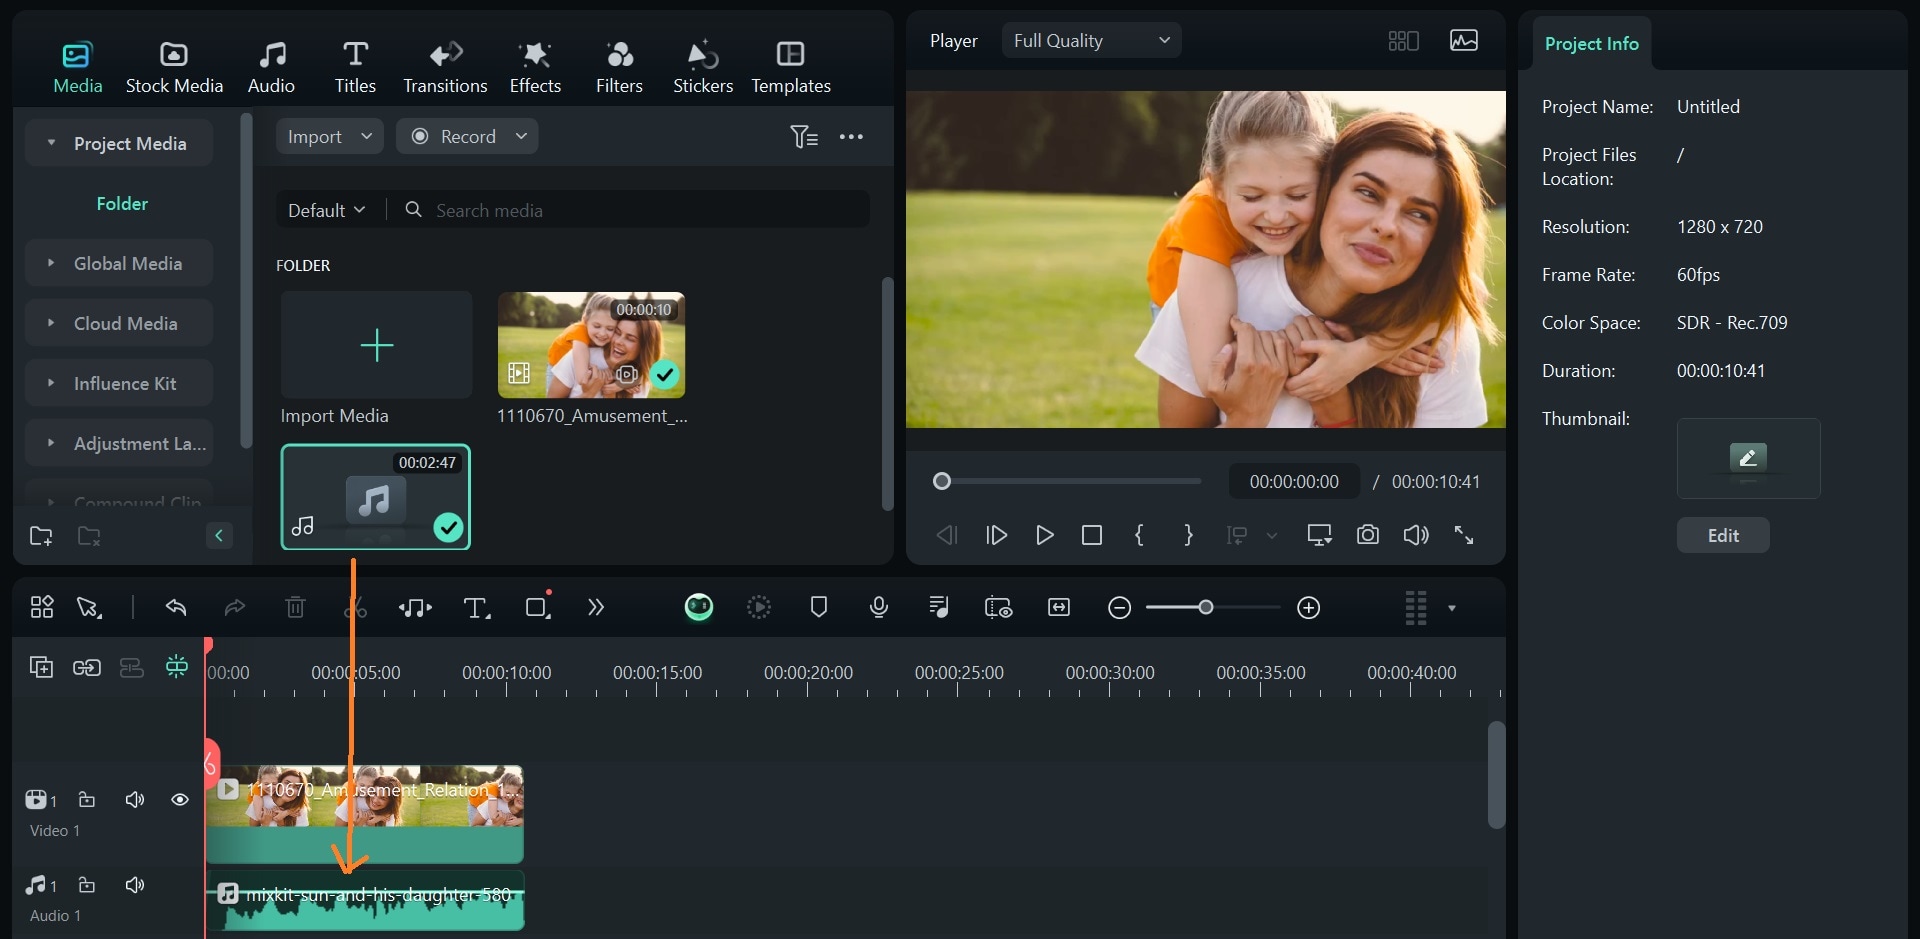
Splitting your video at the different points where you want to add your transitions can help you place transitions properly.
Similarly, you can add your audio clips as a voiceover to your video on Filmora.
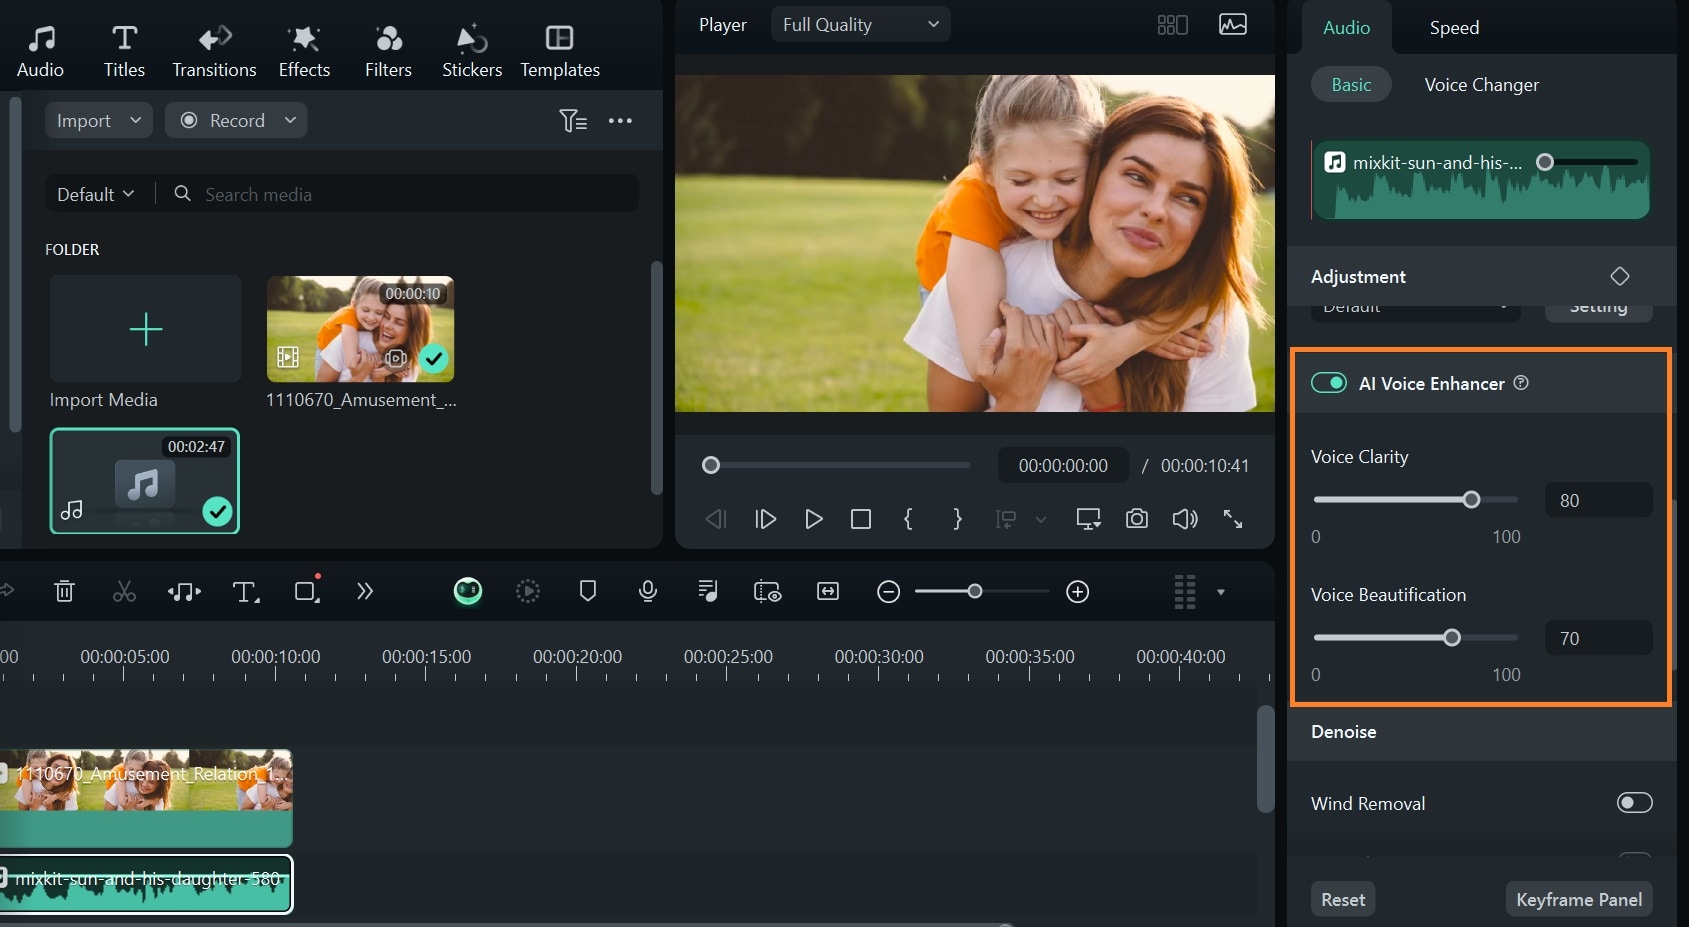
Select the audio clip on the timeline and enable AI Voice Enhancer to enhance the audio. You can also adjust the Voice Clarity to suit your preference.
Part 2: Other Things You Should Know
Note that Gilisoft Video Editor Pro’s functionalities are not limited to those listed above; Gilisoft offers far more than these to users, especially licensed users.
Other Gilisoft Functionalities
Here are a few other useful features of the Gilisoft Video Editor that you may want to try out. The Video Enhancement, Video/Color Filters and Webcam Beautification Tool can come in handy when tweaking prerecorded or live videos. You can Split, Crop & Rotate Video Screens or merge two video clips together as well, using this tool. Gilisoft also allows you to add Video Encryptions to your video clips for privacy and security purposes.

Supported Media Formats
One of the advantages of using Gilisoft is its ability to support a wide range of media formats. No matter what type of content you’re working with—audio, video, or images—whether you're converting files, editing, or exporting, you can rest assured that Gilisoft will work with almost any media file format you have.
Here’s a quick breakdown of some of the supported formats:
| Media Type | Supported Format |
| Video | Input Formats: AVI, DV, DIF, NUT, H261, H264, NSV, FLV, MKV, MKA, MP4, M4V, M4A, PSP, 3GP, MOV, MPG, MPEG, VOB, DAT, EVO, RM, RMVB, TS, TP, TRP, M2TS, WMV, ASF, DVR-MS, 3GP2, ASF, SWF, MOV, WEBM, M1V, M2T, OGM, OGV, VP6, WM, Output Formats: WMV, AVI, MOV, FLV, MKV, MP4 Video(AVC), MP4 Video(Xvid), MP4 Video(MC), ASF, M4V, Xvid, DV, MPEG-1 NTSC, MPEG-1 PAL, MPEG-1 SECAM, MPEG-2 NTSC, MPEG-2 PAL, MPEG-2 SECAM, DVD-Video NTSC, DVD-Video PAL, HTML5, DVD-Video SECAM, MP3 AVI, MP4, MPG, WMV, MOV, TS. |
| Audio | MP3, MP2, WMA, M4A, AAC, WAV, OGG, AC3, APE, AIF, AIFF, FLAC, CUE, AU, AMR, OGG, WAV, DPE, MKA, M4V, MPA, RA. |
| Documents | DOCX, DOC, XLSX, XLS, PPT, PPTX, PDF, TXT. |

Available Pricing/Subscription Plans
Just like other Giliseoft tools, Gilisoft Video Editor Pro has varying price points for different license types.
- Yearly access for 1 PC - $49.95
- Lifetime license for 1 PC - $59.95
- Lifetime license for 3 PCs - $119.95
You will receive an email within 24 hours of paying for a plan and a keycode to access Gilisoft Video Cutter and other tools that come with this package. These licenses come with no watermarks on your videos or photos, free technical support, and lifetime free updates. You can also switch computers and sign in on a different computer. However, you cannot sign into more computers than your license covers at a time.
Gilisoft Video Editor also gives out free trial access to users. You can choose to download the software for free and enjoy free access to some—not all—of its tools, instead of paying for a license.
Part 3: Editing Videos Without Your Computer: Using Gilisoft Portable on a USB

If you need to get some work done with Gilisoft Video Editor or your deadline has probably been pushed back, but you’re not with your computer, you can use someone else’s with the help of portable software.
Portable software is a version of a program that you can run directly from an external device, such as a USB drive, without installing it on the computer. It works just like installed software but doesn't take up space or require administrator permissions on the computer you're using.
Compared to portable software, regularly installed software is downloaded and set up on a specific computer and requires admin rights and enough storage capacity to get it up and running.
So if you’re traveling, working with a shared computer, using multiple devices, or running low on storage space on your computer, running Gilisoft Video Editor Portable from a USB is a good option.

How to Set Up and Use Gilisoft Video Editor Portable on a USB
Step 1: Download Gilisoft Video Editor Portable software on your computer. The file may come in .rar format, so you may need to extract it using WINRAR or any other file extraction software.
Step 2: Open the portable file folder you have extracted and run the .exe file. It should be set up normally.
Step 3: Drag the software to your USB and you can use it on any computer.
Conclusion
When talking about the Gilisoft Video Editor, the Gilisoft Video Cutter‘s functionalities don’t cut it. This tool has a wide range of features and tools for creators and non-creators to choose from. It has several non-cutting and non-clipping features, ranging from various video converters to video downloaders and autocaption generators you can use for your video projects.
The tool is awesome, but when paired with Filmora’s precise media manipulation tools, you are guaranteed exceptional results.


