
 100% Security Verified | No Subscription Required | No Malware
 TL;DR:
Connecting OBS Studio to Facebook Live requires selecting Facebook Live as your service in the OBS Stream settings, pasting your unique stream key, and manually publishing the broadcast from your Facebook page.
● Optimize your initial software setup by running the Auto-Configuration Wizard in the Tools menu to match your internet connection speed and leaving the Output mode on the default Simple setting.
● Clicking Start Streaming in OBS does not immediately broadcast to your audience; you must preview the feed in your Facebook browser tab, configure a 1280x720 pixel thumbnail, and officially publish the stream.
● Completed live streams can be repurposed into shorter formats using Wondershare Filmora (requiring Windows 7 or later, or macOS 10.14 or later) by leveraging its AI Idea to Video tool to generate scripts, voiceovers, and new visual layouts.
Ask AI for a summary
 ChatGPT
 Perplexity
 Gemini
 Claude
 Grok
Grok
OBS Studio is one of the most popular live streaming tools available today. It works seamlessly with platforms like YouTube, Facebook Live, and Twitch, and is easy to set up. With support for webcam, microphone, and screen capture, it runs smoothly on Windows, Mac, and Linux.
OBS offers powerful features like scene nesting, customizable layouts, and a wide range of filters and effects—many of which rival those found in paid software. Thanks to its large user community, help and resources are always available.
In this guide, we’ll show you how to connect OBS Studio to Facebook Live and start streaming in just a few steps.
In this article
Filmora Audio Recorder
Record computer system audio
Capture microphone audio
Customize recording volume
Record screen and webcam as well
Part 1: How to Set up OBS Stream Settings
OBS Studio provides several wonderful tools for beginner broadcasters who are just getting the swing of live broadcasting. The program contains a set of OBS-specific system requirements to guarantee the most optimum live broadcasting experience. These options include the ability to mix several sources with unique transitions, employ audio/video filters and correction tools, and more. First, access the OBS Studio settings by selecting the “Settings” button in the bottom-right region of the program window. The first tab, named “General,” doesn’t include anything particularly significant to examine. However, here, you may pick your language and choose a bright or dark theme.
Steps to Set up OBS Stream Settings:
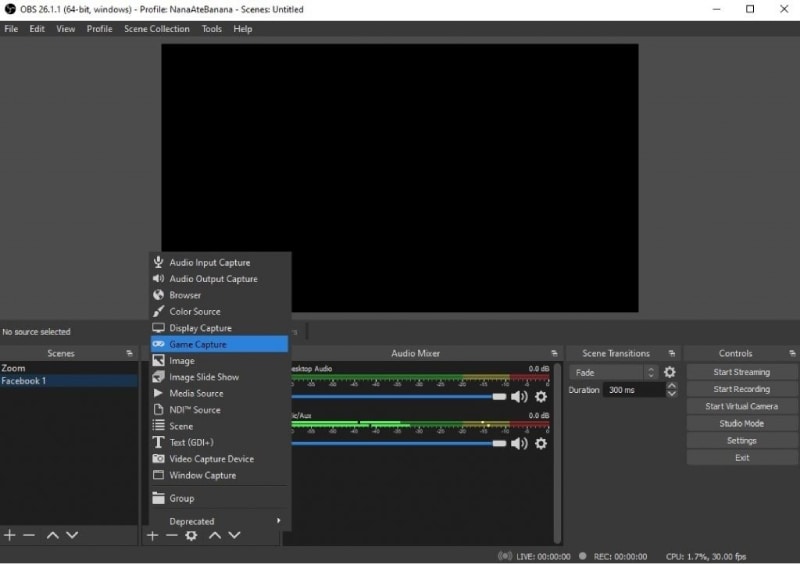
Step 1: Once you’ve evaluated these options, click on the next tab labeled “Stream” in the OBS Studio settings box. Game capture is suggested for live streaming since it is designed for recording screen material as well as capturing video. Multiple sources may be utilized as scenes, and they can be made visible or invisible with the touch of a button.
Step 2: As soon as you run OBS, you are greeted with the auto-config window, which automatically picks various choices for you based on how you want to use it. The auto-configuration settings may be toggled again by clicking on Tools -> Auto-Configuration Wizard. However, your connection speed may be too slow to handle this bitrate. You may simply confirm whether this is the case by running a speed test.
Step 3: On the top, we have the primary canvas showcasing all material to be captured or broadcast. We may add as many sources as we need. There are several choices for visual sources as well as audio channels. By default, the resolution is the same as the laptop screen. At the bottom, various sceneries may be specified. Scenes comprise multiple sources that may be utilized to capture or broadcast.
Part 2: Connect OBS to Facebook Live
OBS Studio can broadcast your videos on all the main streaming networks, including Twitch, YouTube, Facebook Live, and more than 30 similar services. When you live stream on Facebook with OBS Studio, you may experience the host of visual mixing and customization tools of OBS Studio. To alter your OBS Studio settings, you will have to visit the “Output “settings in your OBS Studio account.
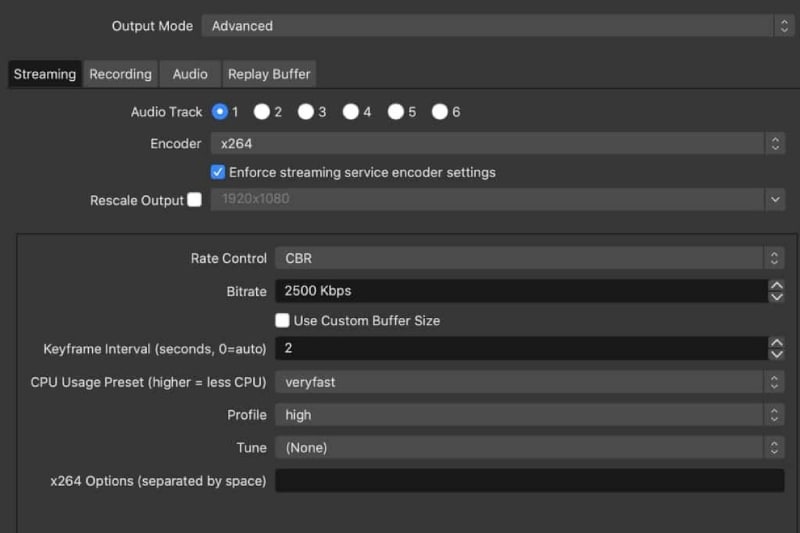
By default, the chosen output mode is “Simple.” To guarantee your live broadcast is reliable and completely functioning we suggest you follow the configuration options offered in the “Encoder Setup” box. The technique to combine OBS Studio and Facebook is pretty straightforward and comprises the following stages.
Steps to Connect OBS to Facebook Live:
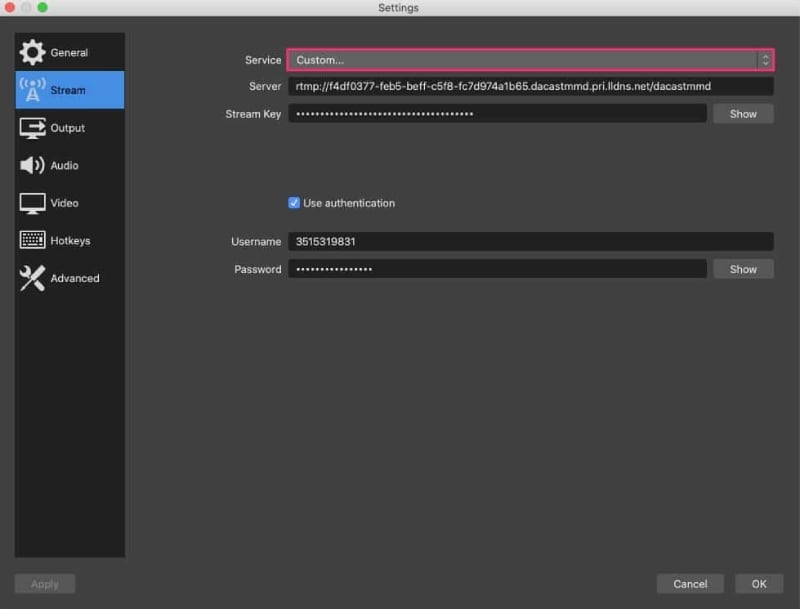
Step 1: Launch OBS Studio. Then go to Files and Click on Settings. Select the Stream option.
Step 2: Set Stream Type as Streaming Services from the drop-down. Select Facebook Live in the Service drop-down list.
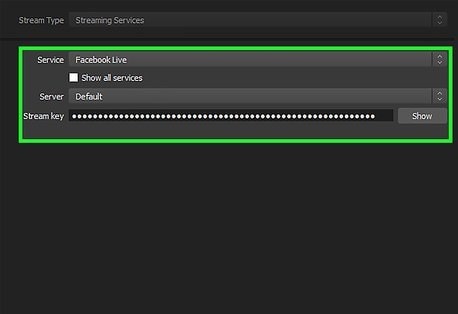
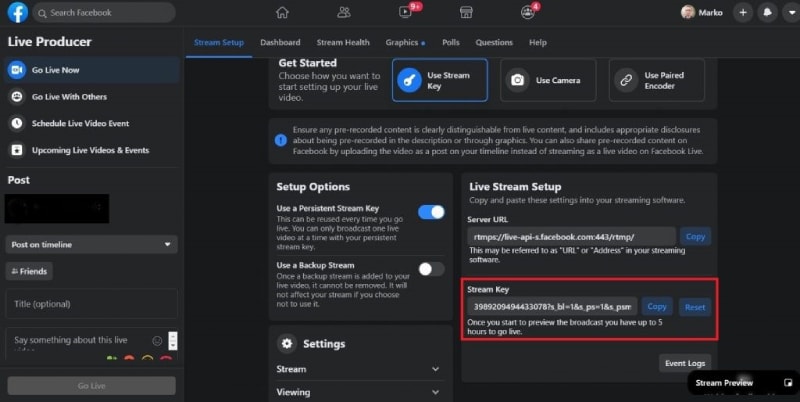
Step 3: Copy the stream key from Facebook and put it into the provided box in OBS Studio. Once done, click OK to conclude the procedure.

Step 4: By combining OBS Studio with Facebook Live, you can go live on Facebook with all the amazing capabilities of OBS Studio.
Part 3: Start live streaming Facebook with OBS
In the OBS Studio main screen, select Start Streaming to transmit the broadcast to Facebook Live. You are not live streaming at this time; you need to preview and confirm the feedthrough Facebook before the stream is officially uploaded. Now that your production is set and streaming on Facebook Live, you need to return to your Facebook page and do some final verification before the stream is properly published. From your Facebook browser window or tab, click the Next button at the bottom-right corner of the window to access the preview page.
Steps to Start live streaming Facebook with OBS:
Step 1: Click the Settings button in the lower-right corner of the OBS Studio interface to enter the Settings window.
Step 2: Click Stream, then pick Facebook Live from the Service drop-down box and start streaming by hitting on the ‘Start Streaming’ button.
Step 3: Live streaming may be started immediately away. Live streaming may also be arranged. Streams may be launched by specifying a thumbnail picture of the required size, 1280×720 pixels before they begin broadcasting. You are all prepared to utilize OBS for Live broadcasting on Facebook!
Step 4: Verify that your stream is coming through correctly, and when satisfied, use the fields on this page to add a video title, keywords, and accompanying text to post alongside your live stream.
🎥 Bonus Tip: Use Filmora AI to Repurpose Your Live Stream into Engaging Videos
Live streaming with OBS is a powerful way to connect with your audience in real time—but what happens after the stream ends?
Instead of letting your live footage sit untouched, you can now use Wondershare Filmora’s new feature—AI Text to VideoAI Idea to Video—to instantly transform your live recordings into polished, shareable content for YouTube, TikTok, Instagram, or internal presentations.
Here’s how Filmora helps you repurpose live streams with AI:
- 🧠 From Idea to Script to Video: Describe the key topic of your stream (e.g., “A 10-minute summary of my OBS live Q&A on video editing tips”) and let Filmora’s AI auto-generate a full video structure, script, and visual layout.
- 🎬 Storyboard Customization: Before generating the final video, you can adjust key scenes, rearrange talking points, or highlight the best moments of your stream.
- 🎤 AI Voiceover & Lip Sync: Want to re-narrate your stream or summarize it in a shorter version? Filmora offers lifelike AI voiceovers that match lip movements and tone.
- 🎨 Choose Your Visual Style: Repackage your stream highlights in a cinematic, anime, tech, or educational style depending on your audience or platform.
- 📱 Perfect for Short-Form Platforms: Break down long streams into auto-generated vertical videos for TikTok, Shorts, or Reels with aspect ratio and style presets.
Whether you’re a content creator, educator, or business streamer, Filmora’s AI Text to VideoAI Idea to Video helps you extend the life of your live content—automatically and creatively.


Conclusion
Facebook Live provides an exciting and entertaining opportunity to connect with your audience fully and in real-time. It has become one of the top channels for businesses, influencers, and consumers alike. Numerous users and surveys suggest that novices and pros use OBS for live streaming on Facebook since it is a feature-rich tool. It is straightforward to set up and operate and users have control over the numerous parameters from video quality, frame rate, and audio bitrate. All in all, it is one of the finest tools available for live streaming and screen recording. It also includes a vast community of users and a blog which is beneficial if users are lost or puzzled when using OBS.
