-
Introduction of Filmora for Mobile
-
Get Started for Mobile
-
AI Features for Mobile
- AI Denoise
- Speech-To-Text
- Text-To-Speech | Filmora App Guide
- AI Captions
- AI Highlight
- Filmora VideoGen Feature Guide
- AI Enhancer | Filmora App Guide
- AI Remover
- AI Auto Cut for Filmora Mobile
- AI Music
- AI Text to Video | Filmora App Guide
- Speaker Detection
- AI Emoji
- AI Beats - Filmora App
- AI Camera
- Edit Speech
- Image to Video for Android and iPhone
- Instant Mode
- AI Audio | Filmora App Guide
- AI Voice Cloning - Filmora App
- AI Voice Changer - Filmora App
- Smart Cutout | Filmora App Guide
-
Recording for Mobile
-
Video Editing for Mobile
- Trim Video
- Duplicate Video | Filmora App Guide
- Spilt Video on Android and iPhone
- Delete Video
- Crop Video
- Replace Video
- Rotate Video
- Reverse Video
- Speed Up Video
- Adjust the Sequence of Clips
- Adjust the Volume of Clips on Android and iPhone
- Adjust the Opacity of Clip | Filmora App Guide
- Adjust the Color of Clips on iPhone and Android
- Add Mask on Android and iPhone
- Add Mosaic on Android and iPhone
- Add Freeze for Android and iPhone
- Green Screen | Filmora App Guide
- Thumbnail Editing | Filmora App Guide
- Track Switching for Android and iPhone
- Color Palette - Filmora App
-
Audio Editing for Mobile
-
Text Editing for Mobile
-
Stickers & Effects & Filters for Mobile
-
Advanced Editing for Mobile
-
Exporting & Cloud Backup for Mobile
Filmora App - Adjust Clip Opacity
Filmora App's Adjust Clip Opacity feature lets you control transparency with precision, making video layering smooth and professional. By adjusting opacity levels, you can create subtle overlays, blend clips seamlessly, highlight key visuals, or add creative fade effects. It's ideal for intros, transitions, watermarks, and cinematic storytelling. This gives editors full creative control without complex settings.
Step-by-Step Guide to Adjusting Opacity with the Filmora App
As discussed, the Filmora App allows users to adjust the transparency of videos with simple techniques. Follow the steps mentioned next to learn how to use this feature:
Index
Filmora for Mobile
Edit Videos on Your Mobile Phone with 1-Click!
- • Powerful Brand New AI Features.
- • User-friendly video editing for beginners.
- • Full-featured video editing for professional.


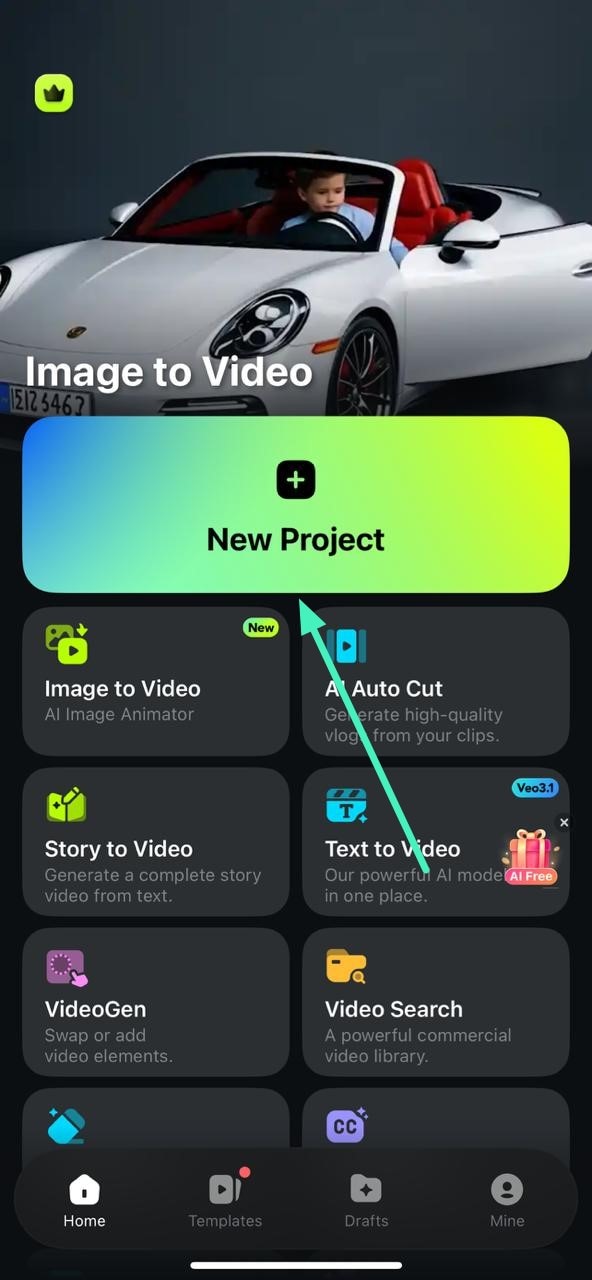
Step 1. Create New Project
To initiate the process, launch the app on your smartphone and press the New Project option located on the homepage.
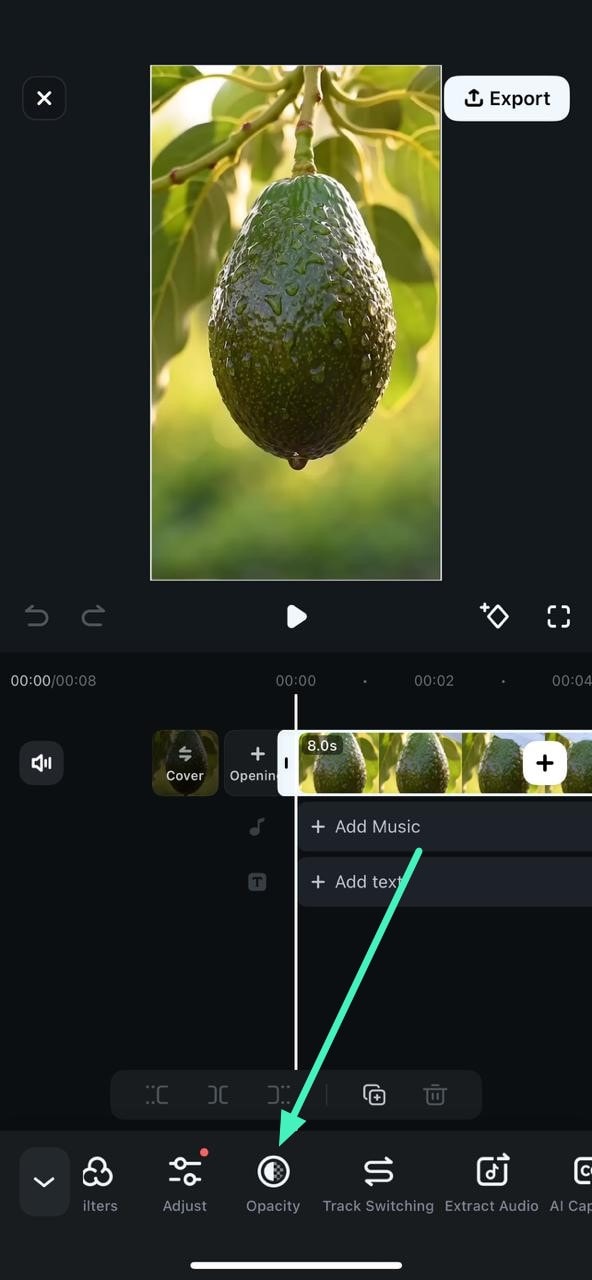
Step 2. Import Video and Select Opacity Feature
In the following interface, import the video to the app's interface and tap on the video track to enable the toolbar at the bottom. Locate the Opacity option and tap on it.
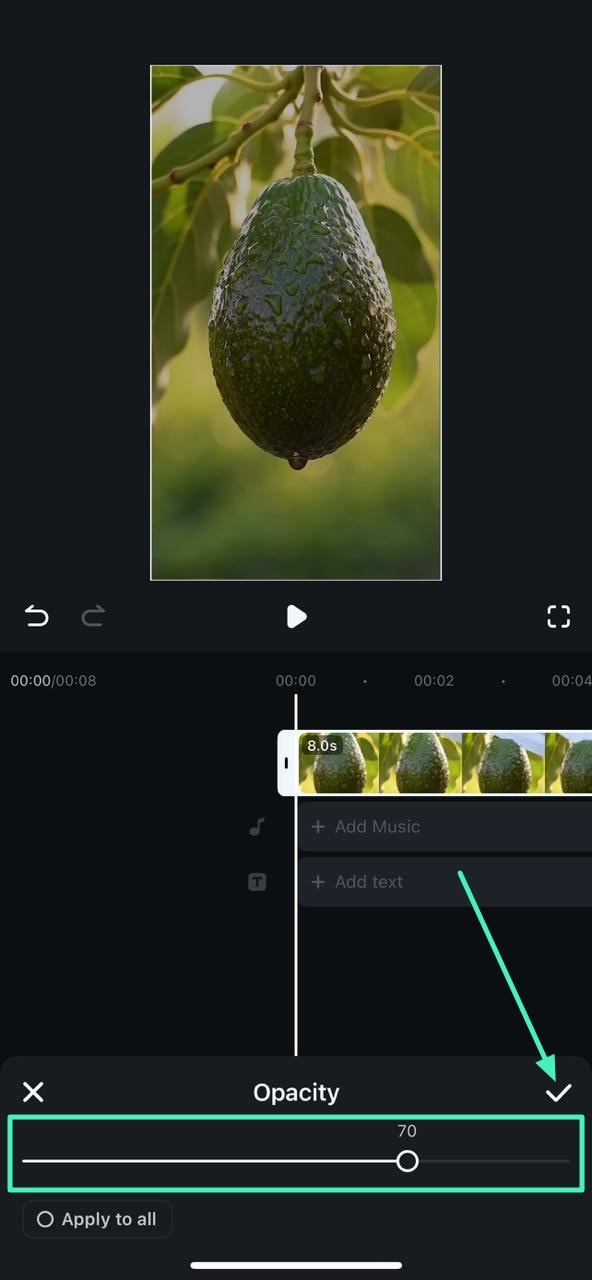
Step 3. Adjust Opacity Accordingly
Next, adjust the opacity of the video by dragging the slider located at the bottom according to your preferences. Once done, tap on the Tick icon to save the changes.
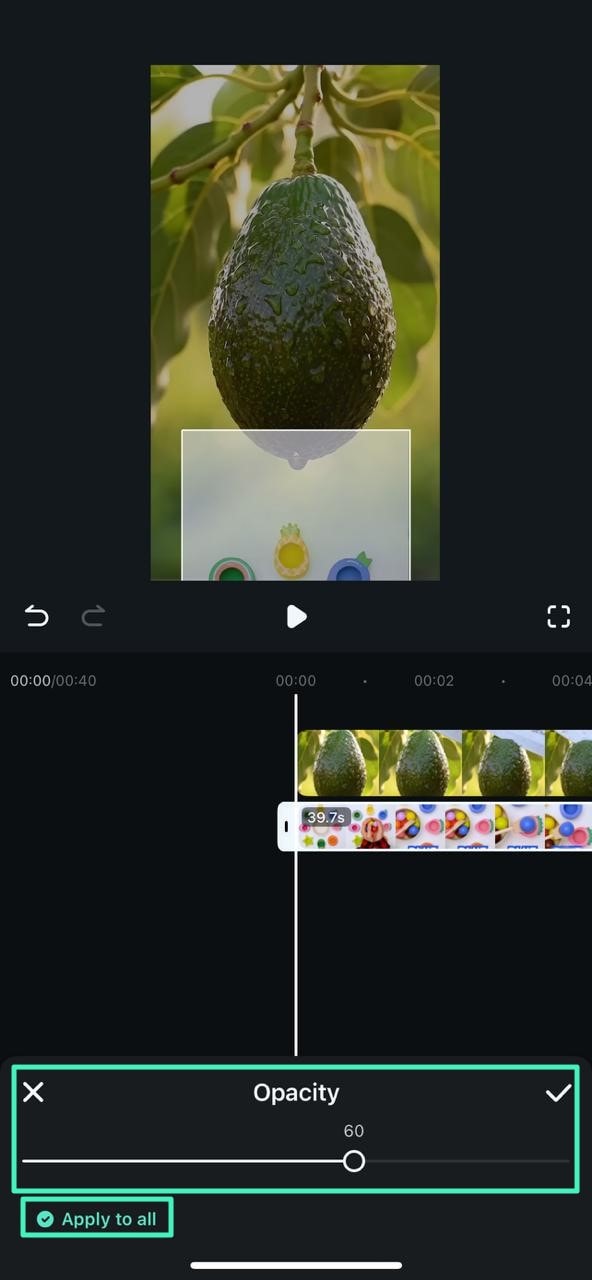
Step 4. Change Opacity of Multiple Clips
To change the opacity of multiple clips, import the videos to the app's interface and press the Opacity option. Next, drag the slider and tick the checkbox for Apply to All to apply it to all the clips. Once done, press the Tick icon to save the changes.
Related Posts
Featured Articles
How to Add Captions to YouTube Videos: Top 3 Methods + Bonus
Learn how to edit YouTube captions right on the platform and use a more professional option.
4 Best Ways to Remove Audio From Videos
Have a look at some of the top ways to remove audio from video using downloadable software, smartphone apps, or online tools.
How To Create Short Movies: Guide for Beginners
Are you looking for a guide on how to create short movies? Look no further as this post is designed to provide a complete guide on how to get this done without hassles.
Recommended User Guide
Delete Video
Let’s face it. All video editors make mistakes. That’s why video deletion is a part of every editing project and is often used for eliminating unnecessary content, removing editing mistakes, or cleaning up your editing area. In Filmora for Mobile, videos can be quickly deleted through the Timeline within the editing app’s Work Area. You can also delete them by removing the entire project through the Project Management panel. Let’s learn how.
Add Freeze for Android and iPhone
Whether you want to add a dramatic pause effect or emphasize a crucial moment in your video, Filmora for Mobile's freeze-frame effect is the perfect solution. At its core, a freeze-frame effect during editing splits the video and freezes your chosen frame, inserting it as a few-second-lasting image. So, let's learn how to add and adjust a freeze frame.
