


 100% Security Verified | No Subscription Required | No Malware

With the emergence of web series on various online platforms, TV shows are also getting broadcasted online to cater to the entertainment needs of online users. If you are a TV show and sitcom lover, you must want to ensure that you do not miss a single episode of your favorite TV shows when it is getting broadcast. However, you may have important works to attend to while your TV shows get aired. Instead of missing them out, you can record online TV shows with a TV online recorder.
You can simply play them on your computer or smartphone, and the online video TV recorder will record the show for you while you keep yourself engaged in your work. You can later save the recordings and watch them in your leisure time as many times as you want. We have compiled the best online video TV recorders from computer and smartphone users to record any TV show at any time.
Way 1. Record online TV Shows with Filmora
Wondershare Filmora is well-known as a video editor, but it also a screen recorder for your computer. You can record anything you play on your computer screen, and this includes any online TV shows and web series. The best part is that you can record at 4K resolution for crystal-clear video quality. You can even edit the recording to trim out unnecessary parts and save them for future reference. You can also trim out parts to share on social media as well as use them in any of your videos to upload on your channel. Here are the steps on how to record online TV shows.
Step 1: Download and install Wondershare Filmora.
For Win 7 or later (64-bit)
For macOS 10.12 or later
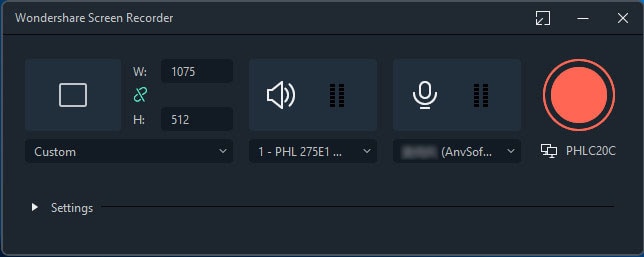
Step 2: Launch Filmora and select PC Screen as shown below.

Step 3: Set the recording screen size and make sure that the system audio is set perfectly. Now, Click on Record button. You will get a few seconds to switch to the online TV show and the recording will start and go on in the background.
Alternatively, you can press F9 key to start recording after you start the online TV show.
Step 4: Once the TV show ends, click on Stop button from Filmora bar or press F9 key again to stop recording.
You can export the recording to save it on your hard drive in the preferred file format.
Way 2. Record Online TV Show Free with Windows Game Bar
If you are a Windows 10 user and you want to record live TV online free, you can use the built-in Windows Game Bar. You do not have to install any third-party app as Game Bar comes pre-installed on Windows 10. You can record the online TV show without any loss of video quality. You can also take screenshots at any time you want. However, there is a limitation on recording time up to two hours. Here are the steps to record online TV shows with Windows Game Bar.
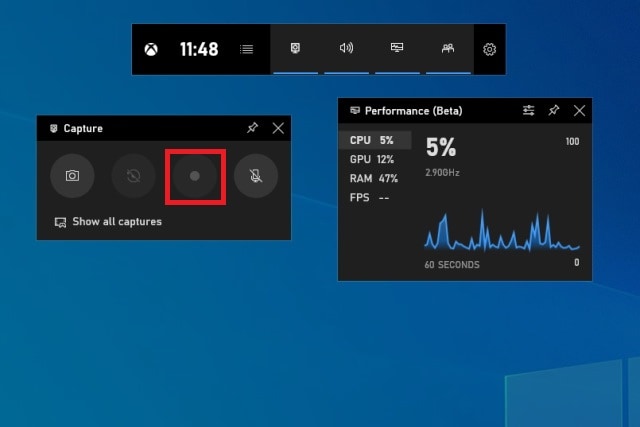
Step 1: Press Windows + G keys together to open Windows Game Bar.
Step 2: Open the online TV show and press Windows + Alt + R keys together to start recording.
Step 3: To stop recording when the show ends, press Windows + Alt + R again.
Step 4: You can check the recorded video under Widgets > Gallery section.
Way 3. Record Online TV on Mac with QuickTime
If you are a Mac user, you can record live TV online free with QuickTime Player. QuickTime comes pre-installed on Mac and therefore, there is no need to install any third-party app. Besides, you can watch the recorded TV show on QuickTime as it is the default video player on Mac. Therefore, there is no issue of compatibility of the recorded video. The video quality is going to be exactly the same as you see on the screen while you play the TV show. Here are the steps on recording online TV shows with QuickTime.
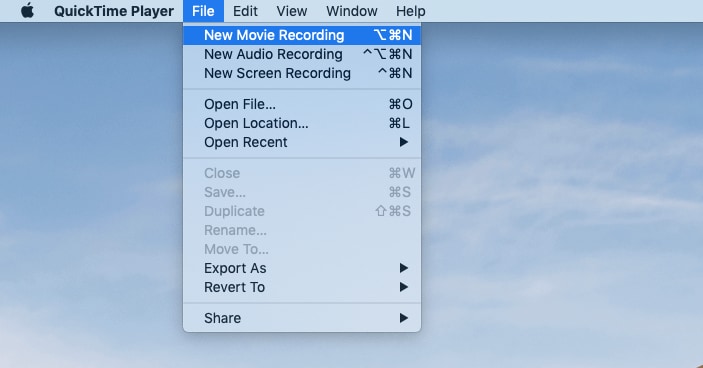
Step 1: Launch QuickTime Player and go to File and click on New Screen Recording option.
Step 2: Open the TV show that you want to record on your screen. Then start recording by pressing Record button from QuickTime widget.
Step 3: To stop recording, press the Stop button. Go to File> Save option to save the recorded TV show file.
Way 4. Record Online TV on iPhone with Record It! App
If you are an iPhone user, you can use iOS screen recorder if you have iOS 11 and above. Otherwise, you can use a dedicated third-party app called Record It. You can record your entire screen which is useful for recording online TV shows. After recording, you can trim the video and make other adjustments. Here are the steps on how to record TV shows with Record It! app.
Step 1: Go to App Store and install Record It! app.
Step 2: Open the app and tap on Gear icon at the top-right corner to set the video quality and audio source.
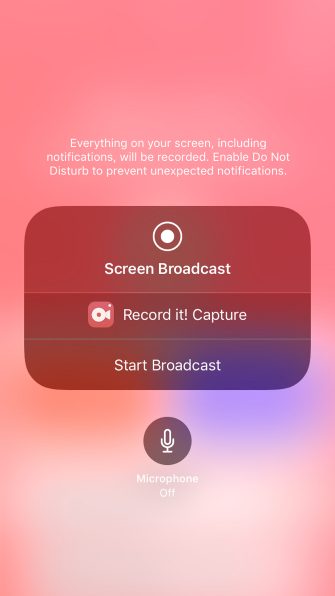
Step 3: Tap on Record button in the middle to start recording. From the pop-up message, select Record It! and tap on Start Broadcast. Make sure the microphone is off.
Step 4: Go to the app to stream TV Show and the recording is going on in the background.
Step 5: To stop recording, tap on the red timer at the top-left corner. You can find the recordings under My Recordings on the app.
Way 5. Record Online TV on Android with AZ Screen Recorder
If you are watching TV shows on your Android smartphone or tablet through streaming apps, you need a legitimate online TV recorder app Android. We recommend AZ Screen recorder app as it is super easy to use and it can record TV shows with loss in video and audio quality. There is no limitation on recording time and there is no need to root your device to record live TV shows. Here are the steps to follow to use this online TV recorder app Android.
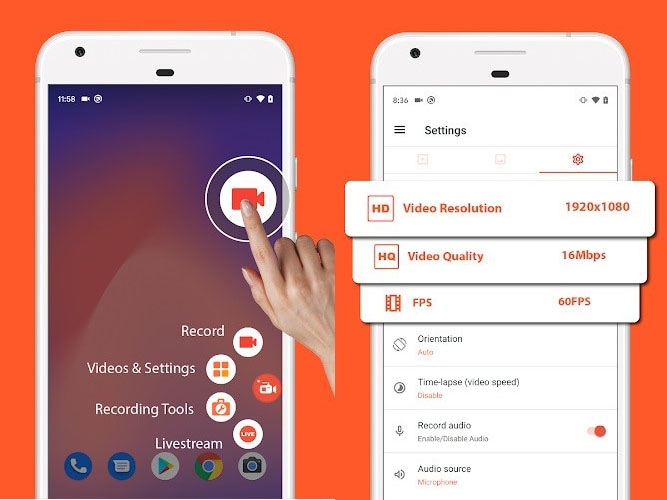
Step 1: Install AZ Screen Recorder from Play Store and launch the app and set it up.
Step 2: You will get a floating widget with different options.
Step 3: Set the video configurations and audio source and enable Record Audio option.
Step 4: Open the live TV show and tap on Record option to start recording.
Step 5: To stop recording, tap on Stop option by pulling down the notification panel. You will find the recorded video in the phone gallery.
Conclusion
Recording TV shows is no more an impossible thing whether you are streaming the show on your computer or smartphone. For Windows users, there is Windows Game Bar and for Mac users, there is QuickTime Player. But the best TV online recorder for computer users is Wondershare Filmora. For Android users, AZ Screen Recorder app is the best while for iPhone users, the built-in screen recorder as well as Record It! app will get the job done perfectly.
