For the Best Results, Use the Latest Version.
-
Preparations for Mac
-
Account (Mac)
-
Get Started & Basic Settings (Mac)
- Release notes for Mac
- Latest Versions and Features for Mac
- Get Started on Mac - Full Guide
- Download/register/uninstall on Mac
- Panel Layout on Mac
- Keyboard shortcuts on Mac
- Touchbar on Mac
- Change playback quality on Mac
- Render preview files on Mac
- Manage timeline on Mac
- Media for use on Mac
- Logo Reveal For Mac
- Marked Favorites for Mac
-
Compatibility & Tech Specs (Mac)
-
Performance Settings (Mac)
-
-
Creating Projects - Mac
-
Creating New Projects (Mac)
-
-
Importing & Recording - Mac
-
Importing (Mac)
-
Recording (Mac)
-
-
Video Editing for Mac
-
Basic Video Editing for Mac
- Edit Live Photos on Mac
- Enable/Disable Clip for Mac
- Magnetic Timeline For Mac
- Select All Clips on Timeline for Mac
- Auto Ripple for Mac
- Split & cut videos on Mac
- Compositing on Mac
- Crop and zoom on Mac
- Playback Zoom Level for Mac
- Change speed on Mac
- Play video in reverse on Mac
- Mark In and Mark Out for Mac
- Markers for Mac
- Group clips on Mac
- Customized Backgrounds for Videos and Images in Mac
- Video snapshot on Mac
- Freeze frame on Mac
- Auto enhance on Mac
- Applying Drop Shadow for Mac
- Adjustment Layer for Mac
- Mark clip on Mac
- Video Editing Ruler – Mac
- Apply Transforming for Mac
-
Advanced Video Editing for Mac
-
AI-Powered Video Editing for Mac
- Smart Scene Cut for Mac
- Smart Short Clips for Mac
- Image to Video for Mac
- AI Idea to Video for Mac
- AI Text-to-Video for Mac
- Instant Cutter Tool on Mac
- AI Face Mosaic for Mac
- Keyframe Path Curve for Mac
- Planar Tracking for Mac
- AI Extend For Mac
- AI Script-to-Video for Mac
- AI Text-Based Editing in Mac
- Create With Instant Mode on Mac
- ChatGPT Plugin - AI Copywriting on Mac
- AI Smart Cutout for Mac
- Auto reframe on Mac
- Lens correction on Mac
- AI Portrait Cutout on Mac
- Scene detection on Mac
- AI Smart Masking for Mac
- AI Mate Editing for Mac
- Motion Tracking on Mac
- Stabilize video on Mac
- AI Object Remover For Mac
- AI Smart Search for Mac
- AI Skin Tone Protection for Mac
- Green screen on Mac
- Super Slow Motion with Optical Flow for Mac
- AI stylizer on Mac
- Video Denoise for Mac
-
-
Audio Editing for Mac
-
Basic Audio Editing for Mac
-
Advanced Audio Editing for Mac
-
AI-Powered Audio Editing for Mac
- Audio To Video for Mac
- AI Sound Effect for Mac
- Smart BGM Generation for Mac
- AI Voice Enhancer for Mac
- Audio Stretch for Mac
- AI Audio Denoise for Mac
- Auto synchronization for Mac
- AI Vocal Remover for Mac
- Auto Beat Sync on Mac
- AI Music Generator for Mac
- How to Perform AI Voice Cloning in Wondershare Filmora?
- Silence detection on Mac
-
-
Text Editing for Mac
-
Basic Text Editing for Mac
-
Advanced Text Editing for Mac
-
AI-Powered Text Editing for Mac
-
-
Video Customizations for Mac
-
Video Effects (Mac)
-
Audio Effects (Mac)
-
Transitions (Mac)
-
Stickers (Mac)
-
Filters (Mac)
-
Color Editing (Mac)
-
Animations (Mac)
-
Templates (Mac)
-
Asset Center (Mac)
-
-
Exporting & Share & Cloud Backup - Mac
Pro Video Scopes for Mac
Wondershare Filmora, being a professional video editor, offers four types of video scopes. At first, only a histogram was added, but now, three more have been introduced in the new version to help editors with color balancing and correcting. To gain proper knowledge of these video scopes and access them, read the guide given below:
Index
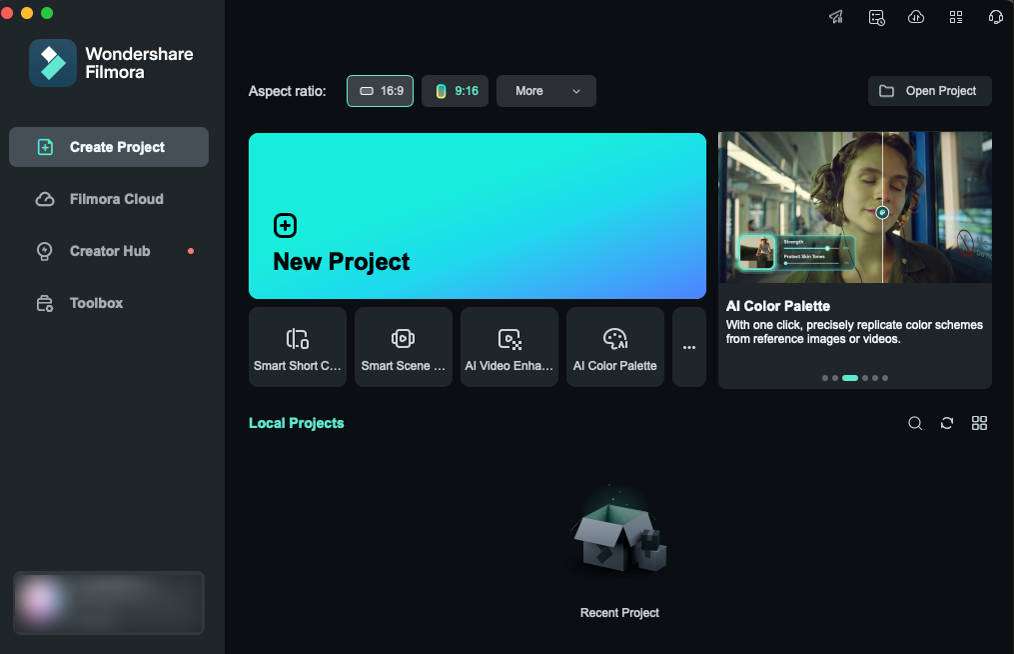
Download Filmora and Create a New Project
To access this professional editing feature of Filmora, first download the new version for your Mac. Launch it, locate the "Profile" icon at the top bar of the main menu, and log in or sign up. To access this feature, you need to access the editing window first. For this purpose, navigate to the center of the screen and click on the "New Project" button.
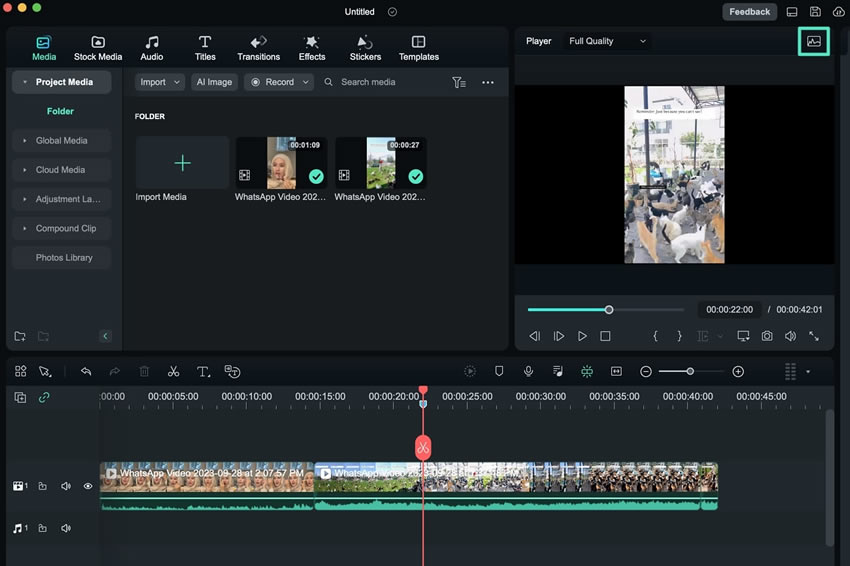
Accessing Video Scopes
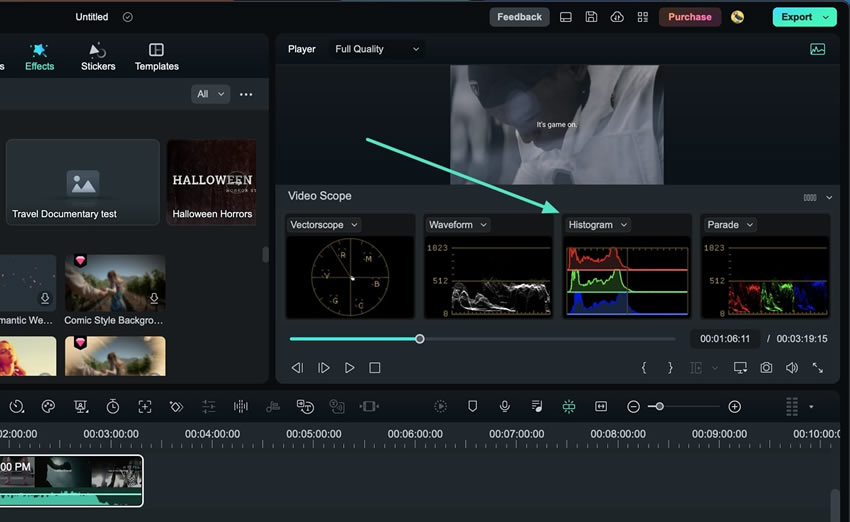
Once you're in Filmora's main interface, head to the top right corner of the preview screen at the right. There, you'll find a "Video Scope" button; click it, and the video scope bar will show up on the preview screen.
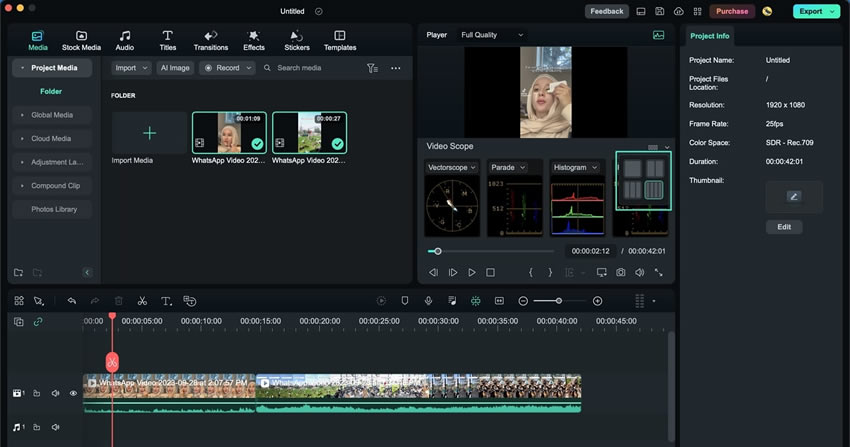
Customizing the Video Scopes
In addition to that, users can customize the layout of the Videoscope bar by clicking on the icon at the top right corner of it. They can choose from four layout options. Additionally, they can expand the button displaying the Video Scope's name and modify the display options for each of the video scopes.
Start With Managing Vectorscope Video Scope
Manage different video scopes displayed across the preview screen. For instance, you can define the skin tone indication with the "Vectorscope" video scope.
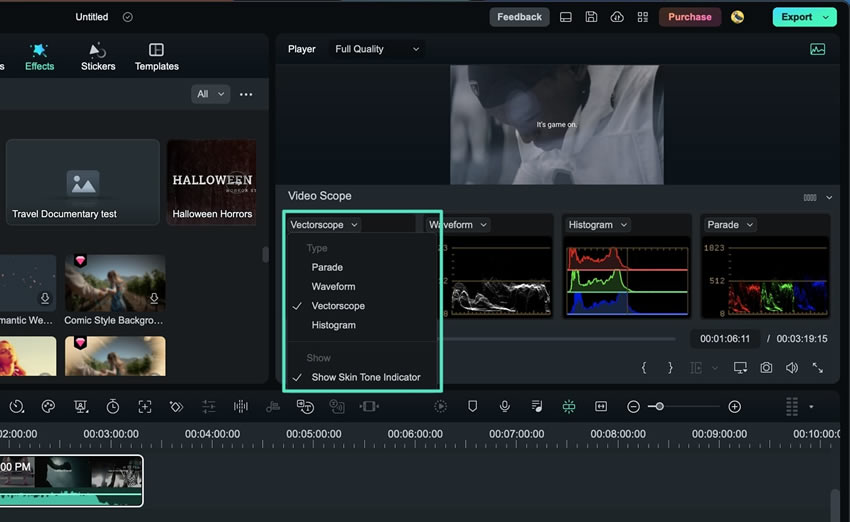
Personalize the Histogram Options
Customize the video scope layout to a single view from the top right corner. Moreover, expand the "Type" navigation, and from the dropdown menu, select "Histogram" to observe the color preview. Furthermore, you can switch between histogram channels, including "RGB" and "YRGB".

Change Other Video Scope in Window
While you can change the locations of the video scope type in the same window, there are other video scopes that help you control the color grading of the video. You can view the color changes through the "Waveform", "Histogram", and "Parade" video scopes. Change the color channels for viewing specific changes in the color across the video.
Related Posts
Featured Articles
Create an Animated Logo Like a Pro: A Complete Beginner's Guide
Check out the best tools to make animated logo videos. Learn step-by-step how to animate your brand logo, where to use it, and tips to make it look professional.
Create Hilarious TikToks That Go Viral: The Secret Tips You Need
TikTok funny videos go viral fast. See why humor works, how to edit better with smart tools, and get easy ideas to make your next video stand out in the feed.
How to Add Motion Graphics and Animated Stickers to Photos and Videos on Mobile?
Are you curious about how to do motion graphics in Android? Check out filmora and learn how to do it on mobile.
Recommended User Guide
AI Color Palette for Mac (Color Match)
Learn how to match the color.
Advanced Color Adjustment for Mac
Filmora offers various color correction and adjustment features, including the HSL function, RGB, and color wheels.
Color Wheels for Mac
Users can improve their tasks in video editing or graphic design in Filmora by utilizing color wheels.
