For the Best Results, Use the Latest Version.
-
Preparations for Mac
-
Account (Mac)
-
Get Started & Basic Settings (Mac)
- Release notes for Mac
- Latest Versions and Features for Mac
- Get Started on Mac - Full Guide
- Download/register/uninstall on Mac
- Panel Layout on Mac
- Keyboard shortcuts on Mac
- Touchbar on Mac
- Change playback quality on Mac
- Render preview files on Mac
- Manage timeline on Mac
- Media for use on Mac
- Logo Reveal For Mac
- Marked Favorites for Mac
-
Compatibility & Tech Specs (Mac)
-
Performance Settings (Mac)
-
-
Creating Projects - Mac
-
Creating New Projects (Mac)
-
-
Importing & Recording - Mac
-
Importing (Mac)
-
Recording (Mac)
-
-
Video Editing for Mac
-
Basic Video Editing for Mac
- Edit Live Photos on Mac
- Enable/Disable Clip for Mac
- Magnetic Timeline For Mac
- Select All Clips on Timeline for Mac
- Auto Ripple for Mac
- Split & cut videos on Mac
- Compositing on Mac
- Crop and zoom on Mac
- Playback Zoom Level for Mac
- Change speed on Mac
- Play video in reverse on Mac
- Mark In and Mark Out for Mac
- Markers for Mac
- Group clips on Mac
- Customized Backgrounds for Videos and Images in Mac
- Video snapshot on Mac
- Freeze frame on Mac
- Auto enhance on Mac
- Applying Drop Shadow for Mac
- Adjustment Layer for Mac
- Mark clip on Mac
- Video Editing Ruler – Mac
- Apply Transforming for Mac
-
Advanced Video Editing for Mac
-
AI-Powered Video Editing for Mac
- Smart Scene Cut for Mac
- Smart Short Clips for Mac
- Image to Video for Mac
- AI Idea to Video for Mac
- AI Text-to-Video for Mac
- Instant Cutter Tool on Mac
- AI Face Mosaic for Mac
- Keyframe Path Curve for Mac
- Planar Tracking for Mac
- AI Extend For Mac
- AI Script-to-Video for Mac
- AI Text-Based Editing in Mac
- Create With Instant Mode on Mac
- ChatGPT Plugin - AI Copywriting on Mac
- AI Smart Cutout for Mac
- Auto reframe on Mac
- Lens correction on Mac
- AI Portrait Cutout on Mac
- Scene detection on Mac
- AI Smart Masking for Mac
- AI Mate Editing for Mac
- Motion Tracking on Mac
- Stabilize video on Mac
- AI Object Remover For Mac
- AI Smart Search for Mac
- AI Skin Tone Protection for Mac
- Green screen on Mac
- Super Slow Motion with Optical Flow for Mac
- AI stylizer on Mac
- Video Denoise for Mac
-
-
Audio Editing for Mac
-
Basic Audio Editing for Mac
-
Advanced Audio Editing for Mac
-
AI-Powered Audio Editing for Mac
- Audio To Video for Mac
- AI Sound Effect for Mac
- Smart BGM Generation for Mac
- AI Voice Enhancer for Mac
- Audio Stretch for Mac
- AI Audio Denoise for Mac
- Auto synchronization for Mac
- AI Vocal Remover for Mac
- Auto Beat Sync on Mac
- AI Music Generator for Mac
- How to Perform AI Voice Cloning in Wondershare Filmora?
- Silence detection on Mac
-
-
Text Editing for Mac
-
Basic Text Editing for Mac
-
Advanced Text Editing for Mac
-
AI-Powered Text Editing for Mac
-
-
Video Customizations for Mac
-
Video Effects (Mac)
-
Audio Effects (Mac)
-
Transitions (Mac)
-
Stickers (Mac)
-
Filters (Mac)
-
Color Editing (Mac)
-
Animations (Mac)
-
Templates (Mac)
-
Asset Center (Mac)
-
-
Exporting & Share & Cloud Backup - Mac
Audio Stretch for Mac
Among many diverse functions Filmora offers is its Audio Stretch feature. This feature allows editors to alter the duration of an audio track to align seamlessly with the video clip. There are no technicalities involved, as users can increase or decrease the duration of an audio using their mouse. For an in-depth detail of this feature, read the following guide:
Index
Usage Scenarios
AI Audio Stretch plays a vital role in many scenarios.
- One situation is when a vlog with multiple scenes and different music clips, you would expect these short videos to combine into one video. Audio set at an ideal time is a natural way to link these valuable memories.
- Another circumstance is a vlog with the same music, but the music time doesn't match the video time. You might face it when you process a long video with only one piece of music. AI Audio Stretch is needed to avoid repeating the same melody monotonously several times.
Locate Audio Stretch
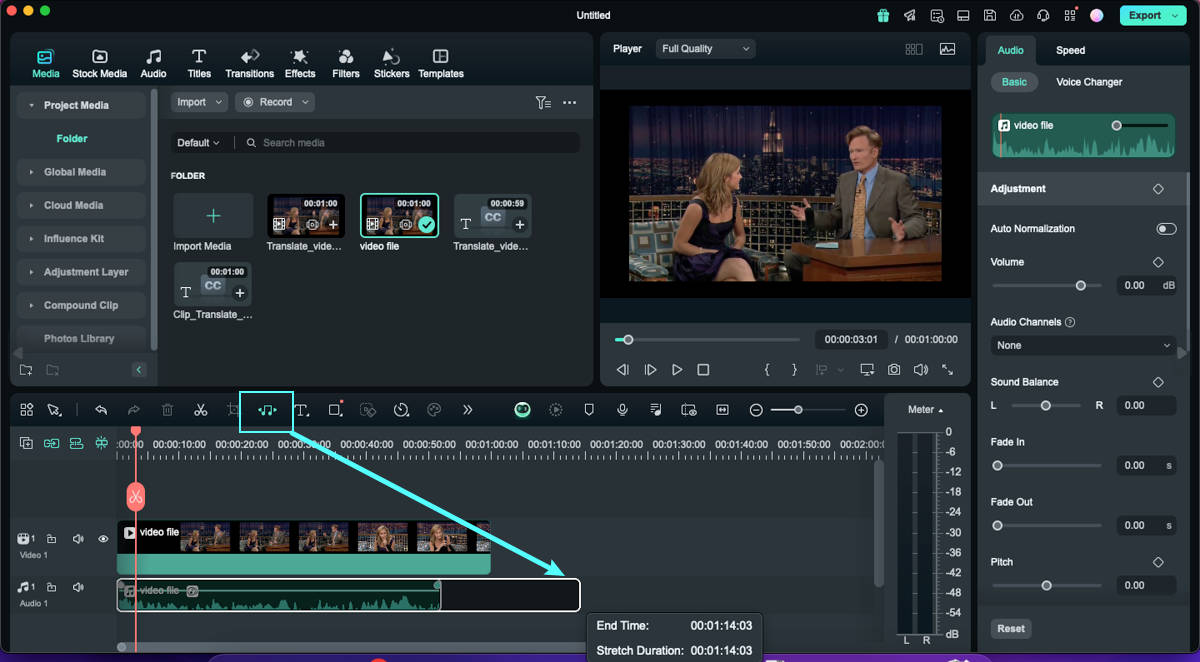
From Filmora's main interface, there exist two methods to employ the Audio Stretch function, and here is a precise instruction manual ability to activate it:
Method 1: Via the Timeline Tools Panel
First, download the latest version of Filmora on your device and launch it. Upon the appearance of its main display, click the "New Project" tab to start with.

Method 2: Via the Keyboard Shortcuts
Another way to access the Audio Stretch functionality is by selecting the detached audio clip within the timeline and pressing the "S" key on the keyboard.
Import Media and Separate Audio
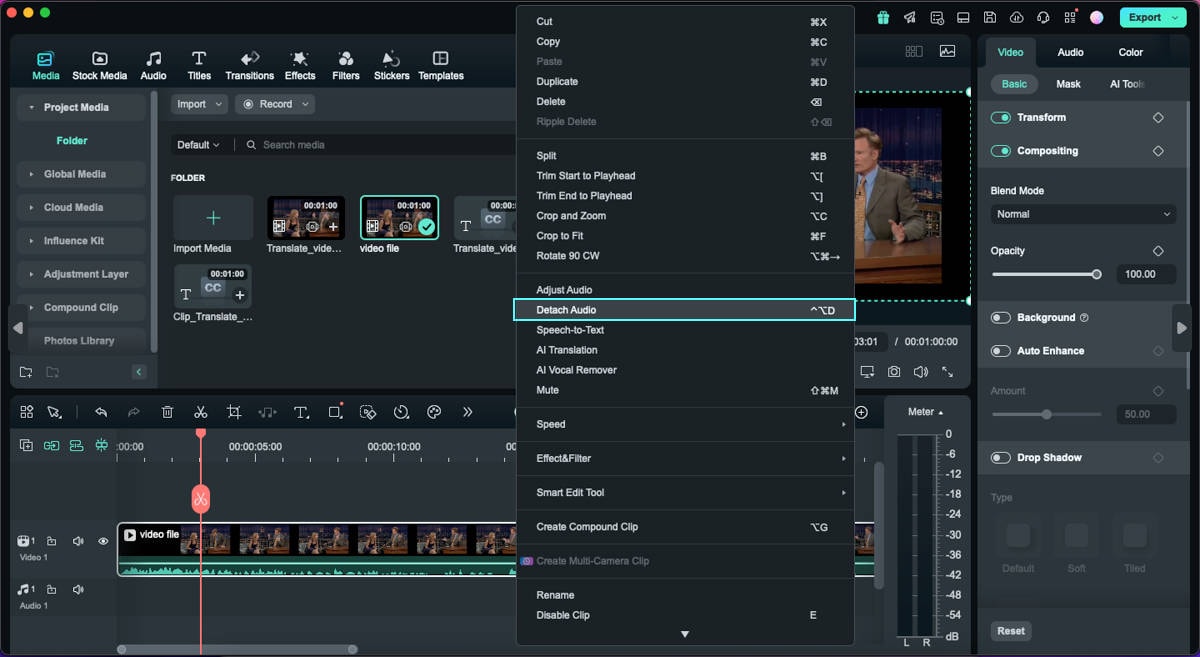
Initiate the editing process by importing your media content into its Media Library and placing it on a timeline. Keep in view that it is important for a video file to contain audio. Following this, select the clip and press "Command + Click" from your keyboard. From the selection panel, click the "Detach Audio" option to separate the audio track from a video.

Activate the Audio Stretch Feature
Now, move your cursor towards the detached audio track within the timeline, select it, and from the timeline interface, select the "Audio Stretch" option. Now, experiment with your cursor to change the settings.

Re-edit This Feature
Follow the procedure below to reset the duration of the audio.
Step 1: Re-edit the length if you need
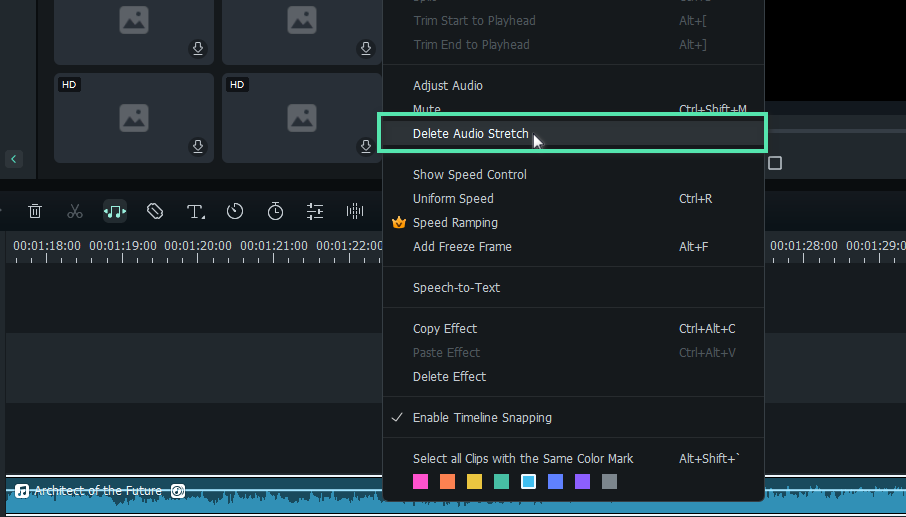
To delete the effect, you can select the clip by clicking on the right side of the mouse and then choosing Delete Audio Stretch to remove the stretch effect. Alternatively, you can restart the Audio Stretch function by clicking the stretch icon to set it again.

Note:
- Filmora AI Audio Stretch only supports the time limit of audio clips from 10s up to 10h.
- If you use the audio stretch, the reverse effect used before for your clip will be automatically removed.
Related Posts
Featured Articles
How to Add Song Lyrics on Instagram Story & Reels (With or Without the App)
Adding lyrics to your Instagram Story or Reel is easy. Discover editing tips, step-by-step instructions, and creative ways to make your content stand out!
How to Add a Transition Effect in Premiere Pro + A More Intuitive Alternative
If you are just starting your video editing journey, you are certainly learning about transition effects in Premiere Pro and how to use them.
A Guide on How to Insert Text in Final Cut Pro over Video 2025
How to insert text over video via Final Cut Pro and Filmora? What is the Speech-to-text feature of Filmora? Tips to remember. FAQs to answer your queries.
Recommended User Guide
AI Music Generator for Mac
In this guide, we are going to learn all about music generation with Filmora's AI technology.
AI Vocal Remover for Mac
Removing vocals from videos aids in many creative tasks further, and Filmora has introduced this feature in its new upgrade.
