For the Best Results, Use the Latest Version.
-
Preparations for Mac
-
Account (Mac)
-
Get Started & Basic Settings (Mac)
- Release notes for Mac
- Latest Versions and Features for Mac
- Get Started on Mac - Full Guide
- Download/register/uninstall on Mac
- Panel Layout on Mac
- Keyboard shortcuts on Mac
- Touchbar on Mac
- Change playback quality on Mac
- Render preview files on Mac
- Manage Timeline on Mac
- Media for use on Mac
- Logo Reveal For Mac
- Marked Favorites for Mac
-
Compatibility & Tech Specs (Mac)
-
Performance Settings (Mac)
-
-
Creating Projects - Mac
-
Creating New Projects (Mac)
-
-
Importing & Recording - Mac
-
Importing (Mac)
-
Recording (Mac)
-
-
Video Editing for Mac
-
Basic Video Editing for Mac
- Edit Live Photos on Mac
- Enable/Disable Clip for Mac
- Magnetic Timeline For Mac
- Dual Monitor Setup for Video Editing on Mac
- Select All Clips on Timeline for Mac
- Auto Ripple for Mac
- Split & cut videos on Mac
- Compositing on Mac
- Crop and zoom on Mac
- Playback Zoom Level for Mac
- Change speed on Mac
- Play video in reverse on Mac
- Mark In and Mark Out for Mac
- Markers for Mac
- Group clips on Mac
- Customized Backgrounds for Videos and Images in Mac
- Video snapshot on Mac
- Freeze frame on Mac
- Auto enhance on Mac
- Applying Drop Shadow for Mac
- Adjustment Layer for Mac
- Mark clip on Mac
- Video Editing Ruler – Mac
- Apply Transforming for Mac
-
Advanced Video Editing for Mac
- Text Animation Path for Mac
- Create Multi-Camera Clip for Mac
- Drawing Tools for Mac | Filmora Guide
- Compound Clips for Mac
- AI Video Enhancer for Mac
- Filmora Flicker Removal Guide | Mac
- Multi-Clip Editing for Mac
- Keyframe Graph Editor for Mac
- Animation keyframing on Mac
- Mask on Mac
- PIP (picture in picture) on Mac
-
AI-Powered Video Editing for Mac
- Smart Scene Cut for Mac
- Smart Short Clips for Mac
- Filmora Image to Video for Mac
- AI Idea to Video for Mac
- AI Text-to-Video for Mac
- Instant Cutter Tool on Mac
- AI Face Mosaic for Mac
- Keyframe Path Curve for Mac
- Planar Tracking for Mac
- Filmora AI Relight - Mac
- AI Extend For Mac
- AI Script-to-Video for Mac
- AI Text-Based Editing in Mac
- Create With Instant Mode on Mac
- ChatGPT Plugin - AI Copywriting on Mac
- AI Smart Cutout for Mac
- Auto reframe on Mac
- Lens correction on Mac
- AI Portrait Cutout on Mac
- Scene detection on Mac
- AI Smart Masking for Mac
- AI Mate Editing for Mac
- Motion Tracking on Mac
- Video Stabilization for Mac
- AI Object Remover For Mac
- AI Smart Search for Mac
- AI Skin Tone Protection for Mac
- Green screen on Mac
- Super Slow Motion with Optical Flow for Mac
- AI stylizer on Mac
- Video Denoise for Mac
-
-
Audio Editing for Mac
-
Basic Audio Editing for Mac
-
Advanced Audio Editing for Mac
-
AI-Powered Audio Editing for Mac
- Audio To Video for Mac
- AI Sound Effect for Mac
- Smart BGM Generation for Mac
- AI Voice Enhancer for Mac
- Audio Stretch for Mac
- AI Audio Denoise for Mac
- Auto synchronization for Mac
- AI Vocal Remover for Mac
- Auto Beat Sync on Mac
- AI Music Generator for Mac
- How to Perform AI Voice Cloning in Wondershare Filmora?
- Silence detection on Mac
-
-
Text Editing for Mac
-
Basic Text Editing for Mac
-
Advanced Text Editing for Mac
-
AI-Powered Text Editing for Mac
-
-
Video Customizations for Mac
-
Video Effects (Mac)
-
Audio Effects (Mac)
-
Transitions (Mac)
-
Stickers (Mac)
-
Filters (Mac)
-
Color Editing (Mac)
-
Animations (Mac)
-
Templates (Mac)
-
Asset Center (Mac)
-
-
Exporting & Share & Cloud Backup - Mac
Advanced Color Adjustment for Mac
The primary focus of this guide is to provide instructions on how to access and enable the Advanced Color Adjustment feature in just a few clicks:
HSL
Filmora's HSL Eyedropper (Color Picker) on macOS helps editors fine-tune colors with greater accuracy by sampling tones directly from the video frame. Rather than relying on preset color ranges, users can precisely target the exact shade they want to modify.
This makes it easier to enhance skin tones without affecting surrounding areas, apply cinematic color styles to skies or water, and maintain consistent brand colors across multiple clips. It's a great fit for creators who regularly work with color adjustments.
Steps to Use the HSL Eyedropper on Mac
Filmora for Mac simplifies color grading by eliminating manual color selection. Follow the steps below to apply the HSL Eyedropper effectively.
Step 1. Start a New Project
Open Filmora on your Mac and select New Project from the welcome screen. Import your video file and place it onto the timeline to begin editing.
Step 2. Access the HSL Color Tool
Select the clip on the timeline to open the Inspector panel on the right. Navigate to the Color section and choose HSL. Click the Eyedropper icon in the color panel, then click directly on the area in the preview window to sample the desired color.
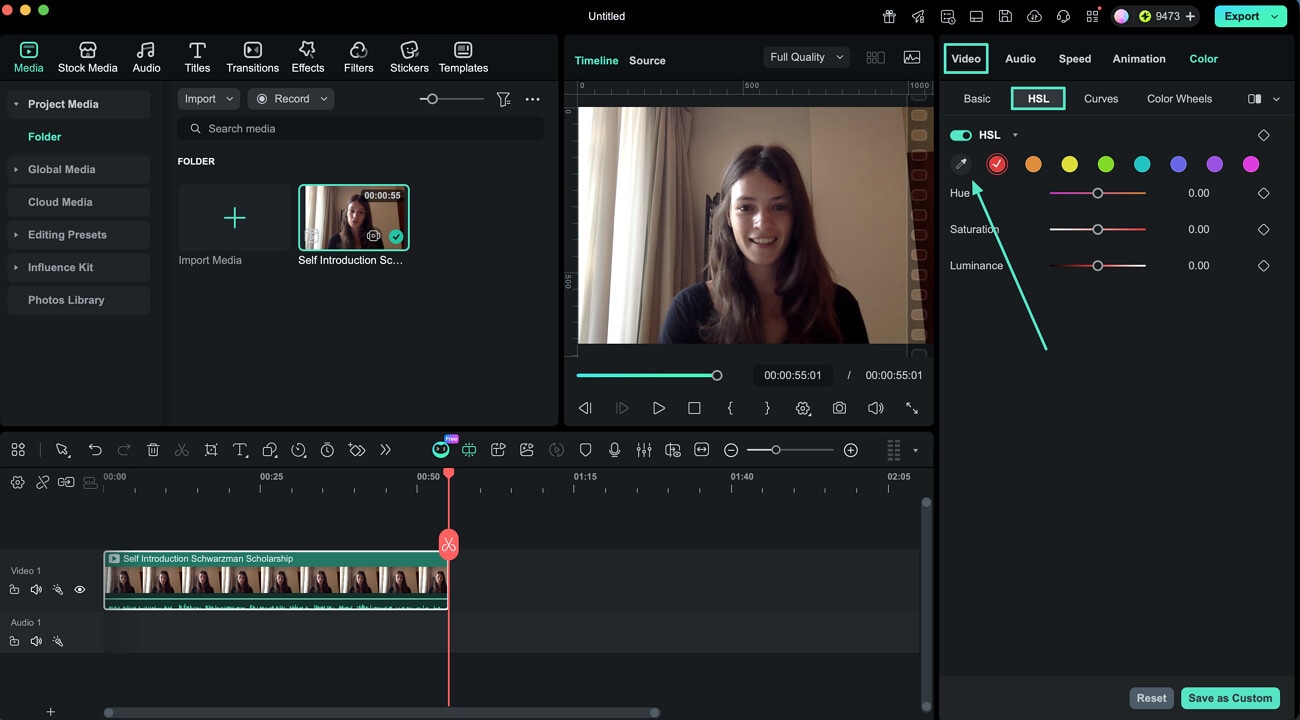
Step 3. Fine-Tune and Export
After selecting the color, refine its Hue, Saturation, and Luminance using the sliders. Once satisfied with the result, Export the video to save the final version.

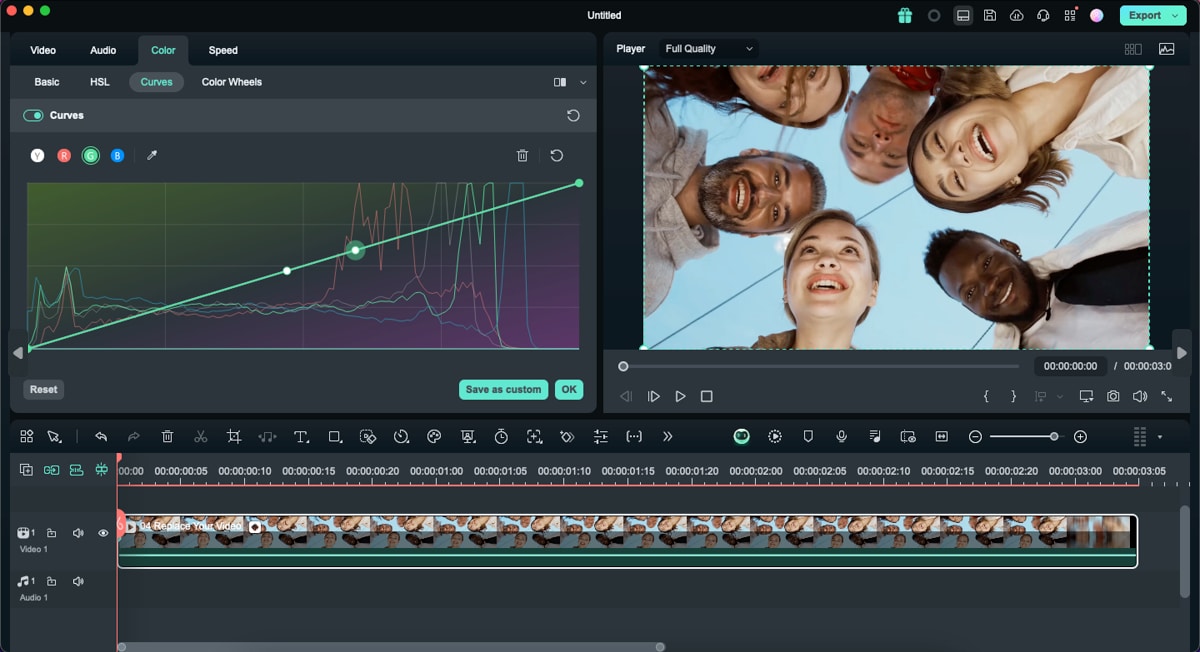
RGB Curve
The RGB curve allows you to make precise color adjustment on your videos to suit your desired style easily. Here are the steps on how to use this feature.
Step 2: Import and Add it to the timeline
Import the video into Filmora and drop the slip to the timeline. Select the video clip from the timeline and then select the "Color > Curves" tab in the editing panel.
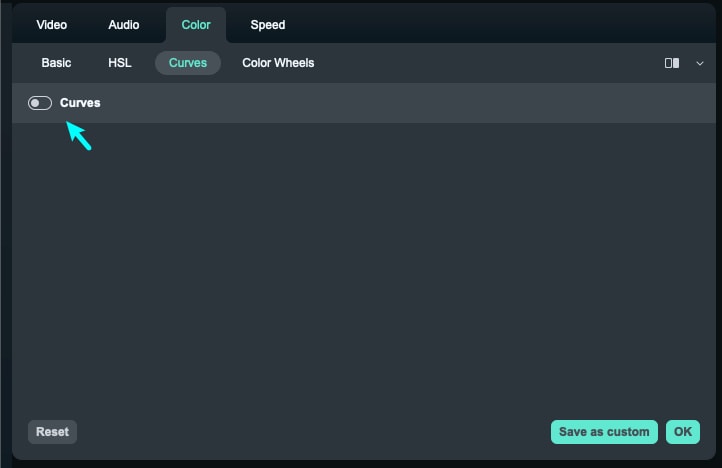
Step 2: Enable Curves feature
Click "Curves" to enable the feature in the panel.
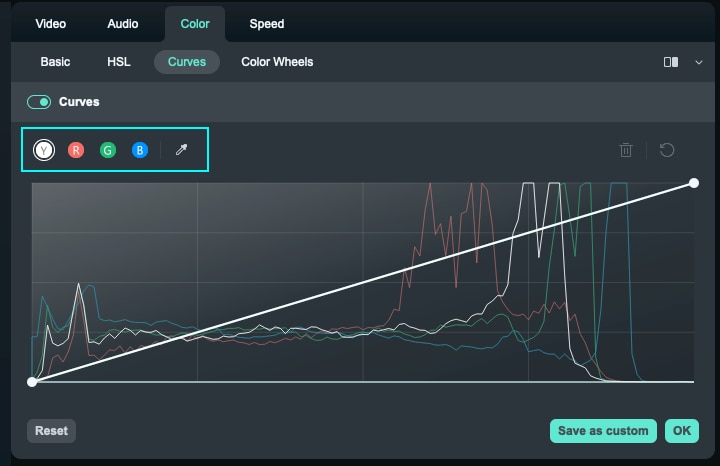
Step 3: Adjust and Preview
Now you can adjust the RGB curves and preview the video from this window.
Related Posts
Featured Articles
How to Write an Attractive Vlog Script: A 2026 Guide
Want to learn how to write a vlog script for any kind of content? Read this guide, where we discuss the ways that you can use to turn viewers into fans.
What Is a POSCA Marker? Types, Applications, and the Video Trend
POSCA marker videos have been taking social media by storm recently. They’re satisfying, relaxing, and visually appealing at the same time.
How To Add Text to Reel on Instagram [Tools & Tips]
Learn how to add text to Reels on Instagram to make them stand out and boost engagement. Discover top tips, tools, and best practices.
Recommended User Guide
Preset Color Adjustment for Mac
When using Filmora, you can harness the power of many options to enhance its color tones.
Color Wheels for Mac
Users can improve their tasks in video editing or graphic design in Filmora by utilizing color wheels.
Custom Color Layer for Mac
This guide shows how to use the Custom Color Layer in Filmora for Mac to enhance mood, style, and consistency across your videos.
