For the Best Results, Use the Latest Version.
-
Preparations for Mac
-
Account (Mac)
-
Get Started & Basic Settings (Mac)
- Release notes for Mac
- Latest Versions and Features for Mac
- Get Started on Mac - Full Guide
- Download/register/uninstall on Mac
- Panel Layout on Mac
- Keyboard shortcuts on Mac
- Touchbar on Mac
- Change playback quality on Mac
- Render preview files on Mac
- Manage Timeline on Mac
- Media for use on Mac
- Logo Reveal For Mac
- Marked Favorites for Mac
-
Compatibility & Tech Specs (Mac)
-
Performance Settings (Mac)
-
-
Creating Projects - Mac
-
Creating New Projects (Mac)
-
-
Importing & Recording - Mac
-
Importing (Mac)
-
Recording (Mac)
-
-
Video Editing for Mac
-
Basic Video Editing for Mac
- Edit Live Photos on Mac
- Enable/Disable Clip for Mac
- Magnetic Timeline For Mac
- Dual Monitor Setup for Video Editing on Mac
- Select All Clips on Timeline for Mac
- Auto Ripple for Mac
- Split & cut videos on Mac
- Compositing on Mac
- Crop and zoom on Mac
- Playback Zoom Level for Mac
- Change Speed on Mac
- Play video in reverse on Mac
- Mark In and Mark Out for Mac
- Markers for Mac
- Group clips on Mac
- Customized Backgrounds for Videos and Images in Mac
- Video snapshot on Mac
- Freeze frame on Mac
- Auto enhance on Mac
- Applying Drop Shadow for Mac
- Adjustment Layer for Mac
- Mark clip on Mac
- Video Editing Ruler – Mac
- Apply Transforming for Mac
-
Advanced Video Editing for Mac
- Text Animation Path for Mac
- Create Multi-Camera Clip for Mac
- Filmora Motion Blur | Mac
- Drawing Tools for Mac | Filmora Guide
- Compound Clips for Mac
- AI Video Enhancer for Mac
- Filmora Flicker Removal Guide | Mac
- Multi-Clip Editing for Mac
- Keyframe Graph Editor for Mac
- Animation keyframing on Mac
- Mask on Mac
- PIP (picture in picture) on Mac
-
AI-Powered Video Editing for Mac
- Smart Scene Cut for Mac
- Smart Short Clips for Mac
- Filmora AI Eye Contact - Mac
- Filmora Image to Video for Mac
- AI Idea to Video for Mac
- AI Text-to-Video for Mac
- Instant Cutter Tool on Mac
- AI Face Mosaic for Mac
- Filmora Image to Prompt for Mac
- Keyframe Path Curve for Mac
- Filmora AI Image Enhancer Guide – macOS
- Planar Tracking for Mac
- Filmora AI Relight - Mac
- AI Extend For Mac
- AI Script-to-Video for Mac
- AI Text-Based Editing in Mac
- Create With Instant Mode on Mac
- ChatGPT Plugin - AI Copywriting on Mac
- AI Smart Cutout for Mac
- Auto reframe on Mac
- Lens correction on Mac
- AI Portrait Cutout on Mac
- Scene detection on Mac
- AI Smart Masking for Mac
- AI Mate Editing for Mac
- Motion Tracking on Mac
- Video Stabilization for Mac
- AI Object Remover For Mac
- AI Smart Search for Mac
- AI Skin Tone Protection for Mac
- Green screen on Mac
- Super Slow Motion with Optical Flow for Mac
- AI stylizer on Mac
- Video Denoise for Mac
-
-
Audio Editing for Mac
-
Basic Audio Editing for Mac
-
Advanced Audio Editing for Mac
-
AI-Powered Audio Editing for Mac
- Audio To Video for Mac
- AI Sound Effect for Mac
- Smart BGM Generation for Mac
- AI Voice Enhancer for Mac
- Audio Stretch for Mac
- AI Audio Denoise for Mac
- Auto synchronization for Mac
- AI Vocal Remover for Mac
- Auto Beat Sync on Mac
- AI Music Generator for Mac
- How to Perform AI Voice Cloning in Wondershare Filmora?
- Silence detection on Mac
-
-
Text Editing for Mac
-
Basic Text Editing for Mac
-
Advanced Text Editing for Mac
-
AI-Powered Text Editing for Mac
-
-
Video Customizations for Mac
-
Video Effects (Mac)
-
Audio Effects (Mac)
-
Transitions (Mac)
-
Stickers (Mac)
-
Filters (Mac)
-
Color Editing (Mac)
-
Animations (Mac)
-
Templates (Mac)
-
Asset Center (Mac)
-
-
Exporting & Share & Cloud Backup - Mac
Apply Segmented Speed Control Mac
It is an advanced editing feature designed to give creators precise control over motion timing within a single clip. Instead of applying one uniform speed, it allows multiple speed variations across different sections of the same video. Each segment can be independently adjusted to slow down, speed up, or maintain normal playback. This enables users to create dynamic storytelling effects such as cinematic slow motion, high-energy action sequences, and rhythm-based edits.
The feature also supports smooth transitions between speed points, helping maintain visual continuity. Additionally, it enhances creative flexibility by allowing editors to experiment with pacing without splitting the clip manually.
Steps to Apply Segmented Speed Control in Video
As discussed, the segmented speed control in Filmora allows you to add multiple speed options to a single clip. Read the steps provided below to learn how to use this feature:
Index
Step 1. Start a New Project in Filmora
Open Filmora on your Mac and select New Project from the main screen. Import your video file into the media library, then drag and drop it onto the timeline. Click on the clip you want to edit to activate it for segmented speed adjustments.

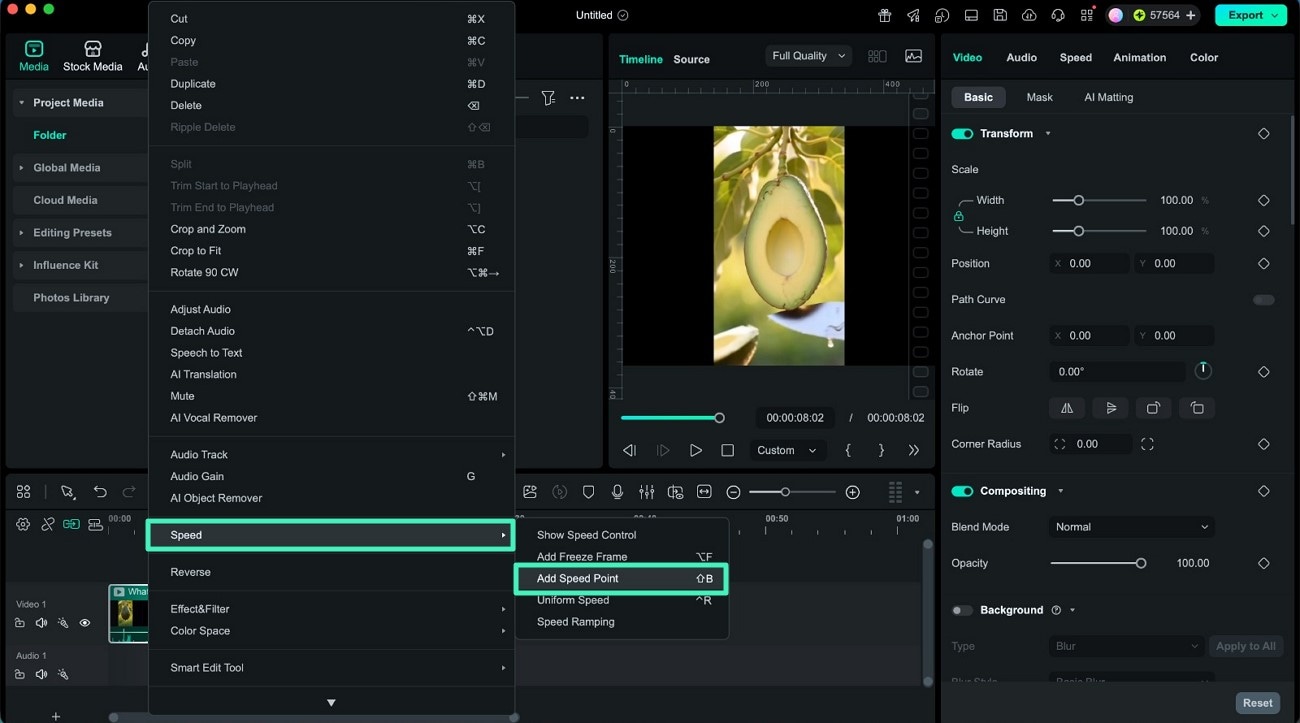
Step 2. Activate the Speed Control Panel
Position the playhead at the exact point where you want the speed change to begin. Right-click on the clip to open the options menu, then go to Speed and select Add Speed Point. This will allow you to create separate speed sections within the same clip.
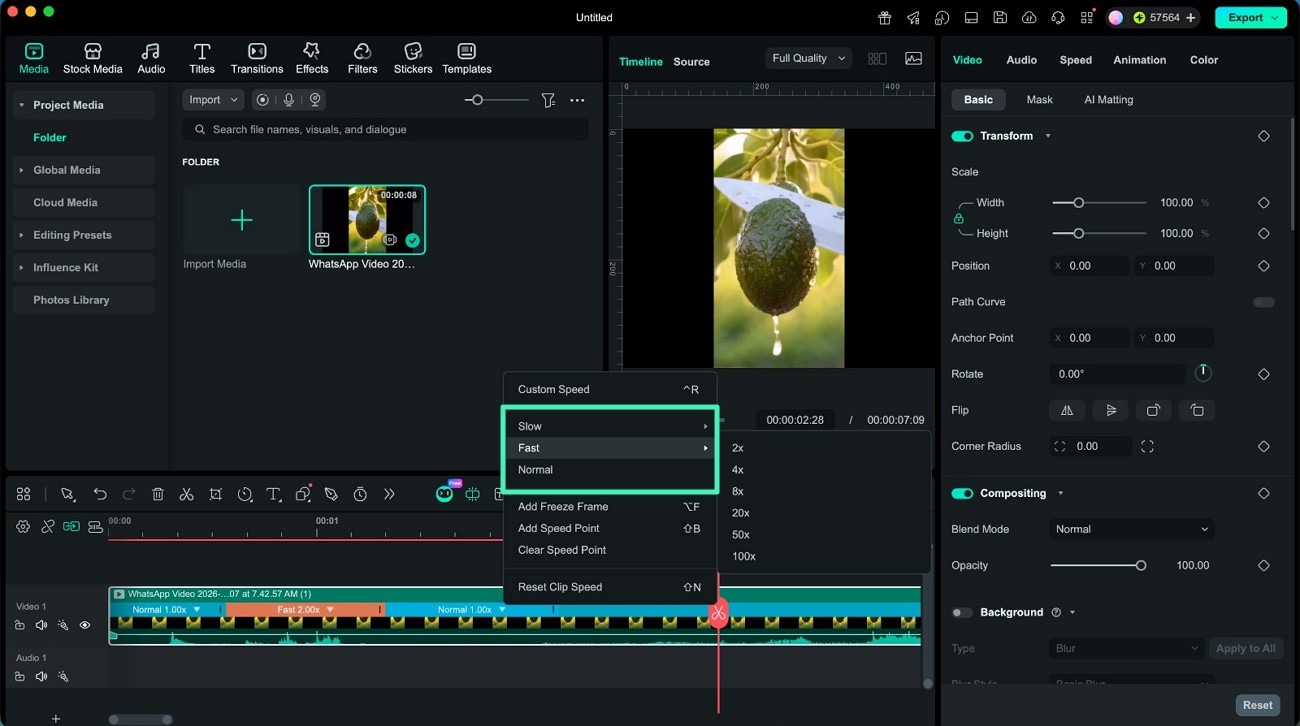
Step 3. Modify Speed for Individual Sections
Select each created segment and adjust its playback speed according to your requirement. You can choose preset speeds like Slow, Normal, or Fast, or manually enter a custom value. This process divides your footage into multiple segments, each with independent speed control for more dynamic editing.
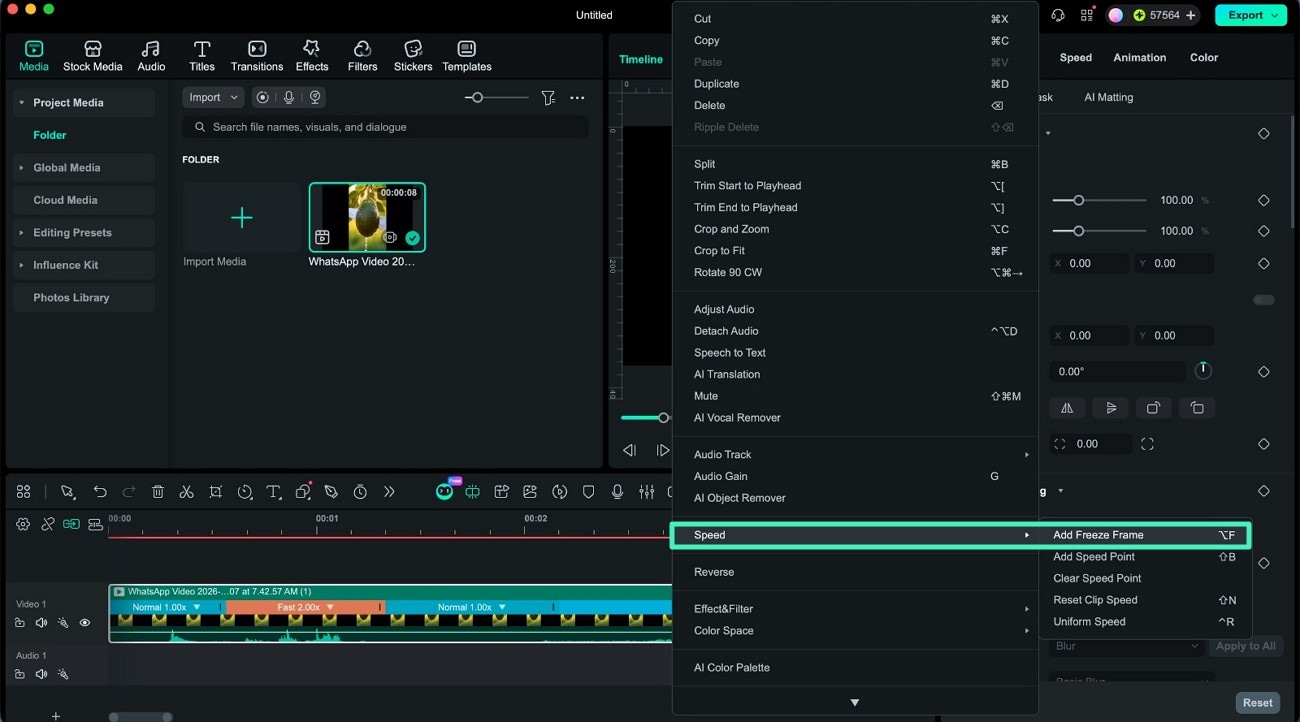
Step 4. Add a Freeze Frame Effect
Move the playhead to the exact frame where you want the video to pause. Use the Add Freeze Frame option to create a still segment automatically, typically set to a default duration of around five seconds for dramatic emphasis or highlight moments.
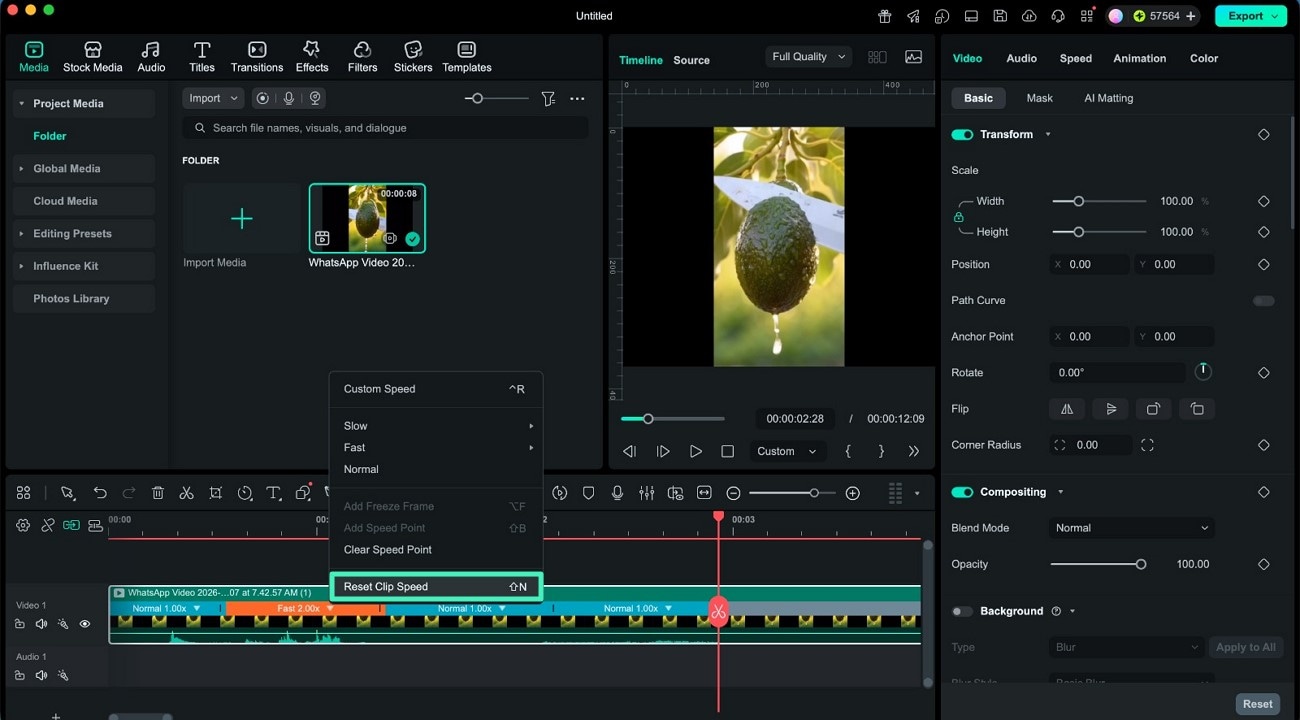
Step 5. Reset Speed Adjustments if Needed
If you want to remove all changes, select the edited clip and use the Clear Clip Speed option. This restores the video to its original single-speed playback, removing all segmented speed points.
Related Posts
Featured Articles
How to Remove Audio From iPhone Videos – A Detailed Guide
Discover the best editing tools, free apps, and online services for removing audio from iPhone videos. Read our guide to learn six effortless ways to do it.
How To Use LUTs in Lumafusion & Free LUTs Resource
LumaFusion offers various Look Up Table presets, or LUTs, such as FiLMiC deLog and FiLMiC DeFlat, and several stylistic LUTs for use with neutral use video. You can also manually add the LUTs.
How To Use Voicemod On Discord
And when it comes to voice changers, none is as easy to operate as the Voicemod in Discord. Here is a detailed guide about how to use Voicemod on Discord on mobile and desktop devices.
Recommended User Guide
Freeze frame on Mac
This guide will show you the detailed steps on how to freeze frame in videos with Filmora.
Magnetic Timeline For Mac
Achieve seamless video editing with Wondershare Filmora's Magnetic Timeline on Mac
Edit Live Photos on Mac
edit Live Photos on mac
