For the Best Results, Use the Latest Version.
-
Preparations for Mac
-
Account (Mac)
-
Get Started & Basic Settings (Mac)
- Release notes for Mac
- Latest Versions and Features for Mac
- Get Started on Mac - Full Guide
- Download/register/uninstall on Mac
- Panel Layout on Mac
- Keyboard shortcuts on Mac
- Touchbar on Mac
- Change playback quality on Mac
- Render preview files on Mac
- Manage timeline on Mac
- Media for use on Mac
- Logo Reveal For Mac
- Marked Favorites for Mac
-
Compatibility & Tech Specs (Mac)
-
Performance Settings (Mac)
-
-
Creating Projects - Mac
-
Creating New Projects (Mac)
-
-
Importing & Recording - Mac
-
Importing (Mac)
-
Recording (Mac)
-
-
Video Editing for Mac
-
Basic Video Editing for Mac
- Edit Live Photos on Mac
- Enable/Disable Clip for Mac
- Magnetic Timeline For Mac
- Select All Clips on Timeline for Mac
- Auto Ripple for Mac
- Split & cut videos on Mac
- Compositing on Mac
- Crop and zoom on Mac
- Playback Zoom Level for Mac
- Change speed on Mac
- Play video in reverse on Mac
- Mark In and Mark Out for Mac
- Markers for Mac
- Group clips on Mac
- Customized Backgrounds for Videos and Images in Mac
- Video snapshot on Mac
- Freeze frame on Mac
- Auto enhance on Mac
- Applying Drop Shadow for Mac
- Adjustment Layer for Mac
- Mark clip on Mac
- Video Editing Ruler – Mac
- Apply Transforming for Mac
-
Advanced Video Editing for Mac
-
AI-Powered Video Editing for Mac
- Smart Scene Cut for Mac
- Smart Short Clips for Mac
- Image to Video for Mac
- AI Idea to Video for Mac
- AI Text-to-Video for Mac
- Instant Cutter Tool on Mac
- AI Face Mosaic for Mac
- Keyframe Path Curve for Mac
- Planar Tracking for Mac
- AI Extend For Mac
- AI Script-to-Video for Mac
- AI Text-Based Editing in Mac
- Create With Instant Mode on Mac
- ChatGPT Plugin - AI Copywriting on Mac
- AI Smart Cutout for Mac
- Auto reframe on Mac
- Lens correction on Mac
- AI Portrait Cutout on Mac
- Scene detection on Mac
- AI Smart Masking for Mac
- AI Mate Editing for Mac
- Motion Tracking on Mac
- Stabilize video on Mac
- AI Object Remover For Mac
- AI Smart Search for Mac
- AI Skin Tone Protection for Mac
- Green screen on Mac
- Super Slow Motion with Optical Flow for Mac
- AI stylizer on Mac
- Video Denoise for Mac
-
-
Audio Editing for Mac
-
Basic Audio Editing for Mac
-
Advanced Audio Editing for Mac
-
AI-Powered Audio Editing for Mac
- Audio To Video for Mac
- AI Sound Effect for Mac
- Smart BGM Generation for Mac
- AI Voice Enhancer for Mac
- Audio Stretch for Mac
- AI Audio Denoise for Mac
- Auto synchronization for Mac
- AI Vocal Remover for Mac
- Auto Beat Sync on Mac
- AI Music Generator for Mac
- How to Perform AI Voice Cloning in Wondershare Filmora?
- Silence detection on Mac
-
-
Text Editing for Mac
-
Basic Text Editing for Mac
-
Advanced Text Editing for Mac
-
AI-Powered Text Editing for Mac
-
-
Video Customizations for Mac
-
Video Effects (Mac)
-
Audio Effects (Mac)
-
Transitions (Mac)
-
Stickers (Mac)
-
Filters (Mac)
-
Color Editing (Mac)
-
Animations (Mac)
-
Templates (Mac)
-
Asset Center (Mac)
-
-
Exporting & Share & Cloud Backup - Mac
Change Speed
Speeding up or slowing down a video is commonly used in editing. Here, we will show you how to change video speed in Filmora on Mac.
Index
Change Video Speed with Uniform Speed
Using the Uniform Speed feature, you can adjust the speed of the selected clip to the same rate.
Get to the Uniform Speed Panel
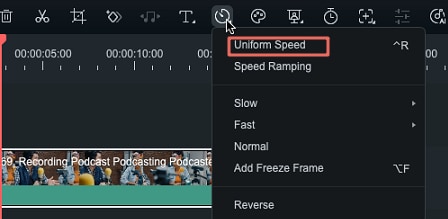
Choose the video in the timeline and click the Speed icon from the toolbar above it. Select the Uniform Speed option.
Change Video Speed to Constant Speed
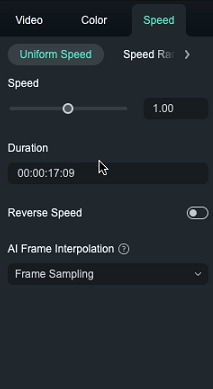
Drag the Speed slider to the right or left to speed up or slow down the playback speed. Optionally, you can enter your preferred value in the Duration field to get a more precise output.
Preview the Video and Save
Click the Play button in the Player or press the Space key to preview the modifications.
Note:
Enabling Maintain the Audio Pitch option to keep the video's audio sound natural is recommended.
Modify Video Playback Speed with Speed Ramping
In addition to constant speed changes in Uniform Speed, you can create variable speed effects with Speed Ramping, where a clip's playback speed changes dynamically. You can set up different playback speeds for each portion of the video.
Go to the Speed Ramping Panel
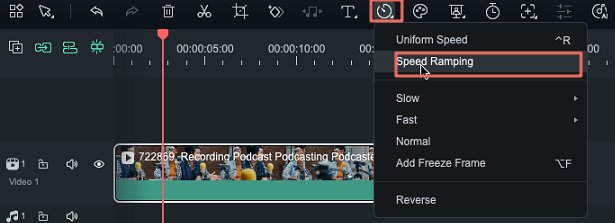
Click the Speed icon again and select the Speed Ramping option, and then you will see a couple of options in the property panel on the right side of the interface.
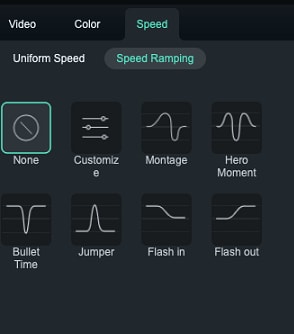
None: Apply no speed ramping.
Customize: By default, five-speed points allow you to customize the speed exactly the way you want.
Montage: Six-speed points in the playback speed of the selected video: 0.9x, 0.9x, 6.9x, 0.3x, 1.0x, and 1.0x, which present a slow, slow, fast, slow, and normal rhythm.
Hero Moment: Eight-speed points in the playback speed of the selected video: 1.0x, 1.0x, 5.4x, 0.5x, 0.5x, 5.4x, 1.0x, and 1.0x, which present a normal, fast, slow, slow, fast, and normal rhythm.
Bullet Time: Six-speed points in the playback speed of the selected video: 5.2x, 5.2x, 0.5x, 0.5x, 5.2x, and 5.2x, which present a fast, fast, slow, slow, fast, fast rhythm.
Jumper: Five-speed points in the playback speed of the selected video: 0.6x, 0.6x, 6.0x, 0.6x, and 0.6x, which present a slow, slow, fast, slow, slow rhythm.
Flash in: Four-speed points in the playback speed of the selected video: 5.2x, 5.2x, 1x, and 1x, which present a fast, fast, normal, normal rhythm.
Flash out: Four-speed points in the playback speed of the selected video: 1x, 1x, 5.2x, and 5.2x, which present a normal, normal, fast, fast rhythm.
Select and Customize Speed Ramping Preset
Please select one of the presets to apply variable video speed and customize it based on your needs. Variation in the speed will remain effective until the Play head reaches the next speed point. The speed of the video will gradually change as the Play head moves between the speed points.
Adjust the speed of the section: Drag the speed point up or down to increase or decrease the speed of the section.
Adjust the range of the section: Drag the speed point left or right to change the portion applying the speed.
Add speed point: Place the play head to the point you want to change the speed, and then click the Plus + icon on the left to add a speed point.
Delete speed point: Select the speed point and click the Plus – icon to remove it.
Add a freeze frame: Place the play head to the point you want to freeze, and then click the snow icon to add a freeze frame feature. Set up the freeze time and click Apply to save.
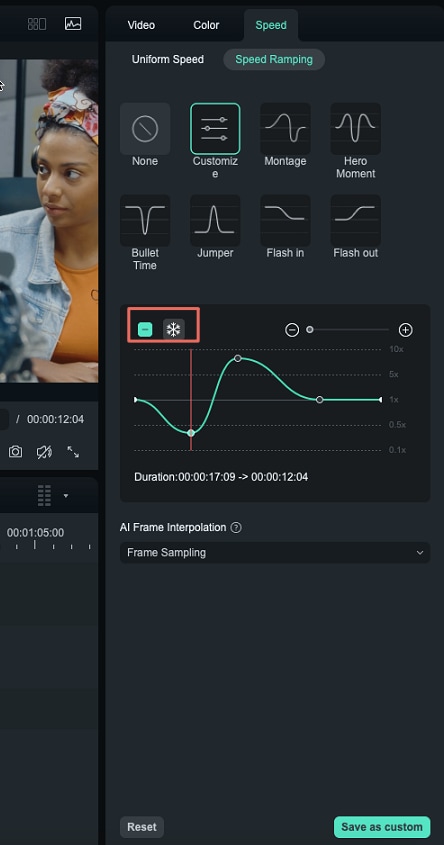
Preview the Video and Save
Press the Space key or click the Play button in the Preview window to preview the modifications in the video. If you want to remove the settings, click Reset. You can also save the speed ramping setting by clicking the Save as a custom button.
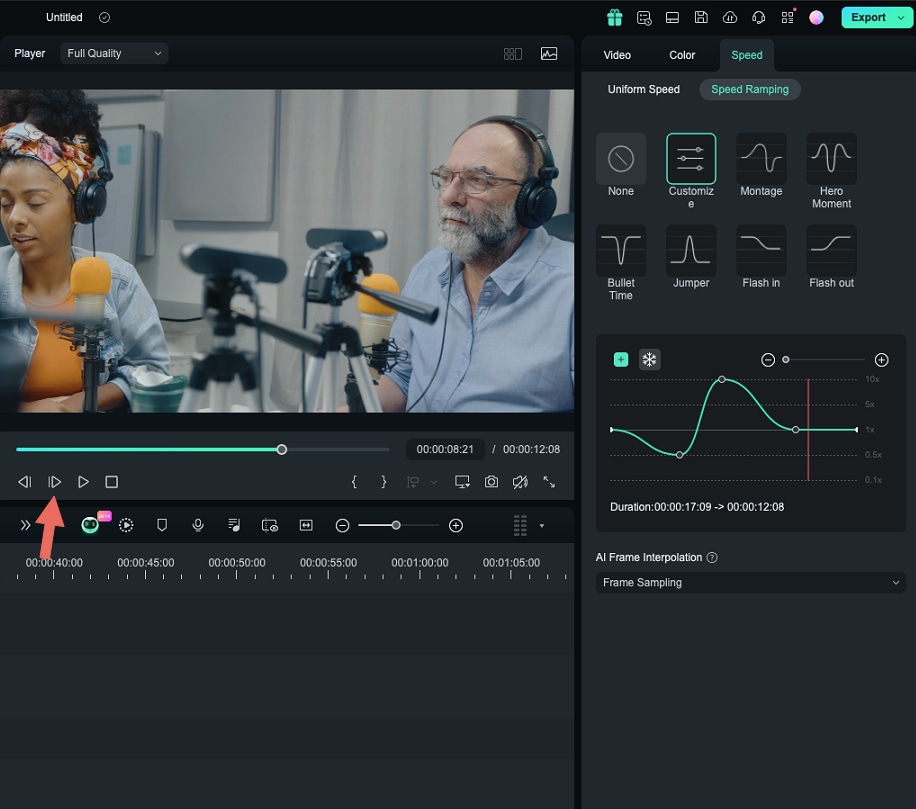
Note:
If the Uniform Speed and Speed Ramping options are not visible, try upgrading Filmora to the latest version.
Change Speed in Timeline
You can also change the speed in the following paths:
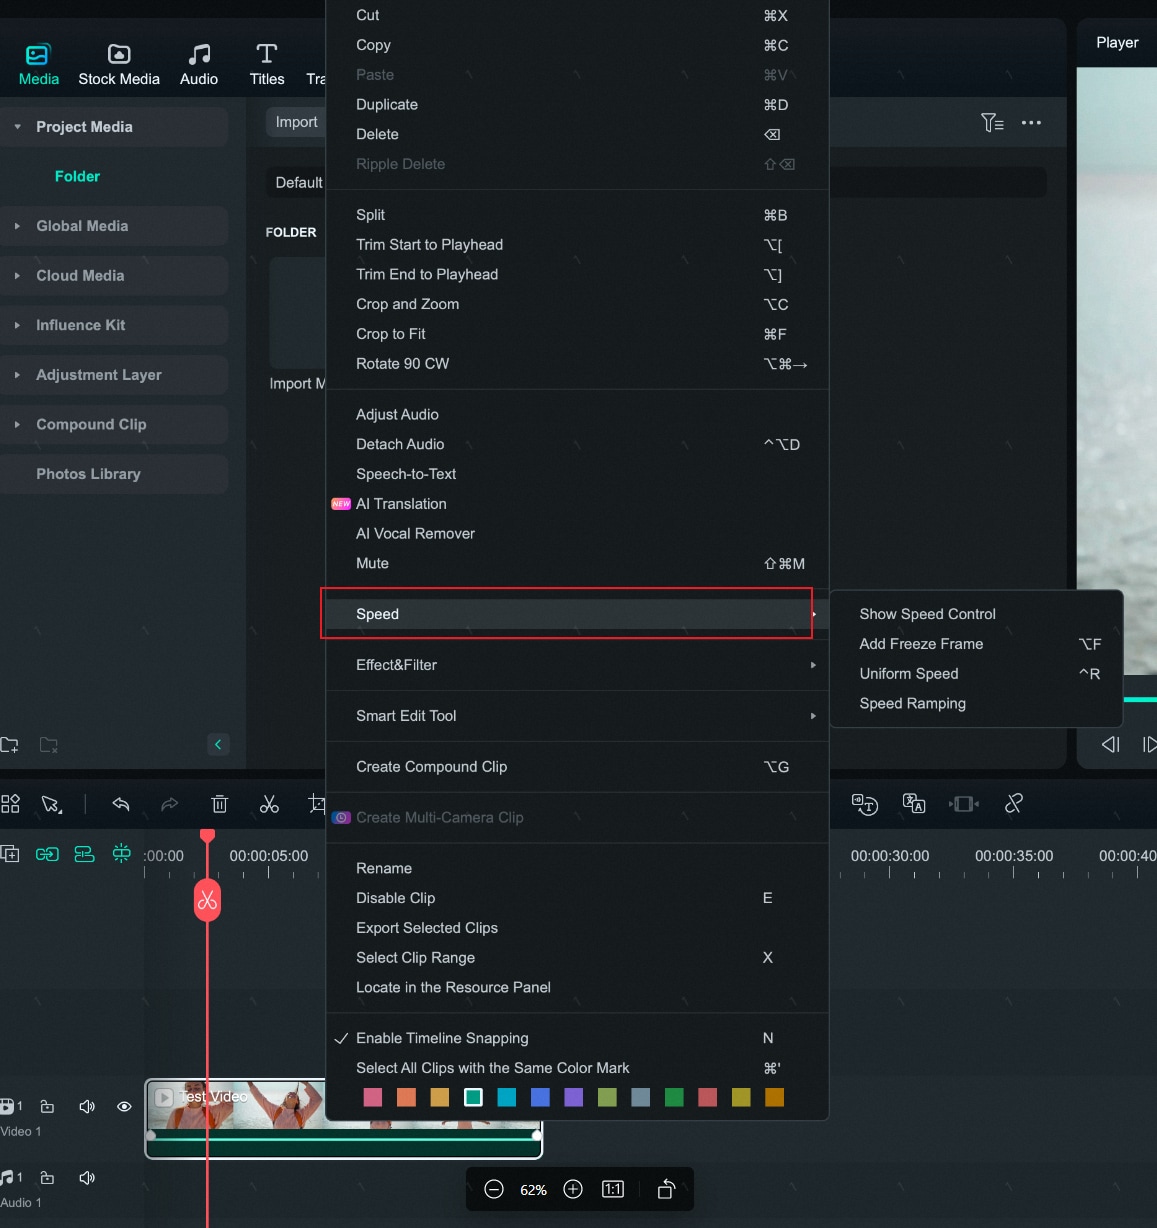
- Right-click the video in the timeline and select Uniform Speed or Speed Ramping on the context menu.
- Choose the speed options (0.01x to 100x) directly from the Slow or Fast menu above the Speed icon.
Playback Speed Shortcuts for Mac
Filmora has assigned three keys as playback speed controllers. This section is going to reveal all of them below:
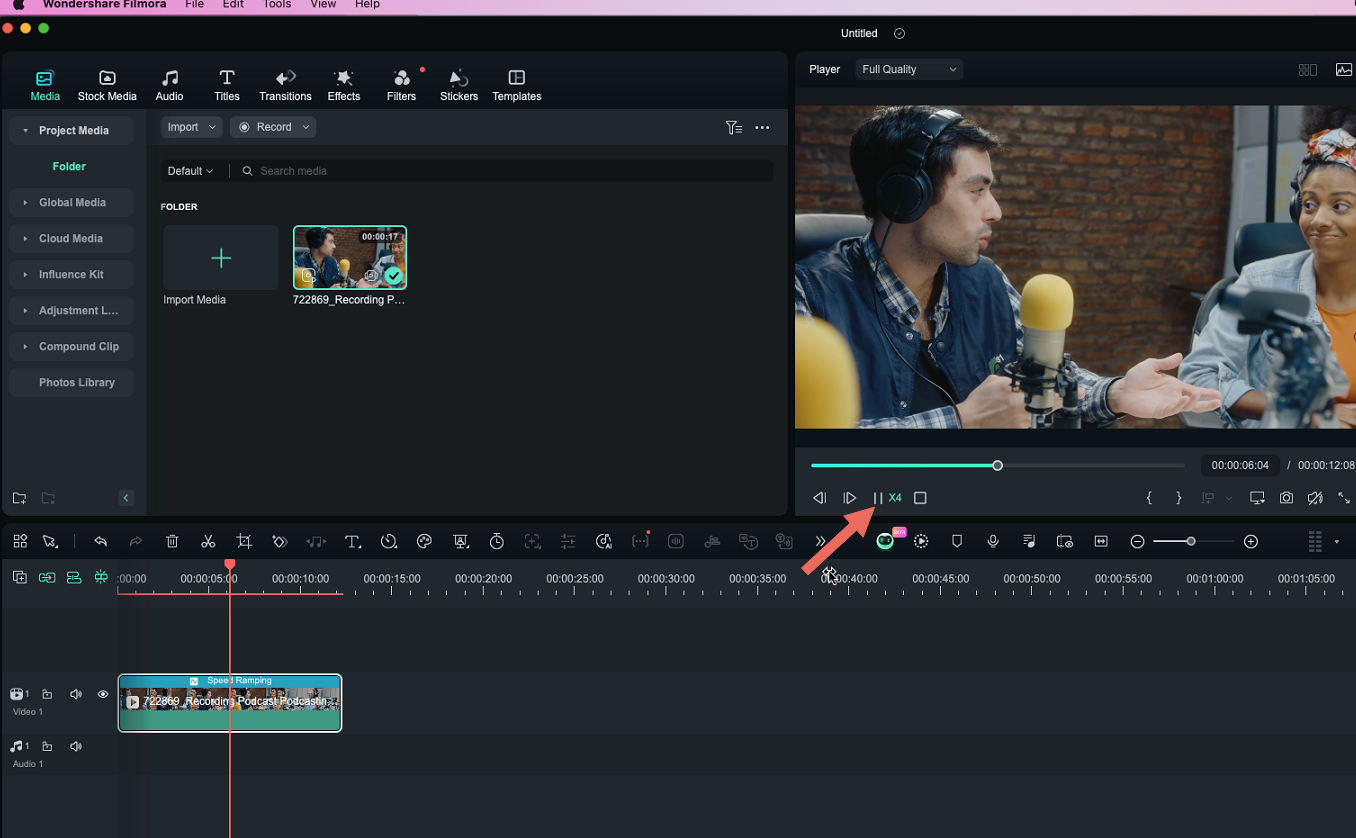
- To reverse your video, click the video in the timeline and press the "J" key on your keyboard. The playback speed range for reversing a video in Filmora is from -x1 to -x32.
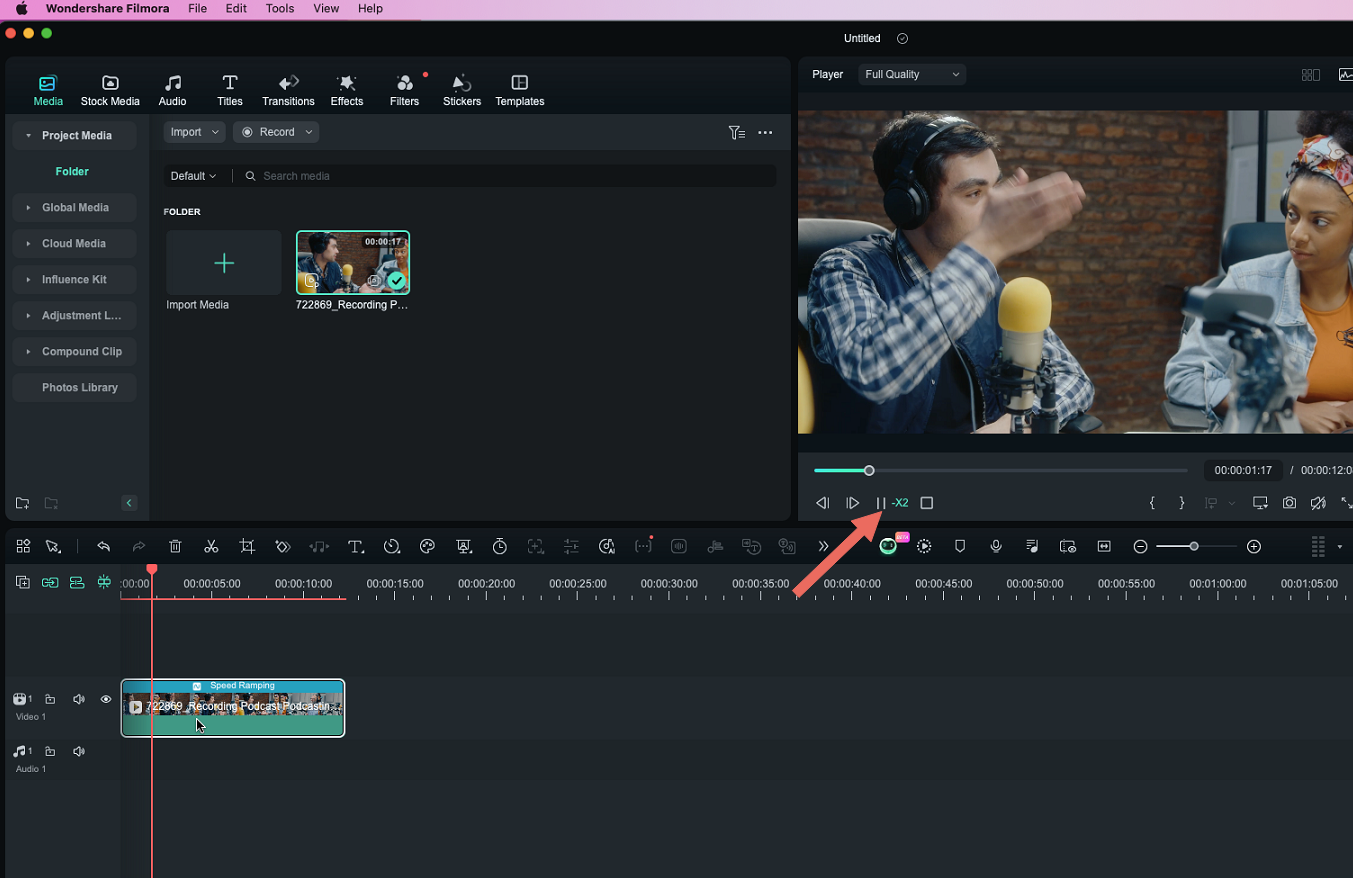
- To pause a video during editing, press the "K" key on your keyboard to pause it.
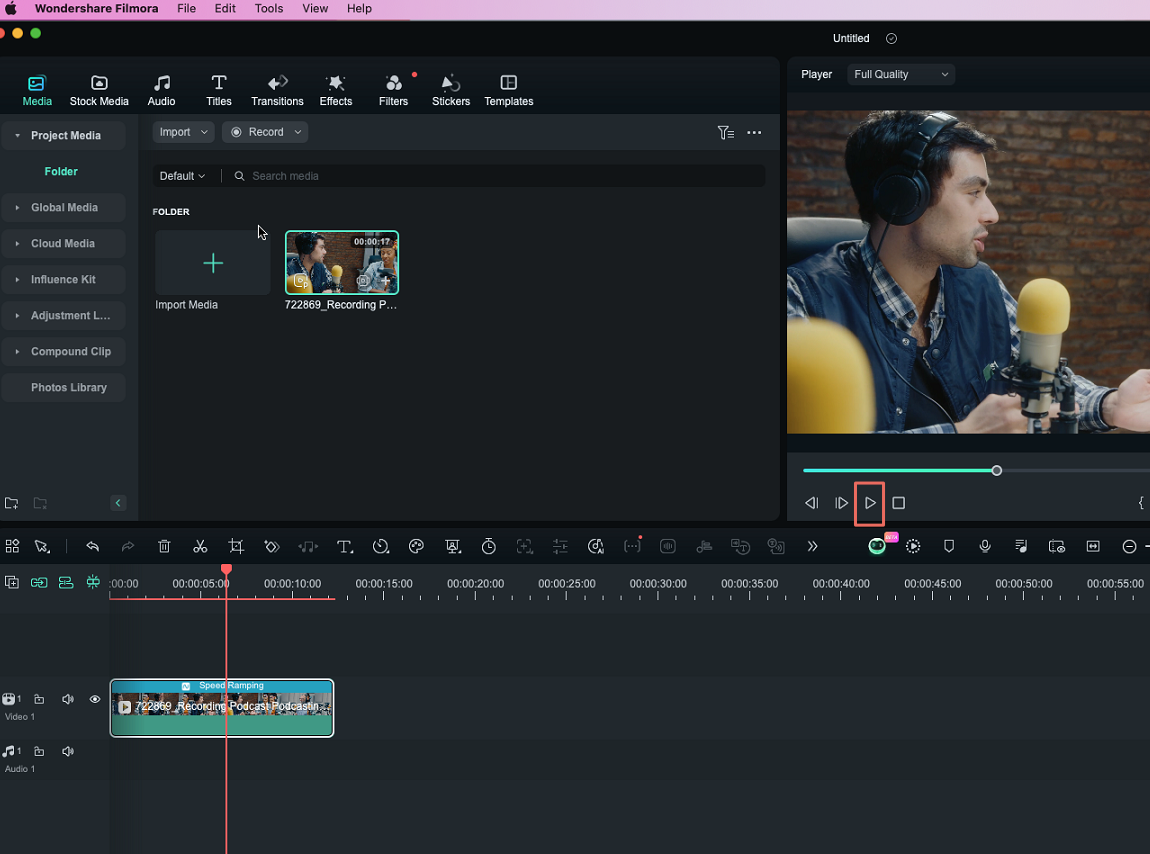
- If you want to forward or increase the playback speed of your video, place your finger on the "L" key on your keyboard and tap it repeatedly until you reach your desired speed. The playback speed range for forwarding a video in Filmora is from 2x to 32x.
Related Posts
Featured Articles
The Best Ad Maker App To Utilize in 2025
Struggling to create eye-catching ads? Discover the best ad-maker apps that simplify design and boost your marketing efforts on social media.
How To Create A Game Highlights Video | Updated
game highlight
Beginner's Guide to Using the Panopto Screen Recorder
The Panopto screen recorder simplifies screen recording and video sharing. Keep reading to learn more about its video recording capabilities.
Recommended User Guide
Group clips on Mac
In this guide, you are going to learn about grouping, ungrouping, and making a cut in a group on your timeline.
Crop and zoom on Mac
Learn how to use Filmora 11 to crop, pan and zoom videos on Mac.
Freeze frame on Mac
This guide will show you the detailed steps on how to freeze frame in videos with Filmora.
