For the Best Results, Use the Latest Version.
-
Preparations for Mac
-
Account (Mac)
-
Get Started & Basic Settings (Mac)
- Release notes for Mac
- Latest Versions and Features for Mac
- Get Started on Mac - Full Guide
- Download/register/uninstall on Mac
- Panel Layout on Mac
- Keyboard shortcuts on Mac
- Touchbar on Mac
- Change playback quality on Mac
- Render preview files on Mac
- Manage Timeline on Mac
- Media for use on Mac
- Logo Reveal For Mac
- Marked Favorites for Mac
-
Compatibility & Tech Specs (Mac)
-
Performance Settings (Mac)
-
-
Creating Projects - Mac
-
Creating New Projects (Mac)
-
-
Importing & Recording - Mac
-
Importing (Mac)
-
Recording (Mac)
-
-
Video Editing for Mac
-
Basic Video Editing for Mac
- Edit Live Photos on Mac
- Enable/Disable Clip for Mac
- Magnetic Timeline For Mac
- Dual Monitor Setup for Video Editing on Mac
- Select All Clips on Timeline for Mac
- Auto Ripple for Mac
- Split & cut videos on Mac
- Compositing on Mac
- Crop and zoom on Mac
- Playback Zoom Level for Mac
- Change speed on Mac
- Play video in reverse on Mac
- Mark In and Mark Out for Mac
- Markers for Mac
- Group clips on Mac
- Customized Backgrounds for Videos and Images in Mac
- Video snapshot on Mac
- Freeze frame on Mac
- Auto enhance on Mac
- Applying Drop Shadow for Mac
- Adjustment Layer for Mac
- Mark clip on Mac
- Video Editing Ruler – Mac
- Apply Transforming for Mac
-
Advanced Video Editing for Mac
- Text Animation Path for Mac
- Create Multi-Camera Clip for Mac
- Drawing Tools for Mac | Filmora Guide
- Compound Clips for Mac
- Mocha Filmora - For Mac
- AI Video Enhancer for Mac
- Multi-Clip Editing for Mac
- Keyframe Graph Editor for Mac
- Animation keyframing on Mac
- Mask on Mac
- PIP (picture in picture) on Mac
-
AI-Powered Video Editing for Mac
- Smart Scene Cut for Mac
- Smart Short Clips for Mac
- Image to Video for Mac
- AI Idea to Video for Mac
- AI Text-to-Video for Mac
- Instant Cutter Tool on Mac
- AI Face Mosaic for Mac
- Keyframe Path Curve for Mac
- Planar Tracking for Mac
- AI Extend For Mac
- AI Script-to-Video for Mac
- AI Text-Based Editing in Mac
- Create With Instant Mode on Mac
- ChatGPT Plugin - AI Copywriting on Mac
- AI Smart Cutout for Mac
- Auto reframe on Mac
- Lens correction on Mac
- AI Portrait Cutout on Mac
- Scene detection on Mac
- AI Smart Masking for Mac
- AI Mate Editing for Mac
- Motion Tracking on Mac
- Video Stabilization for Mac
- AI Object Remover For Mac
- AI Smart Search for Mac
- AI Skin Tone Protection for Mac
- Green screen on Mac
- Super Slow Motion with Optical Flow for Mac
- AI stylizer on Mac
- Video Denoise for Mac
-
-
Audio Editing for Mac
-
Basic Audio Editing for Mac
-
Advanced Audio Editing for Mac
-
AI-Powered Audio Editing for Mac
- Audio To Video for Mac
- AI Sound Effect for Mac
- Smart BGM Generation for Mac
- AI Voice Enhancer for Mac
- Audio Stretch for Mac
- AI Audio Denoise for Mac
- Auto synchronization for Mac
- AI Vocal Remover for Mac
- Auto Beat Sync on Mac
- AI Music Generator for Mac
- How to Perform AI Voice Cloning in Wondershare Filmora?
- Silence detection on Mac
-
-
Text Editing for Mac
-
Basic Text Editing for Mac
-
Advanced Text Editing for Mac
-
AI-Powered Text Editing for Mac
-
-
Video Customizations for Mac
-
Video Effects (Mac)
-
Audio Effects (Mac)
-
Transitions (Mac)
-
Stickers (Mac)
-
Filters (Mac)
-
Color Editing (Mac)
-
Animations (Mac)
-
Templates (Mac)
-
Asset Center (Mac)
-
-
Exporting & Share & Cloud Backup - Mac
Green Screen (Chroma Key)
You can use the Green Screen (Chroma Key) tool to make a color range in a video clip or image in a higher track on your timeline transparent, so the video clip or image underneath it can be seen in place of that color range. You can use this feature to change the background of a clip and make it look like you're a superhero flying through the sky or an explorer on top of a mountain.
Green Screen works best if you have a solid-colored background to make it transparent, preferably a color that the subjects in the video are not also wearing. The most popular choice is bright green. Here's how to use the Chroma Key/Green Screen tool in Filmora for Mac.
Remove Selected Colors with Chroma Key
Enable Chroma Key
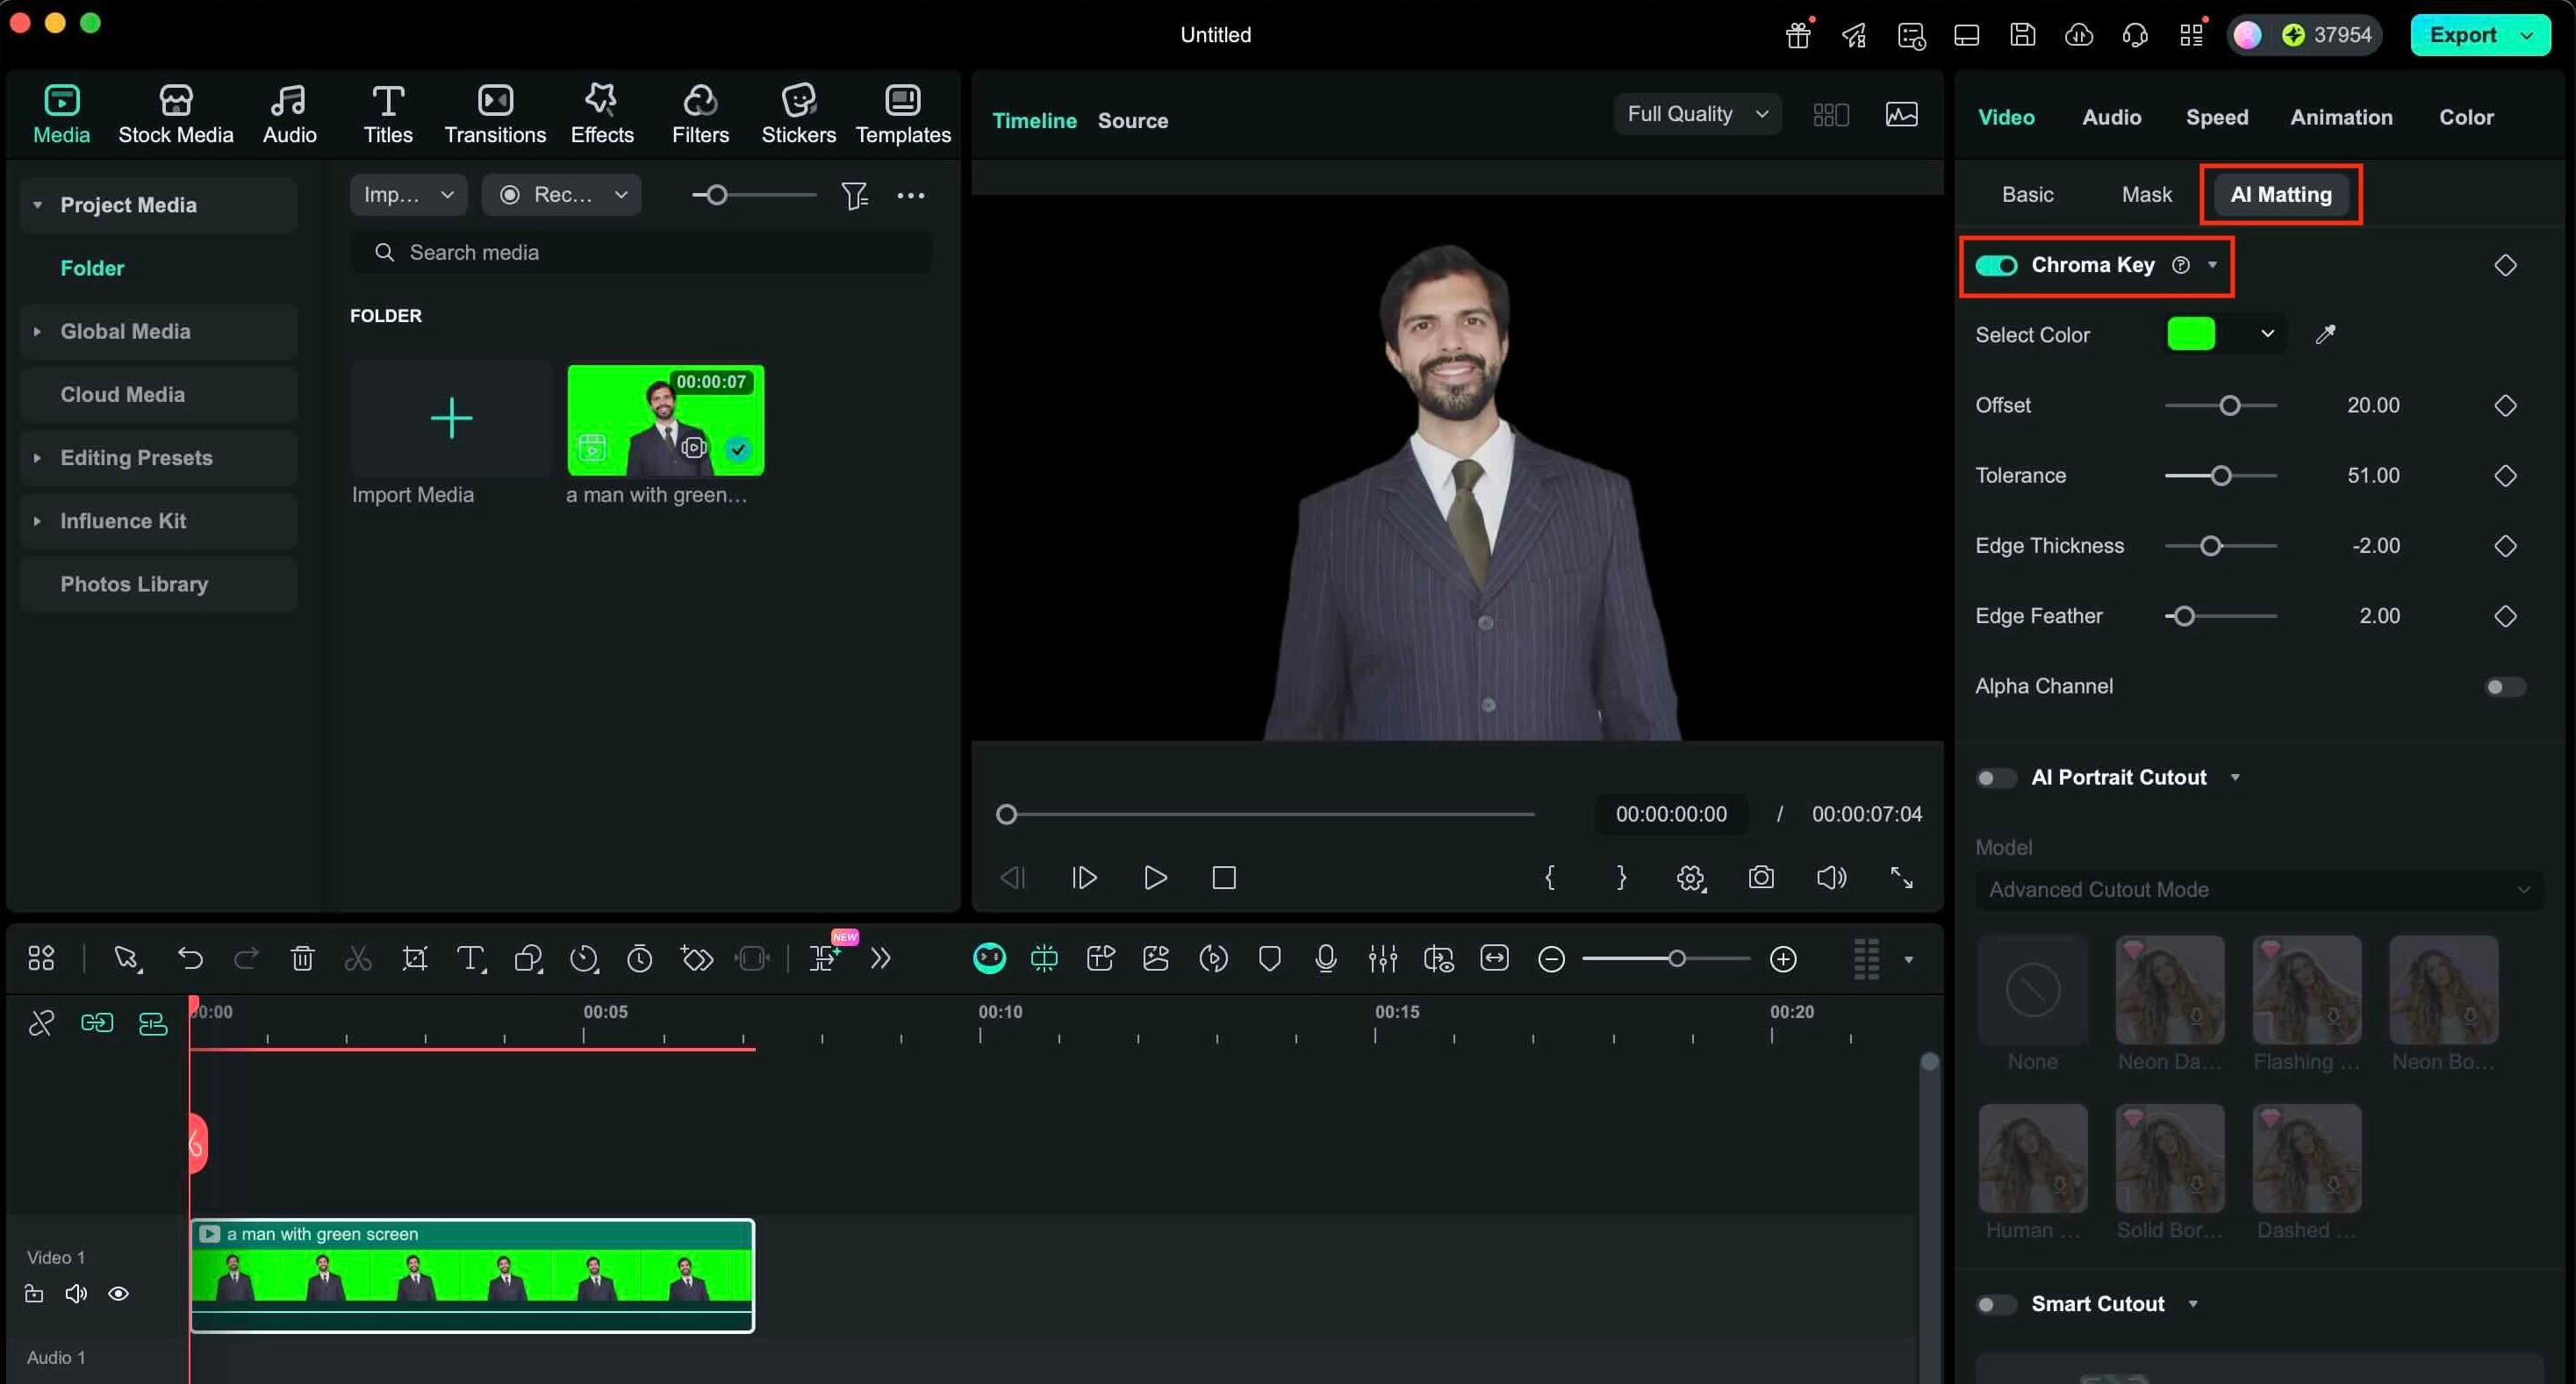
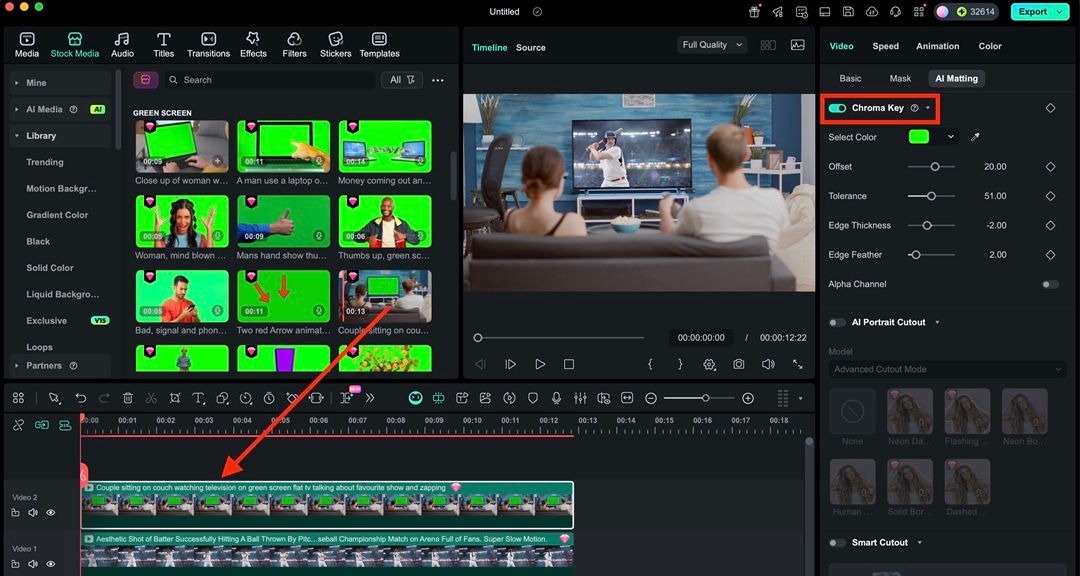
Double click the clip in the timeline, and choose Chroma Key from AI Matting under the Video tab.
Select the color you want to remove
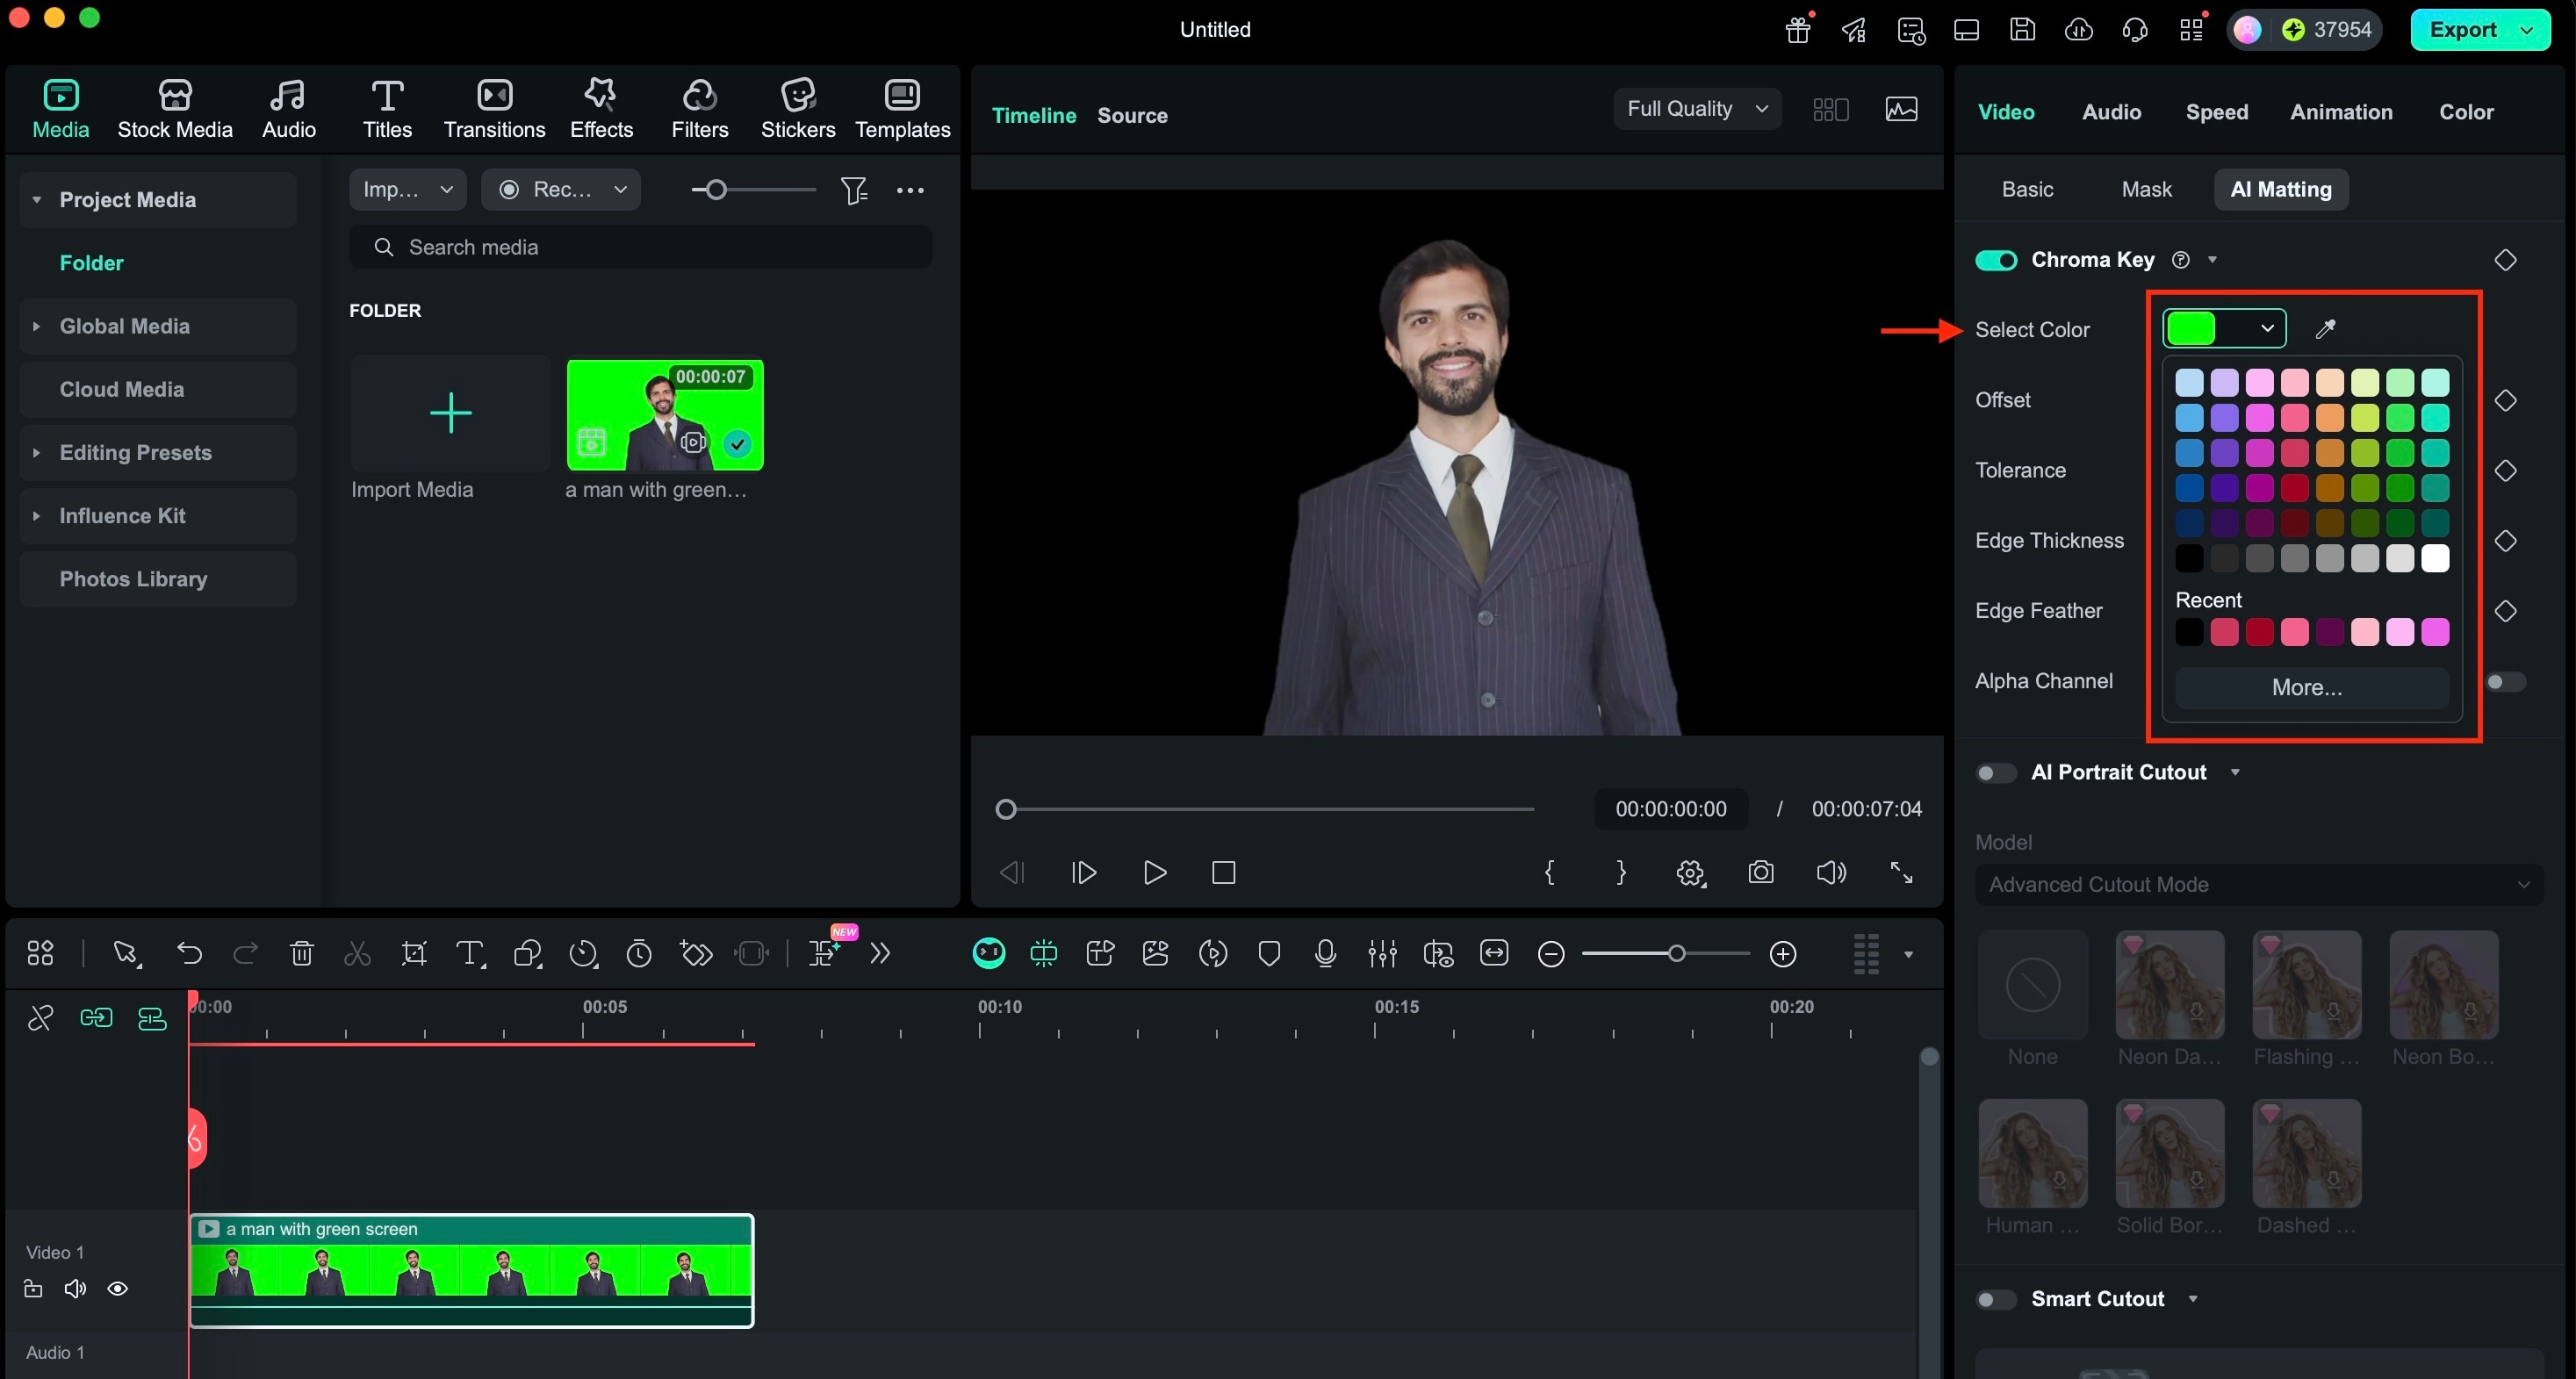
In the Preview window, use the Eyedropper tool to select a color in the image or video clip that you want to make transparent.
Adjust Settings
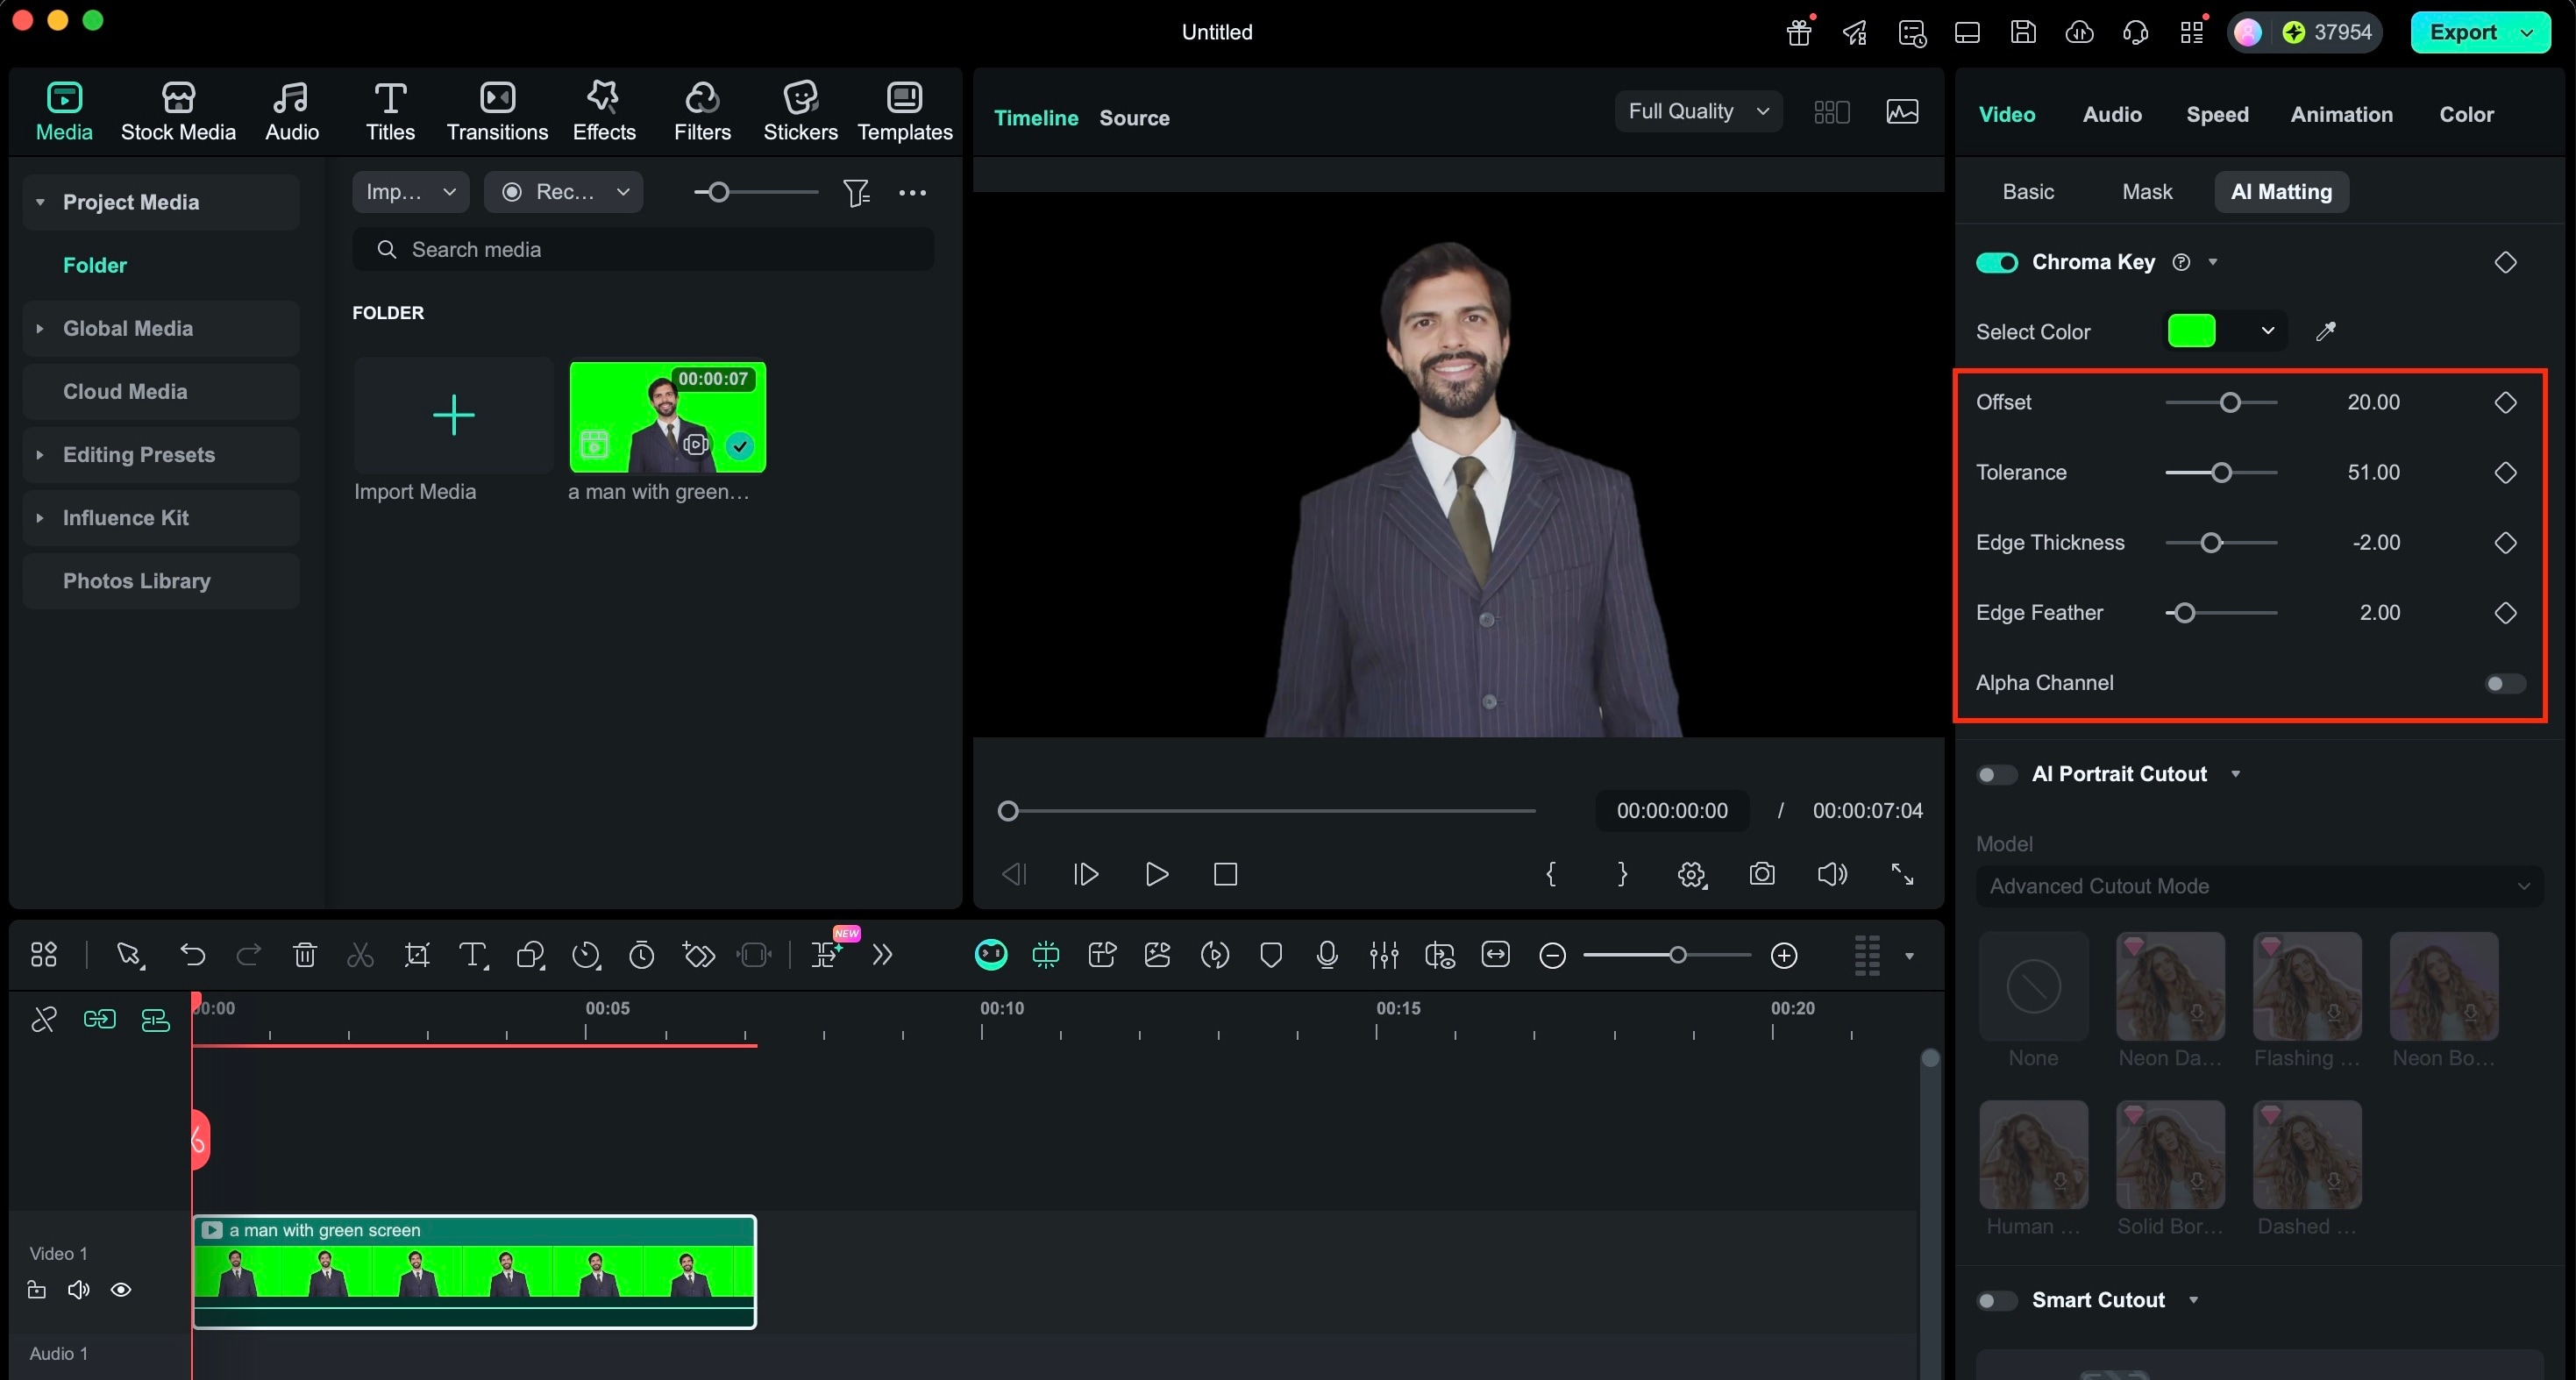
In the video, you can change the borders, transparency, shadows, and much more by adjusting the following settings
- Offset: adjusts the visibility of the backdrop
- Tolerance: controls the width of the range of hues of the key color
- Edge Feather: softens the edges
- Edge Thickness: adjusts the edges of the subject
- Alpha Channel: turns anything keyed out appearing black and anything not keyed out appearing white.
Creative Ideas to Use Chroma Key
The Chroma key makes a color range in the clip's top layer transparent, allowing the background video clip or image to show through.
Import Green Screen templates from Media Library
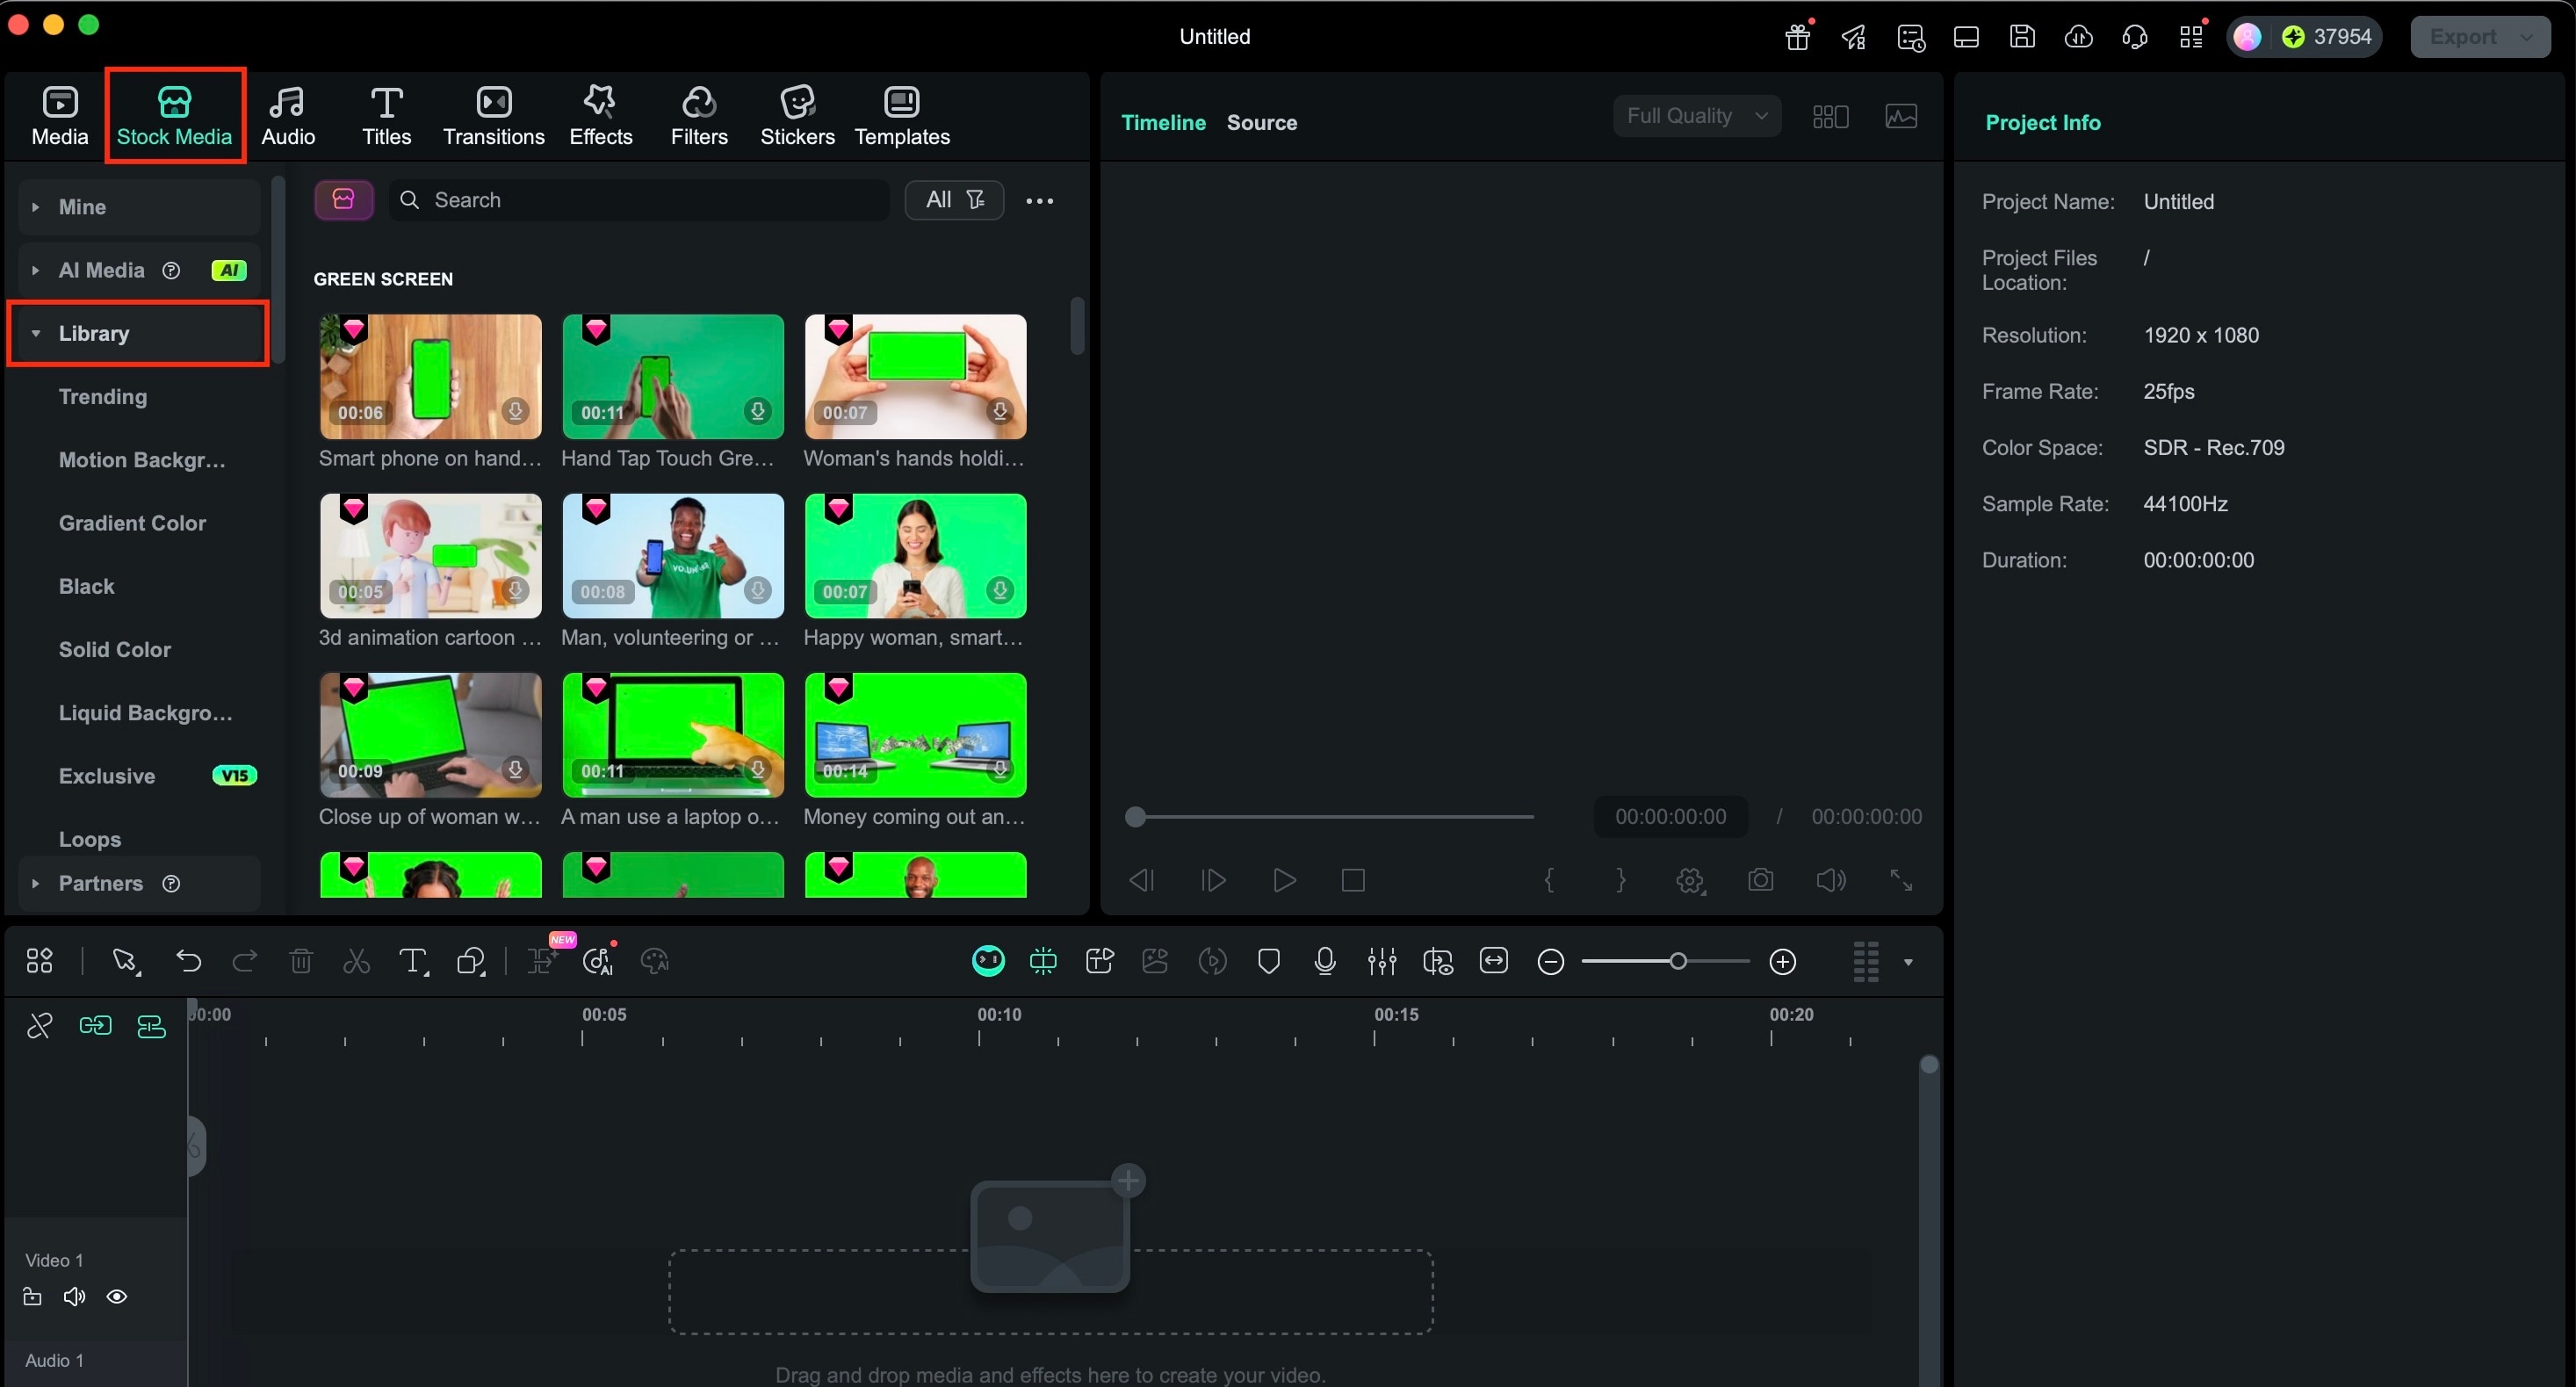
In the Media Library, add your background video and green screen clip.
Remove Green Screen with Chroma Key
Drag your media files to the timeline and put your green screen file above. Double click the green screen file and enable the Chroma Key option. The background color will be removed automatically.
Related Posts
Featured Articles
How to Make Story Highlights on Instagram + A Superior Option
Do you want to share your favorite moments with the world, but you're not sure how to make story highlights? Today, we're going to change that!
How To Blur Face in Videos With Avidemux
If you are searching for steps to complete face blur in Avidemux then the details available below can help you to understand this process completely.
How I Animate Discord Profile Pictures (& You Can Too)
Animated display pictures are very appealing and there is no doubt they make your profile stand out from the competition. The same is the case when you choose animated pictures for discord. Nitro and other tools are helpful in doing so.
Recommended User Guide
AI Mate Editing for Mac
AI assistants are necessary when editing videos, and Filmora's V13 upgrade has introduced its own AI assistant named AI Mate.
AI Object Remover For Mac
Want to remove unwanted objects from videos or photos? Try Filmora's AI object remover now.
AI Smart Search for Mac
Do you have a lot of videos to navigate to find the exact video clip? Try Wondershare Filmora's AI smart search to find the video clips quickly!
