For the Best Results, Use the Latest Version.
Filmora User Guide for Mac
-
Preparations for Mac
-
Account (Mac)
-
Get Started & Basic Settings (Mac)
- Release notes for Mac
- Latest Versions and Features for Mac
- Get Started on Mac - Full Guide
- Download/register/uninstall on Mac
- Panel Layout on Mac
- Keyboard shortcuts on Mac
- Touchbar on Mac
- Change playback quality on Mac
- Render preview files on Mac
- Manage Timeline on Mac
- Media for use on Mac
- Logo Reveal For Mac
- Marked Favorites for Mac
-
Compatibility & Tech Specs (Mac)
-
Performance Settings (Mac)
-
-
Creating Projects - Mac
-
Creating New Projects (Mac)
-
-
Importing & Recording - Mac
-
Importing (Mac)
-
Recording (Mac)
-
-
Video Editing for Mac
-
Basic Video Editing for Mac
- Edit Live Photos on Mac
- Enable/Disable Clip for Mac
- Magnetic Timeline For Mac
- Dual Monitor Setup for Video Editing on Mac
- Select All Clips on Timeline for Mac
- Auto Ripple for Mac
- Split & Cut Videos on Mac
- Compositing on Mac
- Crop and zoom on Mac
- Playback Zoom Level for Mac
- Change Speed on Mac
- Play Video in Reverse on Filmora for Mac
- Mark In and Mark Out for Mac
- Markers for Mac
- Group Clips in Filmora for Mac
- Customized Backgrounds for Videos and Images in Mac
- Video snapshot on Mac
- Freeze Frame on Mac
- Auto enhance on Mac
- Applying Drop Shadow for Mac
- Adjustment Layer for Mac
- Mark Clips in Filmora for Mac
- Video Editing Ruler – Mac
- Apply Transforming for Mac
-
Advanced Video Editing for Mac
- Text Animation Path for Mac
- Create Multi-Camera Clip for Mac
- Filmora Motion Blur | Mac
- Drawing Tools for Mac | Filmora Guide
- Compound Clips for Mac
- AI Video Enhancer for Mac
- Video Chapters in Filmora for Mac
- Filmora Flicker Removal Guide | Mac
- Multi-Clip Editing for Mac
- Keyframe Graph Editor for Mac
- Add Animation Keyframing in Filmora for Mac
- Mask on Mac
- PIP (Picture in Picture) in Filmora on Mac
-
AI-Powered Video Editing for Mac
- Smart Scene Cut for Mac
- Smart Short Clips for Mac
- Filmora AI Eye Contact - Mac
- Filmora Image to Video for Mac
- AI Idea to Video for Mac
- AI Text-to-Video for Mac
- Instant Cutter Tool on Mac
- AI Face Mosaic for Mac
- Filmora Image to Prompt for Mac
- Keyframe Path Curve for Mac
- Filmora AI Image Enhancer Guide – macOS
- Planar Tracking for Mac
- Filmora AI Relight - Mac
- AI Extend For Mac
- AI Script-to-Video for Mac
- AI Text-Based Editing in Mac
- Create With Instant Mode on Mac
- ChatGPT Plugin - AI Copywriting on Mac
- AI Smart Cutout in Filmora for Mac
- Auto reframe on Mac
- Lens Correction in Filmora for Mac
- AI Portrait Cutout on Mac
- Scene detection on Mac
- AI Smart Masking for Mac
- AI Mate Editing for Mac
- Motion Tracking on Mac
- Video Stabilization for Mac
- AI Video/Photo Object Remover for Mac
- AI Smart Search for Mac
- AI Skin Tone Protection for Mac
- Green screen on Mac
- Super Slow Motion with Optical Flow for Mac
- AI Stylizer for Mac
- Video Denoise for Mac
-
-
Audio Editing for Mac
-
Basic Audio Editing for Mac
-
Advanced Audio Editing for Mac
-
AI-Powered Audio Editing for Mac
- Audio To Video for Mac
- AI Sound Effect for Mac
- Smart BGM Generation on Mac
- AI Voice Enhancer for Mac
- Audio Stretch for Mac
- AI Audio Denoise for Mac
- Auto Synchronization on Mac
- AI Vocal Remover for Mac
- AI Auto Beat Sync for Mac
- AI Music Generator for Mac
- AI Voice Cloning on Mac
- Silence Detection on Mac
-
-
Text Editing for Mac
-
Basic Text Editing for Mac
-
Advanced Text Editing for Mac
-
AI-Powered Text Editing for Mac
-
-
Video Customizations for Mac
-
Video Effects (Mac)
-
Audio Effects (Mac)
-
Transitions (Mac)
-
Stickers (Mac)
-
Filters (Mac)
-
Color Editing (Mac)
-
Animations (Mac)
-
Templates (Mac)
-
Asset Center (Mac)
-
-
Exporting & Share & Cloud Backup - Mac
Filmora Tutorial Videos
Filmora 13 & 14 User Guide in PDF
Filmora 12 User Guide in PDF
Filmora 11 User Guide in PDF
Filmora 9 & 10 User Guide
Video Chapters in Filmora for Mac
Adding chapter markers to long-form videos manually can be a time-consuming process, especially when every edit requires you to readjust visual elements. Video Chapters in Filmora for Mac simplify this workflow by automatically generating a chapter-based progress bar from the timestamps and titles you define. Once your chapters are created, Filmora builds a segmented navigation bar that updates according to your video's structure.
The Video Chapters feature is ideal for creators who produce long-form content, including tutorials, online courses, product reviews, webinars, corporate training videos, and travel vlogs. It helps viewers navigate videos more easily while giving creators a faster way to build professional-looking chapter-based progress bars that automatically adapt to timeline changes.
Key Features of Video Chapters
- Chapter Creation and Management: Add, delete, or rearrange chapters whenever needed. Each chapter supports a title of up to 50 characters, including emojis.
- Chapter Text Styling: Customize font family, font size, font color, bold/italic, alignment, uppercase/lowercase, letter spacing, outline, shadow, text opacity, and background styling.
- Progress Bar Personalization: Customize height, corner radius, border thickness, played/un-played colors, opacity, divider appearance, and shadow settings. Filmora automatically sizes each segment based on chapter duration.
- Playhead Customization: Use a built-in rectangular playhead or upload a custom PNG/animated GIF. Adjust position, scale, color, opacity, and vertical offset.
How to Use Video Chapters in Filmora for Mac
The Video Chapters feature automatically embeds chapter-based navigation into your exported video. Follow the steps below to configure and export your project:
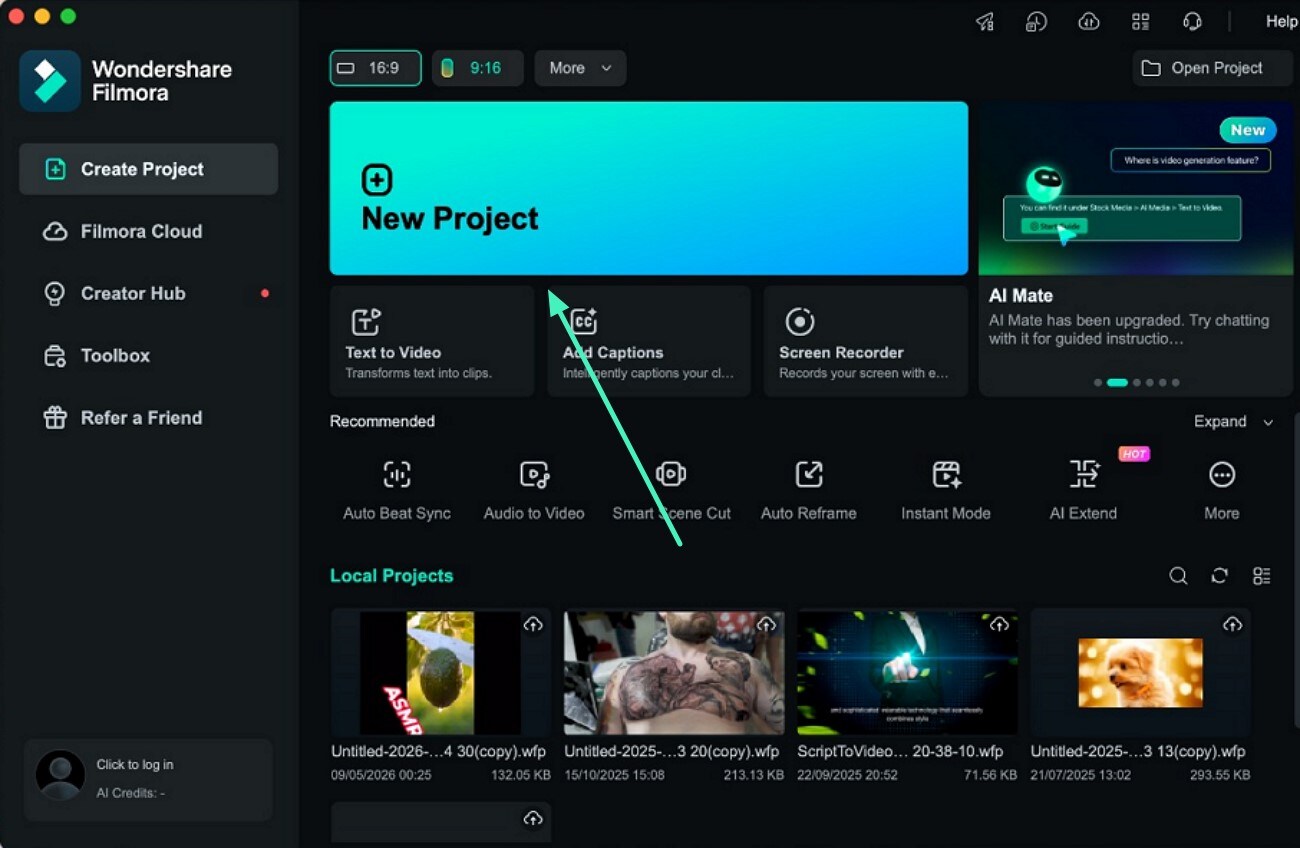
Step 1. Create a New Project
Open Filmora on your Mac and click Create Project from the home screen. Import your video files and drag them onto the timeline to begin editing.
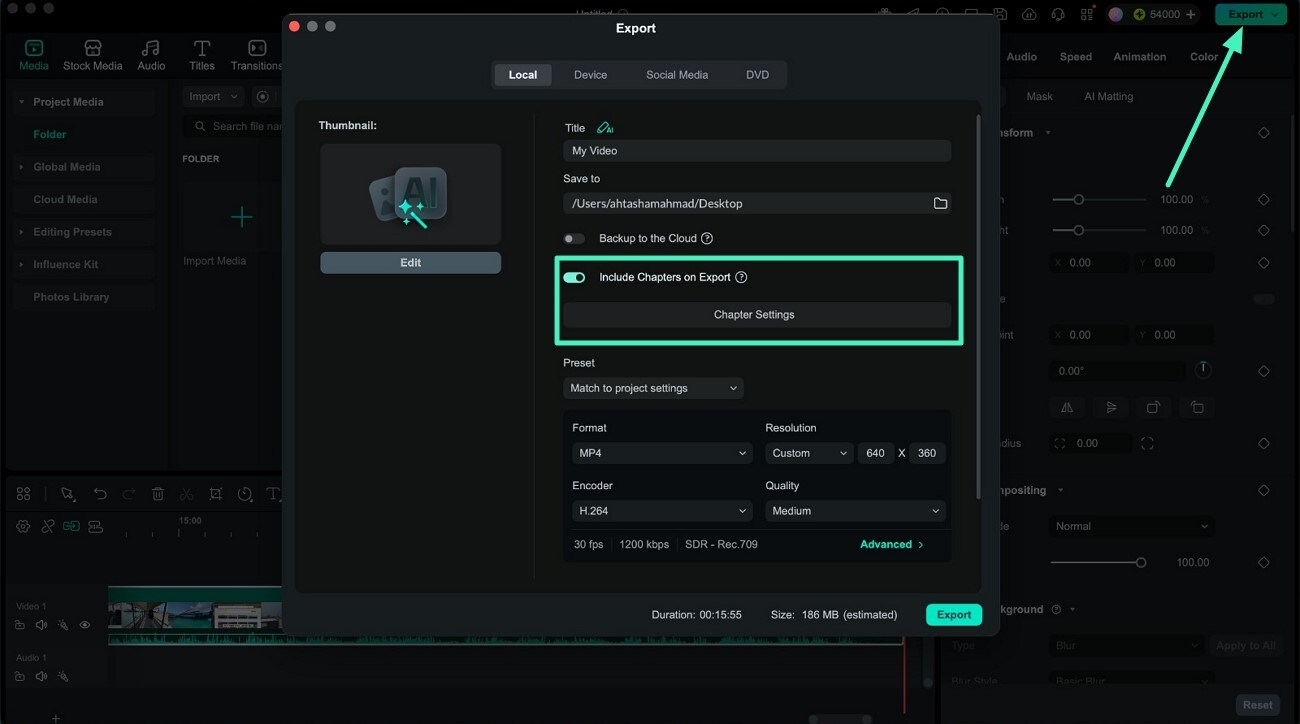
Step 2. Access the Chapter Settings
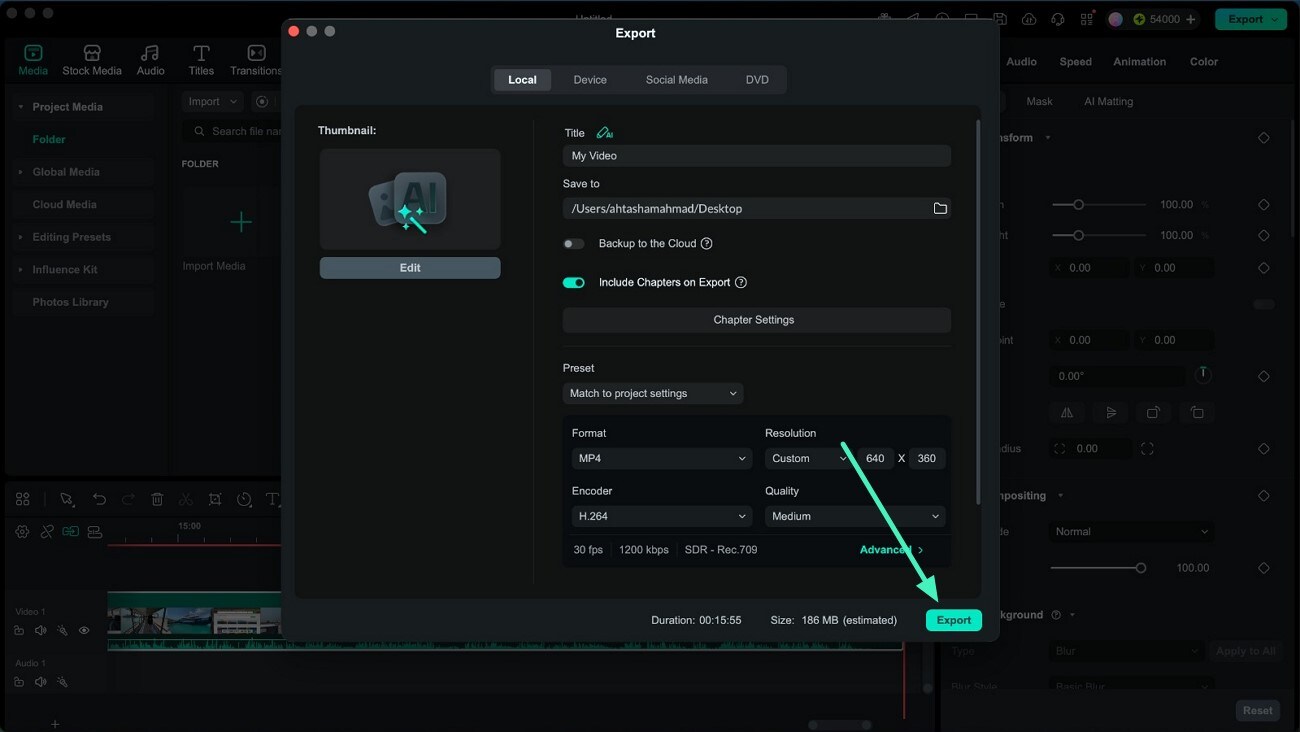
After finishing your edits, click the Export button in the upper-right corner. In the export window, enable Include Chapters on Export, then click Chapter Settings to open the configuration panel.
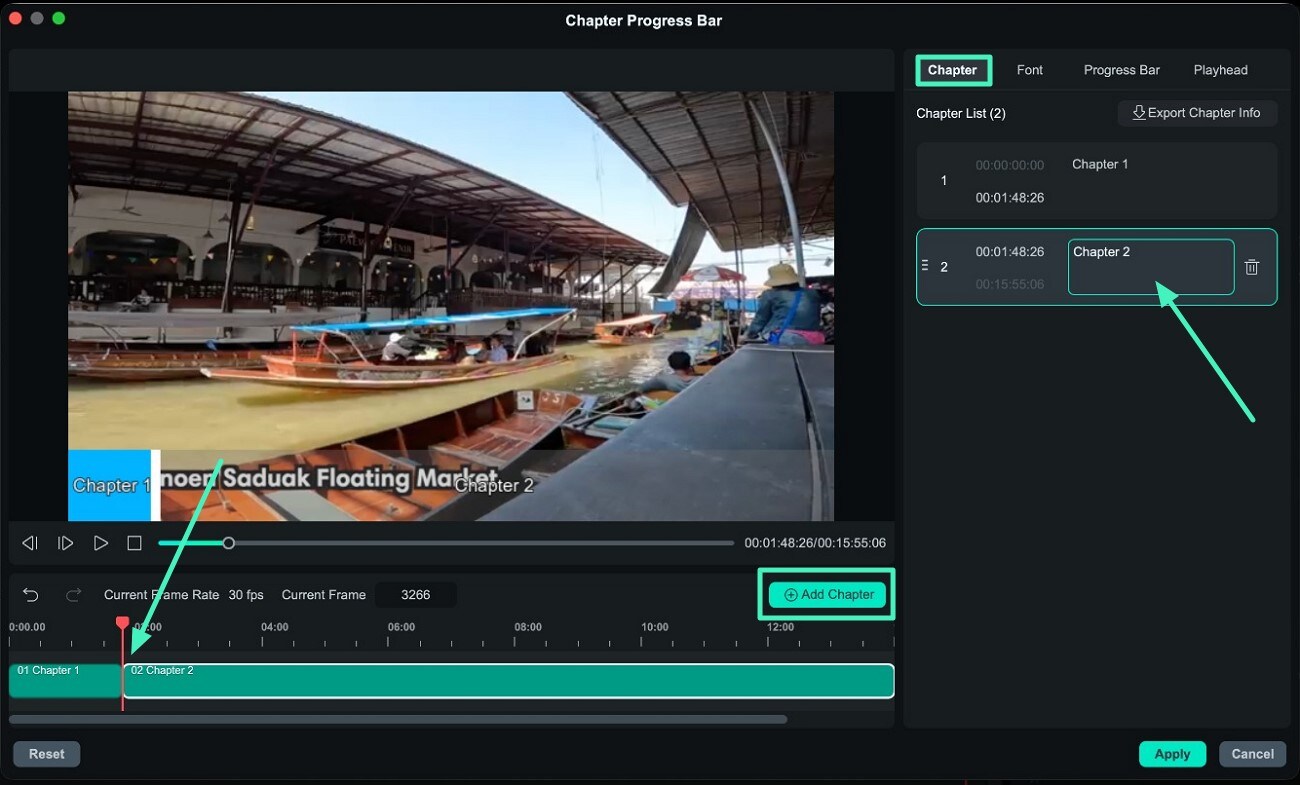
Step 3. Add Chapter Markers
Move the playhead to the point where a new section should begin and click Add Chapter. Enter a title for the chapter, then repeat the process until all sections of your video are marked.
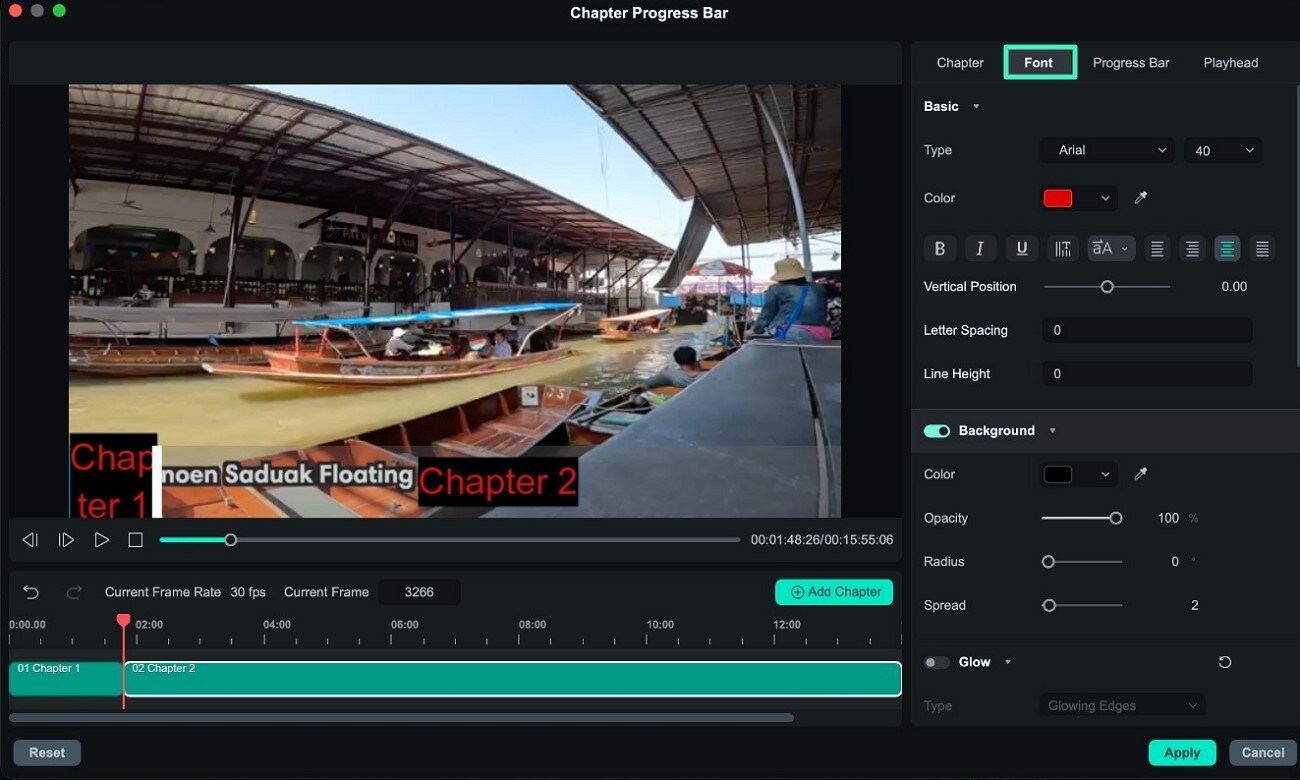
Step 4. Customize the Chapter Text
Open the Font section to personalize the appearance of your chapter titles. You can adjust the font, size, color, outline, shadow, spacing, and background according to your preferred style.
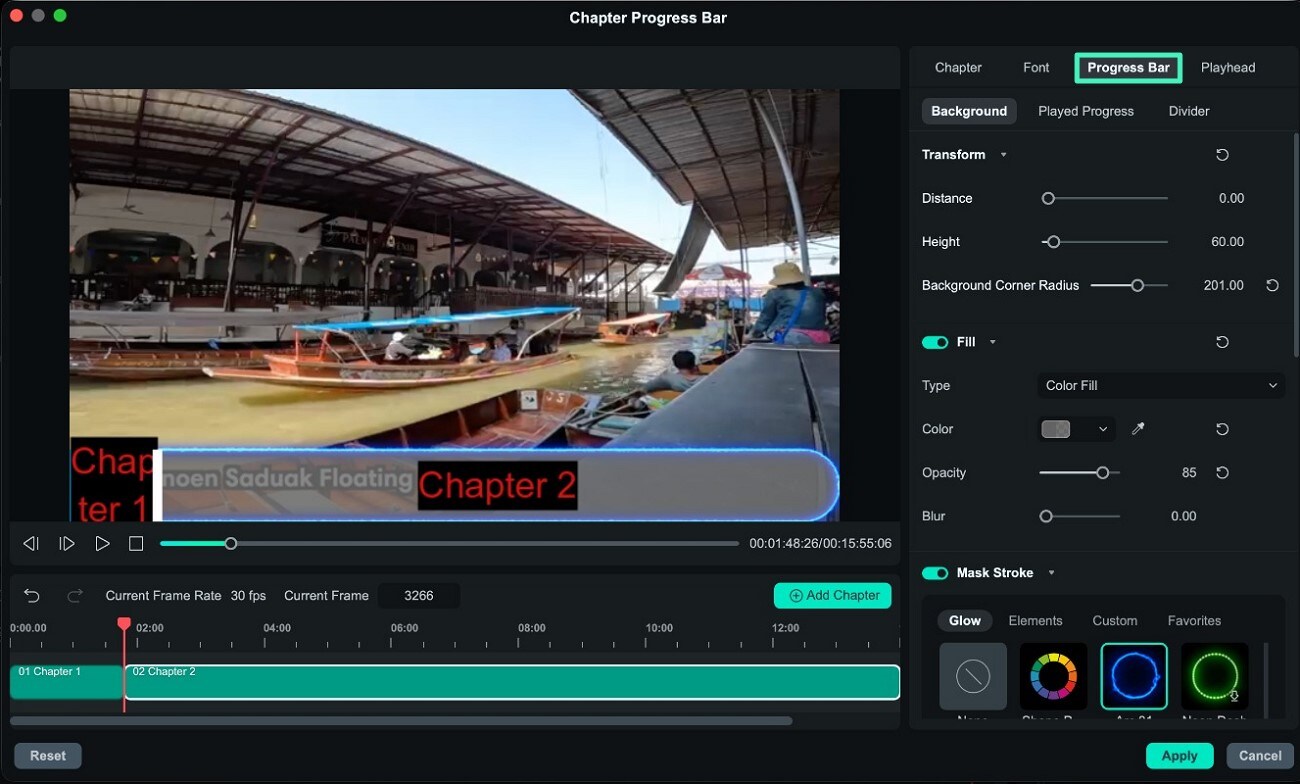
Step 5. Configure the Progress Bar
Expand the Progress Bar section and customize its appearance by modifying the background, played progress, un-played progress, dividers, strokes, fills, and other visual settings.
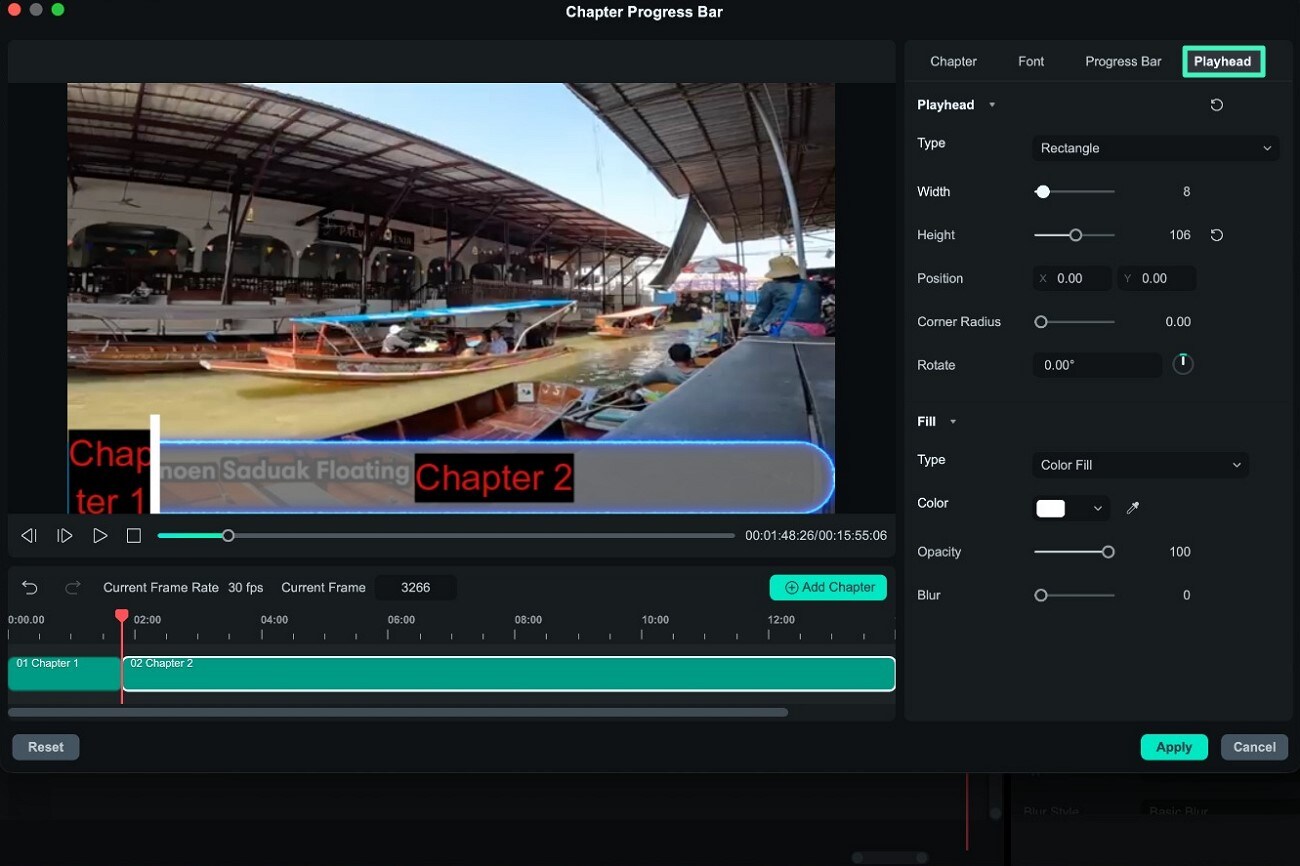
Step 6. Personalize the Playhead
Open the Playhead section and adjust the playback indicator. You can change its position, size, color, opacity, or replace it with a custom PNG or GIF. Click Apply after completing your adjustments.
Step 7. Export the Video
Return to the export window and click Export. Filmora will finalize the video with the customized chapter-based progress bar applied automatically.
Related Posts
Featured Articles
Learn more popular articles from Wondershare.
How to Merge Clips in DaVinci Resolve: Best Ways
Want to make a single video from different clips? Follow these ways to learn about how to merge clips in DaVinci Resolve.
Samsung Remove Background: The Best Ways to Erase Image Backgrounds
Learn how to use Samsung Remove Background to erase image backgrounds on your phone. This guide also covers background removal on a computer and a bonus tip for videos.
Snapchat AR Filters: Top Lenses and How to Use It
Find out how Snapchat AR filters works and which top lenses to try! You can also learn how to create one and elevate your video to make a stand out Snap!
Recommended User Guide
Learn how to use more features.
Multi-Clip Editing for Mac
Multiple clip editing makes editing so easy, and Filmora also offers this.
Text Animation Path for Mac
Filmora has introduced an exciting new feature—Text Path Animation. It enables creators to animate text along a customizable path, making it easier to emphasize key phrases, titles, or special effects in videos. Here's everything you need to know to make the most of this feature and enhance your video content.
Filmora Flicker Removal Guide | Mac
Learn how to use Filmora Flicker Remover on Mac to remove video flicker and fix lighting issues quickly and easily.
