For the Best Results, Use the Latest Version.
-
Preparations
-
Account
-
Get Started & Basic Settings
-
Compatibility & Tech Specs
-
Performance Settings
-
-
Creating Projects
-
Creating New Projects
-
-
Importing & Recording
-
Video Editing for Windows
-
Basic Video Editing
- Enable/Disable Clip in Windows
- Magnetic Timeline for Windows
- Dual Monitor Setup for Video Editing on Windows
- Select All Clips on Timeline for Windows
- Manage Timeline and Tracks on Windows
- Auto Ripple for Windows
- Split & trim video
- Crop & Pan & Zoom Video
- Compositing
- Change Video Speed on Windows
- Playing videos in reverse
- Mark In and Mark Out for Windows
- Markers for Windows
- Group editing
- Customizable Backgrounds for Videos and Images in Windows
- Video snapshot
- Using freeze frame
- Logo Reveal For Windows
- Apply auto enhance
- Applying drop shadow
- Adjustment layer for Windows
- Transforming
- Video Editing Ruler – Windows
-
Advanced Video Editing
- Drawing Tools for Windows | Filmora Guide
- Create Multi-Camera Clip
- Compound Clip for Windows
- Multi-Clip Editing for Windows
- Filmora Motion Blur | Windows
- Filmora Flicker Removal Guide | Windows
- Apply mask to video
- Creating a PIP effect
- Keyframe Graph Editor for Windows
- Add animation keyframing for Windows
- Keyframe Path Curve for Windows
-
AI-Powered Video Editing
- Smart Scene Cut for Windows
- Smart Short Clips for Windows
- AI Face Mosaic for Windows
- Filmora AI Eye Contact- Windows
- AI Video Enhancer for Windows
- AI Text-to-Video for Windows
- Planar Tracking for Windows
- AI Idea to Video for Windows
- Filmora Image to Video for Windows
- Filmora Image to Prompt for Windows
- Instant Cutter Tool for Windows
- AI Extend
- Filmora AI Relight - Windows
- Filmora AI Image Enhancer Guide - Windows
- AI Script to Video Guide for Windows
- AI Text-Based Editing for Windows
- AI Mate Editing for Windows
- Create with instant mode
- ChatGPT Plugin - AI Copywriting
- AI Smart Cutout
- Lens correction on Windows
- Auto reframe video
- AI Portrait Cutout
- Scene detection feature
- AI Smart Masking for Windows
- Make motion tracking
- Video Stabilization for Windows
- AI Video/Photo Object Remover for Windows
- AI Smart Search for Windows
- AI Skin Tone Protection for Windows
- AI Image for Windows
- Chroma key (green screen)
- Super Slow Motion with Optical Flow for Windows
- Video Denoise for Windows
-
-
Audio Editing for Windows
-
Basic Audio Editing
-
Advanced Audio Editing
-
AI-Powered Audio Editing
-
-
Text Editing for Windows
-
Basic Text Editing
-
Advanced Text Editing
-
AI-Powered Text Editing
-
-
Video Customizations
-
Video Effects
-
Audio Effects
-
Transitions
-
Stickers
-
Filters
-
Color Editing
-
Animations
-
Templates
-
Asset Center
-
-
Exporting & Share & Cloud Backup
Advanced Export Options: Clips, Ranges, and Multi-Track Video
Beyond exporting your entire project, Filmora provides powerful, flexible options to export specific parts of your timeline or change how your audio is saved. This can dramatically optimize your editing workflow, whether you need to export a single clip, a specific time range, or your final video with multiple, separate audio tracks for advanced control.
If you are interested in mastering these advanced export methods in Filmora, follow this step-by-step procedure:
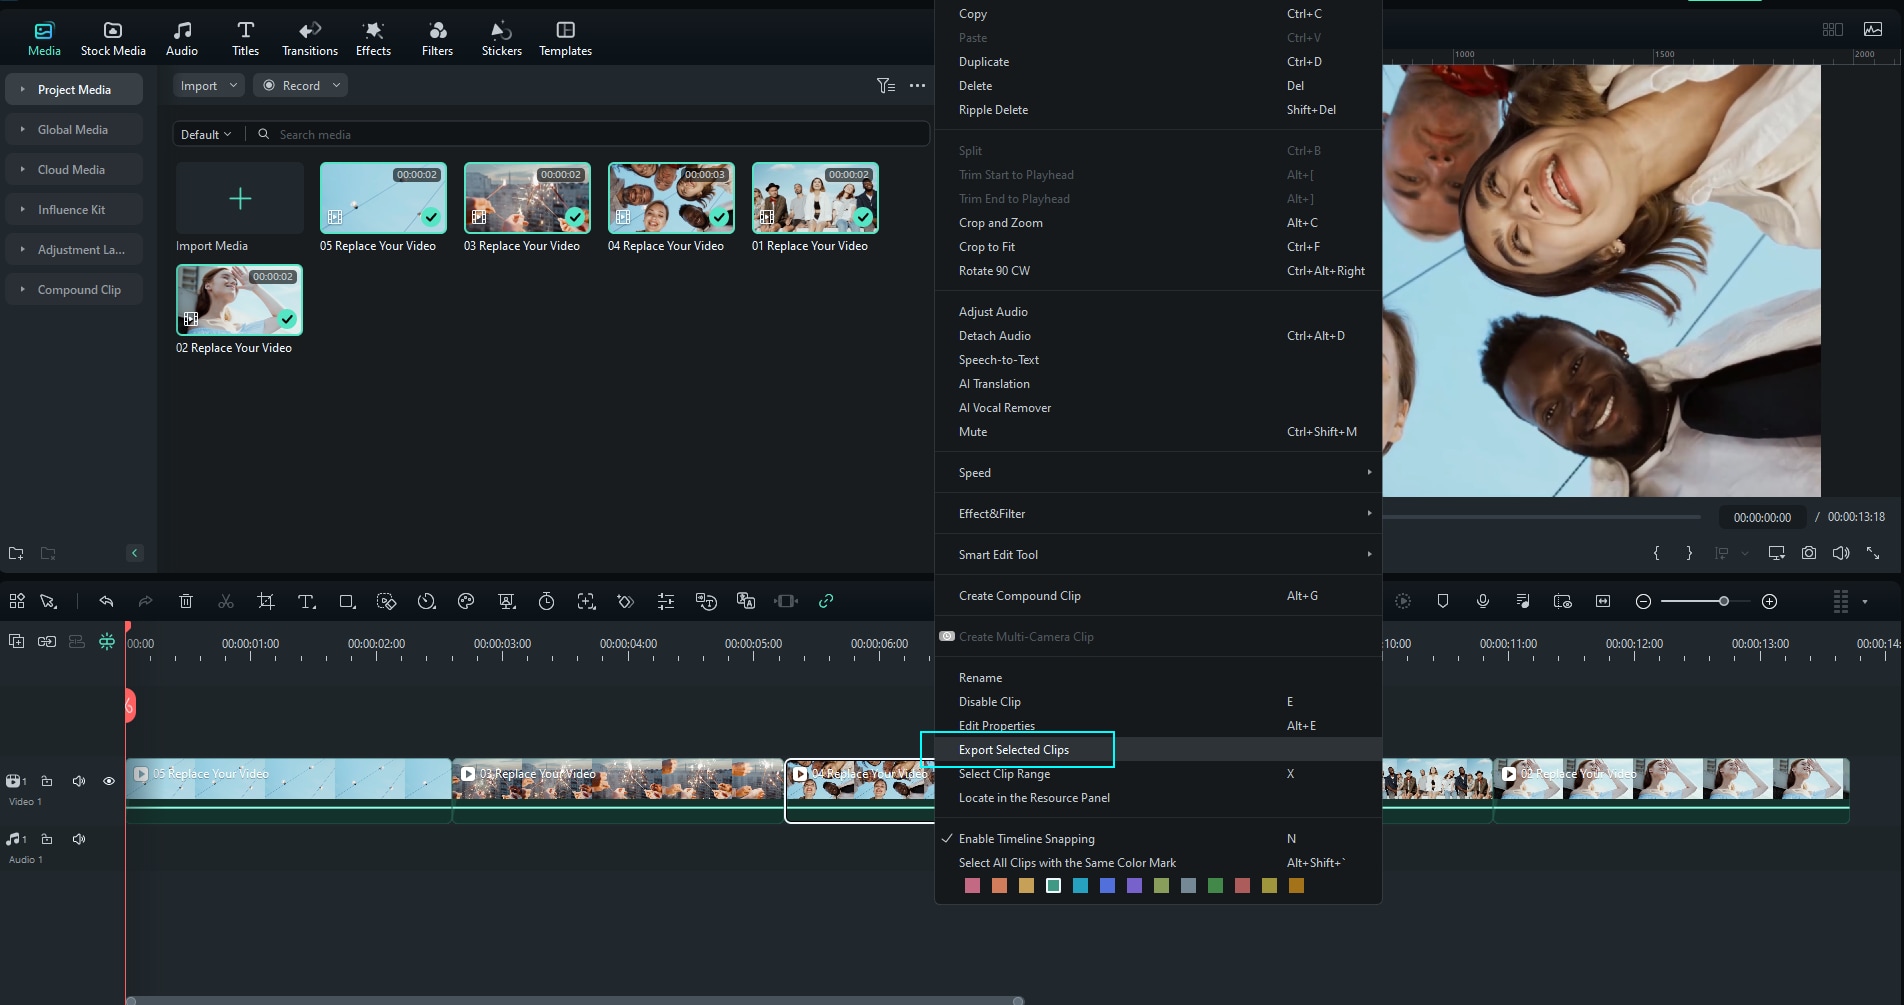
Export the Selected Clips
Step 1: Expand the Export Button
If you are editing many clips at once and want to export just one, right-click on the selected clip and choose "Export Selected Clips".
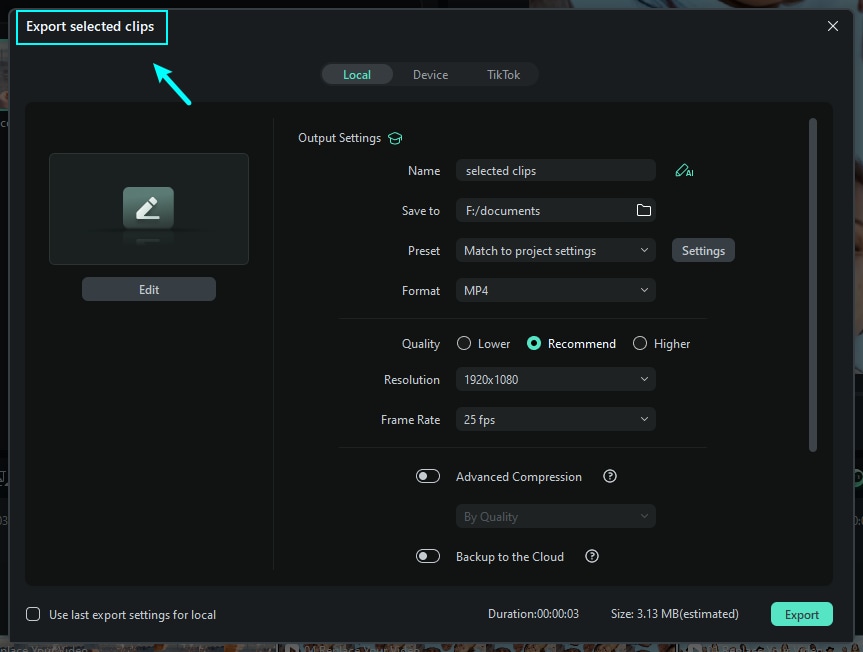
Step 2: Make Customizations in the New Window
Upon the new window opening, change the file name, location, frame rate, resolution, and other settings and hit the "Export" button to save this clip on your device.
Export Clip Range
To maintain the seamless editing flow in Filmora, users can set a specific range from the existing clip and export it. This function has many benefits, as users do not need to trim and export the clip. Scroll down to find more about how to export selected ranges with ease:
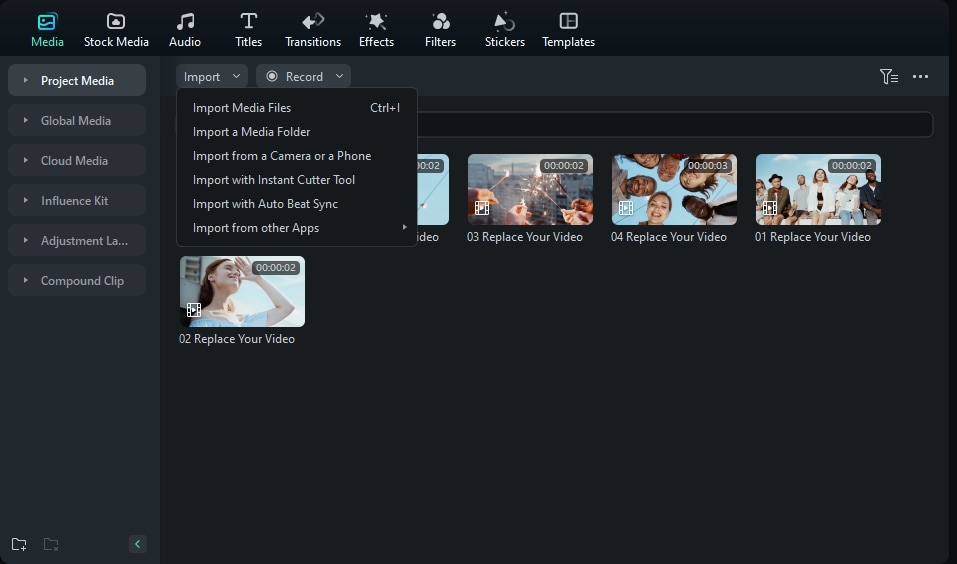
Step 1: Import Media Files to the Timeline
Launch Filmora on your computer, import your files, and add it to the timeline.
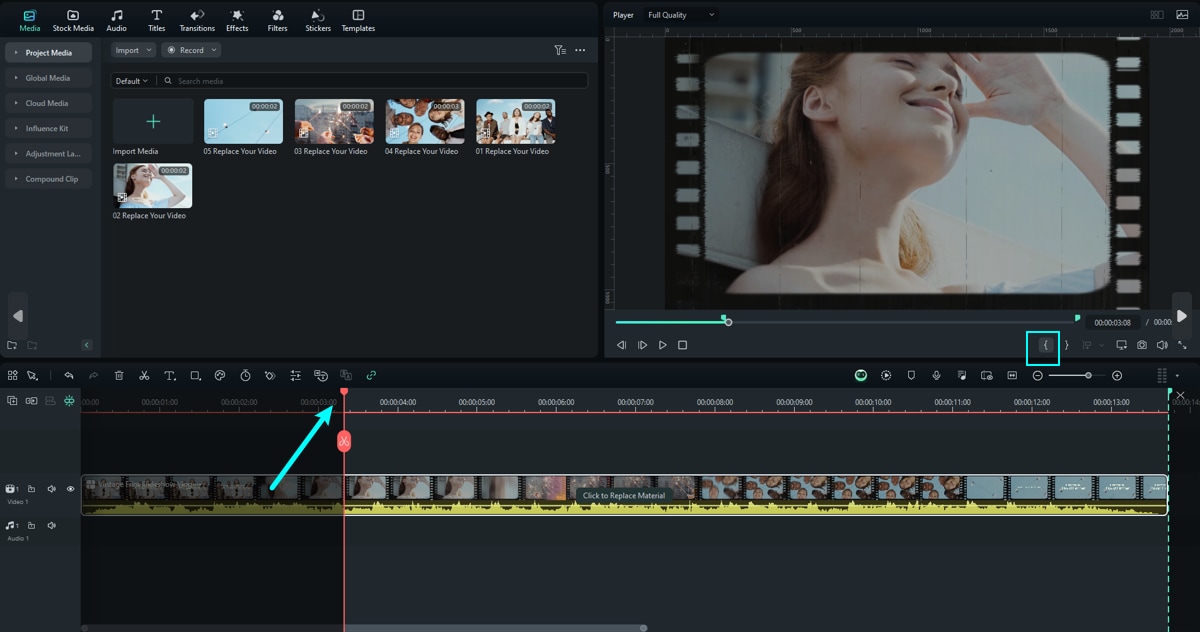
Step 2: Select the Start Point of the Clip Range
Once the clip has been imported in Filmora, hover towards the Preview Window and click the "{" icon, and a slider will appear to adjust the starting point of the clip. An alternative method for commencing the same action is using the "I" key to define the start and the "O" key to define the endpoint.
Step 3: Select the End Point of the Clip Range
Repeat the same process for adjusting the end point of this clip; however, choose the "}" icon this time.

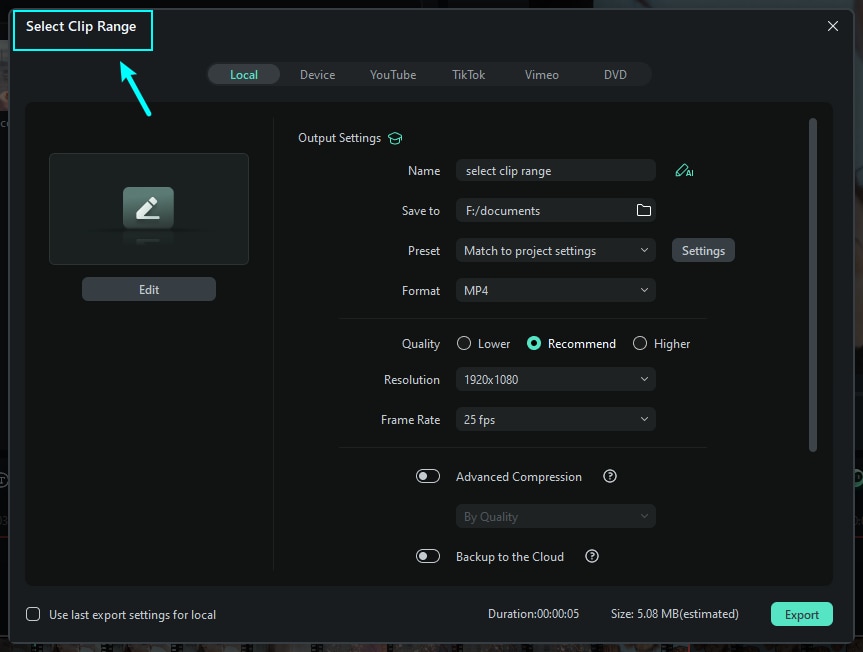
Step 4: Export the Clip Range
Once the clip range has been set, move towards the "Export" button and click it. A "Select Clip Range" window will appear; from there, set the relevant settings like the folder for your clip, its name, and more, and hit the "Export" button.
Export Multi-Track Video
This part presents the new export video with multiple audio tracks available in Filmora V15. It will address the growing need to have more versatile audio control in a wide range of video projects. This feature supports MP4/MOV files having up to 10 configurable audio tracks and is available as an option in the Advanced Parameters section of the export panel.
Dive into the steps below to get a better understanding of how to export a video with multiple audio tracks using Filmora:
Step 1. Import Video and Audio Files in Filmora
After you import your videos and audios, and finish all your video editing in the timeline, use the Playback buttons to preview the final video and hit the Export tab to move to the final step.
Step 2. Enable the Export Multi-Track Video Function
Next, at the Export window, hit the Advanced button. This will open up a new pop-up window. Here, scroll down and locate the Export Multi-Track Video toggle and turn it on. Choose the audio tracks you want to export and hit the Apply button, or you can also Save as Preset.
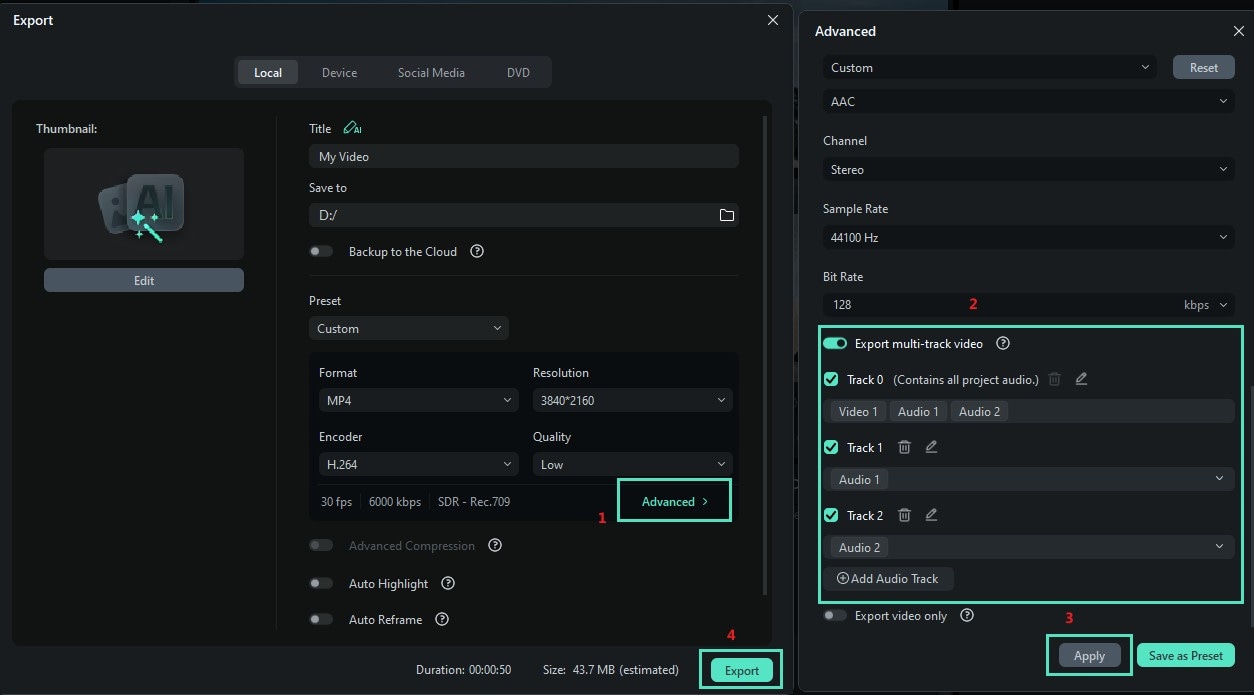
Then, back to the Export window, hit the Export button to download the video with multiple audio tracks.
Related Posts
Featured Articles
Make a Video out of Photos – A Detailed Step-by-Step Guide
Want to make a video out of pictures? Learn how to create exhilarating photo-to-video edits from scratch or use Filmora's templates for a seamless experience.
Where to Find Button Sound Effects for Your Videos
Need the perfect button sound effect for your videos? Check out our guide to find the best places to download or create your own button sounds that stand out.
How to Add Audio Recording and Voiceover on iMovie
To record audio or voiceover on iMovie, you can follow the steps outlined in this article. Open iMovie on your device and select the voiceover button.
Recommended User Guide
AI Thumbnail Creator
Filmora can generate attractive thumbnails for your videos with AI assistance.
Video Compressor on Windows
Learn how to convert video files to smaller sizes without any noticeable loss in quality with Filmora.
