For the Best Results, Use the Latest Version.
-
Preparations
-
Account
-
Get Started & Basic Settings
-
Compatibility & Tech Specs
-
Performance Settings
-
-
Creating Projects
-
Creating New Projects
-
-
Importing & Recording
-
Video Editing for Windows
-
Basic Video Editing
- Enable/Disable Clip in Windows
- Magnetic Timeline for Windows
- Drawing Tools fo Windows
- Dual Monitor Setup for Video Editing on Windows
- Select All Clips on Timeline for Windows
- Dual Monitor Setup for Video Editing on Mac
- Manage Timeline and Tracks
- Auto Ripple for Windows
- Split & trim video
- Crop & Pan & Zoom Video
- Compositing
- Change video playback speed
- Playing videos in reverse
- Mark In and Mark Out for Windows
- Markers for Windows
- Group editing
- Customizable Backgrounds for Videos and Images in Windows
- Video snapshot
- Using freeze frame
- Logo Reveal For Windows
- Apply auto enhance
- Applying drop shadow
- Adjustment layer for Windows
- Transforming
- Video Editing Ruler – Windows
-
Advanced Video Editing
-
AI-Powered Video Editing
- Smart Scene Cut for Windows
- Smart Short Clips for Windows
- AI Face Mosaic for Windows
- AI Video Enhancer
- AI Text-to-Video for Windows
- Planar Tracking
- AI Idea to Video for Windows
- Image to Video for Windows
- Instant Cutter Tool for Windows
- AI Extend
- AI Script to Video Guide for Windows
- AI Text-Based Editing for Windows
- AI Mate Editing for Windows
- Create with instant mode
- ChatGPT Plugin - AI Copywriting
- AI Smart Cutout
- Lens correction
- Auto reframe video
- AI Portrait Cutout
- Scene detection feature
- AI Smart Masking for Windows
- Make motion tracking
- Stabilization
- AI Video/Photo Object Remover for Windows
- AI Smart Search for Windows
- AI Skin Tone Protection for Windows
- AI Image for Windows
- Chroma key (green screen)
- Super Slow Motion with Optical Flow for Windows
- Video Denoise for Windows
-
-
Audio Editing for Windows
-
Basic Audio Editing
-
Advanced Audio Editing
-
AI-Powered Audio Editing
-
-
Text Editing for Windows
-
Basic Text Editing
-
Advanced Text Editing
-
AI-Powered Text Editing
-
-
Video Customizations
-
Video Effects
-
Audio Effects
-
Transitions
-
Stickers
-
Filters
-
Color Editing
-
Animations
-
Templates
-
Asset Center
-
-
Exporting & Share & Cloud Backup
AI Audio Denoise for Windows
This guide shows how to denoise the audio without worrying about losing important sounds.
AI approach is trained by deep learning model with a great amount of data. It performs better in removing the noise, generating a new clear audio signal with distortion at the minimum.
Usage Scenarios
Audio Denoise is crucial in scenarios. A variety of jobs rely on this function to enhance the quality of each video and audio.
As for journalists, cleaning up the background noise in the audio recordings is very helpful. It allows you to clarify what interviewees say or listen clearly about a fast speech.
As for vloggers, reducing the background sound can let the audience hear your words even at a low and comfortable volume. It will result in more fans liking and following your account.
Apply AI Audio Denoise on Windows
Here is the guide on how to launch this tool on Windows.
Step 1: Select the audio you want to process
After launching the Filmora application and adding video or audio to the timeline, you need to click the clip you want to remove noises. Then, the audio settings window will appear on the right side of the interface.

Step 2: Make detailed adjustments
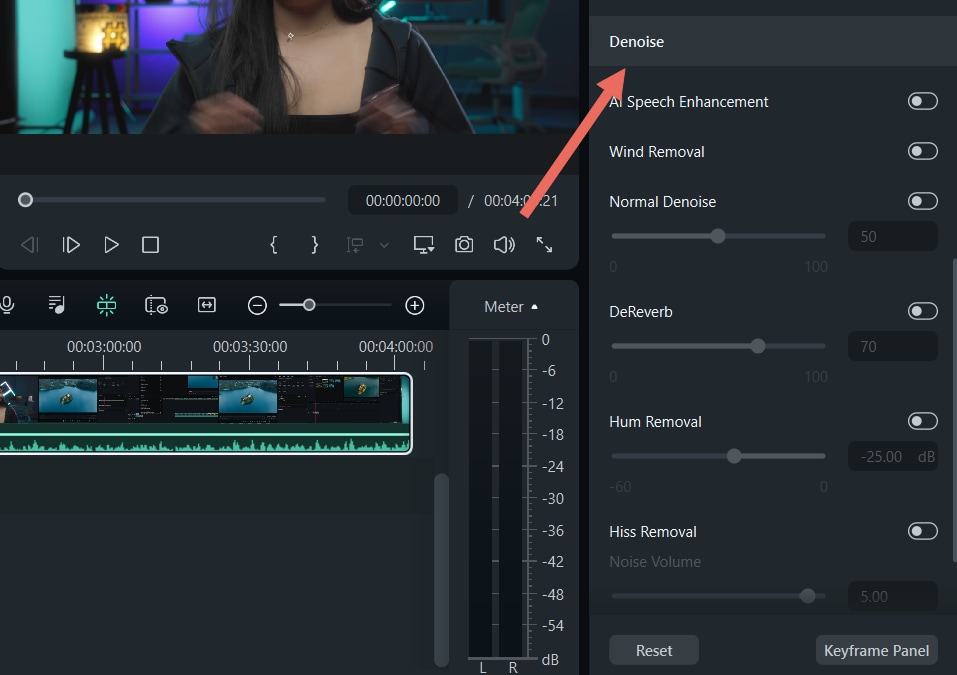
Slide the window to the bottom and click the button beside Denoise first to activate the function. Then, click the button on the right side of each tool to open the function and make precise adjustments.
Adjust This Feature
There are 6 modes: AI Speech Enhancement,Wind Removal,Normal Denoise,DeReverb,Hum Removal, and Hiss Removal.
1 AI Speech Enhancement
AI speech enhancement refers to the use of artificial intelligence (AI) algorithms and techniques to improve the quality of speech signals in various environments. These algorithms are designed to reduce or eliminate unwanted background noise, reverberation, and distortion, making the speech signal more intelligible and easier to understand. AI speech enhancement can be applied in various applications, such as telecommunications, hearing aids, voice assistants, and audio recordings.
2 Wind Removal
Wind Removal specializes in removing the noise of the wind. It estimates the reverberation profile and works out a way to change the amount of reverberation. You can choose whether to turn on or turn off the function.
3 Normal Denoise
Normal noise is any usual noise that appears in the audio. There are three setting options, Low, Mid, and Strong. You need to decide to which extent you want to remove noise. Lower settings apply less processing, retaining more audio in the original input.
4 DeReverb
Wind Removal specializes in removing the noise of the wind. It estimates the reverberation profile and works out a way to change the amount of reverberation. You can choose whether to turn on or turn off the function.
5 Hum Removal
Hum noise refers to the hum or hiss sound. Hum Removal plays a significant role in removing narrow frequency bands as well as their harmonics. You can control the amount of noise you want to reduce, with the range from -60 to 0.
6 Hiss Removal
Hiss Removal is a technique used to reduce or eliminate hissing noise in audio recordings. Hissing noise, or hiss, is a high-frequency noise that often results from the recording equipment or environmental noise. This noise can be persistent and can detract from the overall quality of the audio. Hiss Removal technology works by detecting and filtering out these high-frequency noises, resulting in a clearer and more professional-sounding recording.
Re-edit AI Audio Denoise
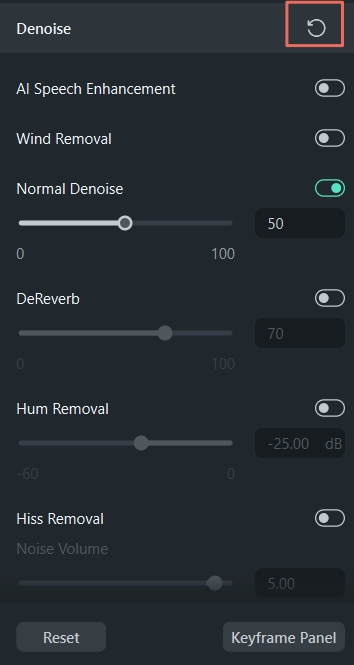
To reset all changes, you can click Reset at the bottom of the window or the refresh icon on the right side of the Denoise bar.

Related Posts
Featured Articles
Recording Like a Pro – How to Create Adobe Audio Recordings
Want to take your audio editing game to another level? Discover Adobe's voice recording software and learn to record and edit audio in this comprehensive guide.
[Solved] How to Fix Audio and Video Out-of-Sync Issues on Amazon Prime Video
Don’t let audio and video sync issues ruin your Amazon Prime Video experience. Check out our guide to quickly address and fix these issues and enjoy smoother streaming.
2025 Updated | 4 Easiest Ways to Crop Videos for TikTok
If you're curious about the most effective way to crop your video for TikTok, you've come to the right place. Keep reading to learn more.
Recommended User Guide
Auto synchronization
This guide helps you match your audio with your video and make the sound clear.
AI Sound Effect
Generate custom sound effects quickly with our AI tool. Just enter descriptive keywords to create personalized audio, set the duration and quantity, and preview or download the effects. Easily add them to your video timeline. Note that sound effects are available for download for 30 days. Enhance your videos with tailored audio effortlessly!
Audio To Video
Audio to Video is a technology that allows users to upload audio, with AI automatically generating corresponding video content. The AI analyzes the audio to create visuals that match its tone, message, and mood, streamlining the process of creating synchronized audio-visual content.
