For the Best Results, Use the Latest Version.
-
Preparations
-
Account
-
Get Started & Basic Settings
-
Compatibility & Tech Specs
-
Performance Settings
-
-
Creating Projects
-
Creating New Projects
-
-
Importing & Recording
-
Video Editing for Windows
-
Basic Video Editing
- Enable/Disable Clip in Windows
- Magnetic Timeline for Windows
- Drawing Tools fo Windows
- Dual Monitor Setup for Video Editing on Windows
- Select All Clips on Timeline for Windows
- Dual Monitor Setup for Video Editing on Mac
- Manage Timeline and Tracks
- Auto Ripple for Windows
- Split & trim video
- Crop & Pan & Zoom Video
- Compositing
- Change video playback speed
- Playing videos in reverse
- Mark In and Mark Out for Windows
- Markers for Windows
- Group editing
- Customizable Backgrounds for Videos and Images in Windows
- Video snapshot
- Using freeze frame
- Logo Reveal For Windows
- Apply auto enhance
- Applying drop shadow
- Adjustment layer for Windows
- Transforming
- Video Editing Ruler – Windows
-
Advanced Video Editing
-
AI-Powered Video Editing
- Smart Scene Cut for Windows
- Smart Short Clips for Windows
- AI Face Mosaic for Windows
- AI Video Enhancer
- AI Text-to-Video for Windows
- Planar Tracking
- AI Idea to Video for Windows
- Image to Video for Windows
- Instant Cutter Tool for Windows
- AI Extend
- AI Script to Video Guide for Windows
- AI Text-Based Editing for Windows
- AI Mate Editing for Windows
- Create with instant mode
- ChatGPT Plugin - AI Copywriting
- AI Smart Cutout
- Lens correction
- Auto reframe video
- AI Portrait Cutout
- Scene detection feature
- AI Smart Masking for Windows
- Make motion tracking
- Stabilization
- AI Video/Photo Object Remover for Windows
- AI Smart Search for Windows
- AI Skin Tone Protection for Windows
- AI Image for Windows
- Chroma key (green screen)
- Super Slow Motion with Optical Flow for Windows
- Video Denoise for Windows
-
-
Audio Editing for Windows
-
Basic Audio Editing
-
Advanced Audio Editing
-
AI-Powered Audio Editing
-
-
Text Editing for Windows
-
Basic Text Editing
-
Advanced Text Editing
-
AI-Powered Text Editing
-
-
Video Customizations
-
Video Effects
-
Audio Effects
-
Transitions
-
Stickers
-
Filters
-
Color Editing
-
Animations
-
Templates
-
Asset Center
-
-
Exporting & Share & Cloud Backup
Workflow for Exporting
You will export the video when you will finish editing. Here is the workflow of exporting:
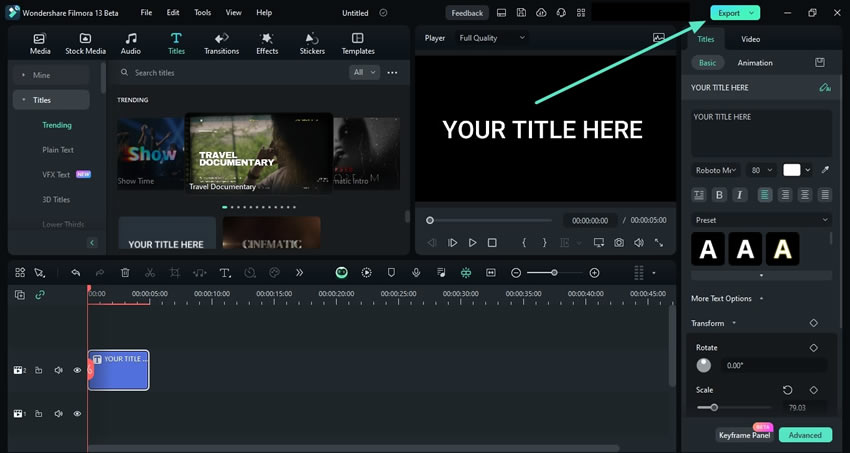
Step 1: Enable Export Settings
After importing your clip in the timeline and editing it, hover your cursor towards the top right corner of Filmora's editing window and click the "Export" button. Choose the one way you want to export and click the “Export” button. You will see your video in the specified position.

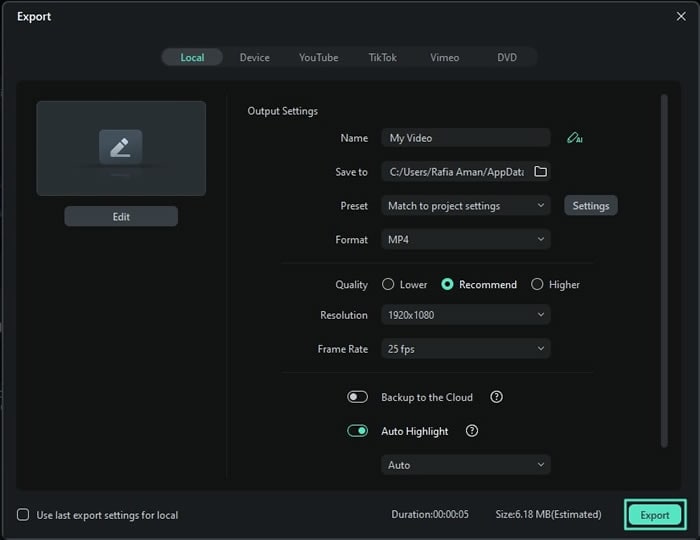
Step 2: Adjust the Export Settings
Commencing the prior action will feature an "Export" window on the screen from where you can customize the export settings. You can personalize your name, file location, format, resolution, and more settings from this window. Once you're through, click the "Export" button to save the file to your device.

To export one or more video clips, you can follow the below steps:
- Select one or more video clips on the timeline and right-click to export the clip(s) easily and fast instead of having to export the whole project.
- Now you’ll see a new window shows up, and you can now select the video format, quality level, the save path (local folder or devices) and other settings.
- Click the “Export” button to start exporting your desired video clip. You can preview the video and the rate of progress.
Related Posts
Featured Articles
How to Remove Background on InShot: The Complete Guide & Best Alternative
Remove background in InShot with this step-by-step guide. See its limitations and find a smarter AI-powered alternative for fast, precise background removal on videos.
Use No Watermark Video Cropper to Crop Your Videos Free
Explore the best video cropper with no watermark online and learn how to use it to crop your videos for free. No hidden cost—just follow the steps below.
Top 5 Motion Tracking Apps for Android/iPhone in 2025
Want to add text, graphics, or effects to moving objects in videos? Discover the best motion-tracking apps for iPhone and Android in 2025.
Recommended User Guide
Auto Highlight
This is a guide about the auto highlight feature in Filmora.
Export Selected Clips
There are various occasions when you edit multiple clips in a timeline and need to export any of them, and Filmora offers this functionality.
Video Compressor on Windows
Learn how to convert video files to smaller sizes without any noticeable loss in quality with Filmora.
