For the Best Results, Use the Latest Version.
-
Preparations
-
Account
-
Get Started & Basic Settings
-
Compatibility & Tech Specs
-
Performance Settings
-
-
Creating Projects
-
Creating New Projects
-
-
Importing & Recording
-
Video Editing for Windows
-
Basic Video Editing
- Enable/Disable Clip in Windows
- Magnetic Timeline for Windows
- Dual Monitor Setup for Video Editing on Windows
- Select All Clips on Timeline for Windows
- Manage Timeline and Tracks on Windows
- Auto Ripple for Windows
- Split & trim video
- Crop & Pan & Zoom Video in Filmora for Windows
- Compositing
- Change Video Speed on Windows
- Playing videos in reverse
- Mark In and Mark Out for Windows
- Markers for Windows
- Group editing
- Customizable Backgrounds for Videos and Images in Windows
- Video snapshot
- Using freeze frame
- Logo Reveal For Windows
- Auto Enhance in Filmora for Windows
- Applying drop shadow
- Adjustment layer for Windows
- Apply Transforming for Windows
- Video Editing Ruler – Windows
-
Advanced Video Editing
- Drawing Tools for Windows | Filmora Guide
- Create Multi-Camera Clip in Filmora for Windows
- Compound Clip for Windows
- Multi-Clip Editing for Windows
- Filmora Motion Blur | Windows
- Filmora Flicker Removal Guide | Windows
- Apply mask to video
- Creating a PIP Effect for Windows
- Keyframe Graph Editor for Windows
- Add animation keyframing for Windows
- Keyframe Path Curve for Windows
-
AI-Powered Video Editing
- Smart Scene Cut for Windows
- Smart Short Clips for Windows
- AI Face Mosaic for Windows
- Filmora AI Eye Contact- Windows
- AI Video Enhancer for Windows
- AI Text-to-Video for Windows
- Planar Tracking for Windows
- AI Idea to Video for Windows
- Filmora Image to Video for Windows
- Filmora Image to Prompt for Windows
- Instant Cutter Tool for Windows
- AI Extend
- Filmora AI Relight - Windows
- Filmora AI Image Enhancer Guide - Windows
- AI Script to Video Guide for Windows
- AI Text-Based Editing for Windows
- AI Mate Editing for Windows
- Instant Mode in Filmora
- ChatGPT Plugin - AI Copywriting
- AI Smart Cutout for Windows
- Lens correction on Windows
- Auto Reframe Video for Windows
- AI Portrait Cutout
- Scene detection feature
- AI Smart Masking for Windows
- Motion Tracking on Windows
- Video Stabilization for Windows
- AI Video/Photo Object Remover for Windows
- AI Smart Search for Windows
- AI Skin Tone Protection for Windows
- AI Image for Windows
- Chroma key (green screen)
- Super Slow Motion with Optical Flow for Windows
- Video Denoise for Windows
-
-
Audio Editing for Windows
-
Basic Audio Editing
-
Advanced Audio Editing
-
AI-Powered Audio Editing
- Auto synchronization
- AI Sound Effect
- Smart BGM Generation
- AI Voice Enhancer
- How to Execute AI Voice Cloning in Wondershare Filmora?
- AI Music Generator for Windows
- Audio To Video
- AI Vocal Remover for Windows
- AI Auto Beat Sync for Windows
- AI Audio Stretch for Windows
- AI Audio Denoise for Windows
- Silence Detection on Windows
-
-
Text Editing for Windows
-
Basic Text Editing
-
Advanced Text Editing
-
AI-Powered Text Editing
-
-
Video Customizations
-
Video Effects
-
Audio Effects
-
Transitions
-
Stickers
-
Filters
-
Color Editing
-
Animations
-
Templates
-
Asset Center
-
-
Exporting & Share & Cloud Backup
Silence Detection on Windows
In Wondershare Filmora, the Silence Detection tool scans your audio or video to locate sections with no sound. It can automatically remove or highlight these silent gaps, helping you tighten your content and improve flow. This feature is especially helpful for refining recordings like podcasts, interviews, or vlogs by eliminating unnecessary pauses.
Step-by-Step Guide to Using Filmora Silence Detection
As discussed, the silence detection tool in Filmora allows users to automatically remove the unwanted pauses and silences from audio and video files. To learn how to use this feature, read the steps provided next:
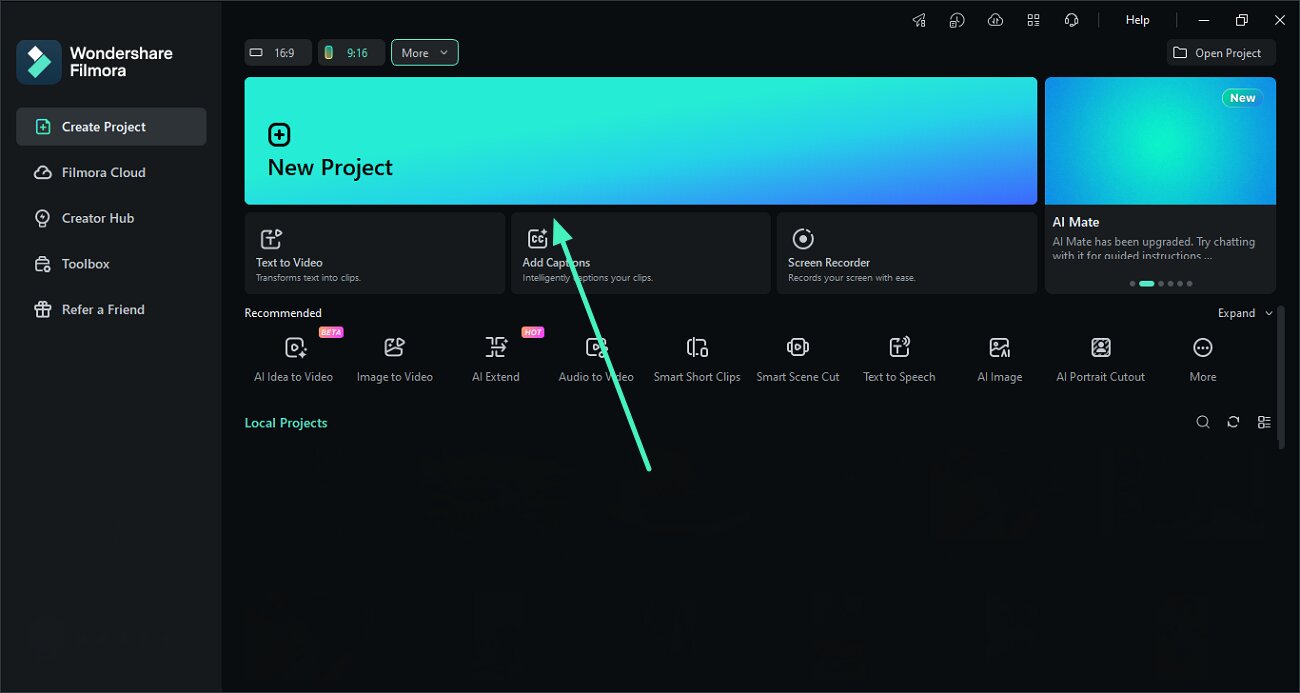
Step 1. Start a New Project in Filmora
Open Filmora and choose New Project from the home screen to enter the editing workspace. Then import your video file and place it on the timeline to begin editing.
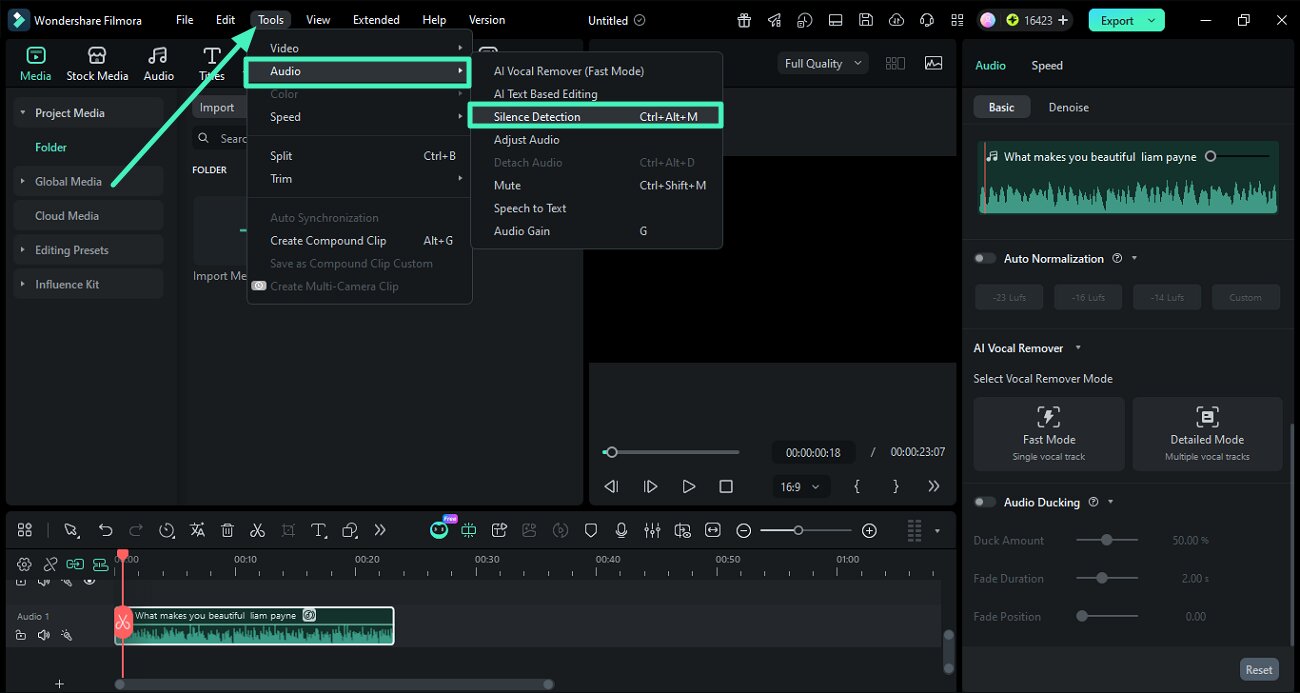
Step 2. Select Silence Detection Feature
Once you enter the editing interface, expand the Tools option from the toolbar located at the top. Now, expand the audio option and click on the Silence Detection feature.
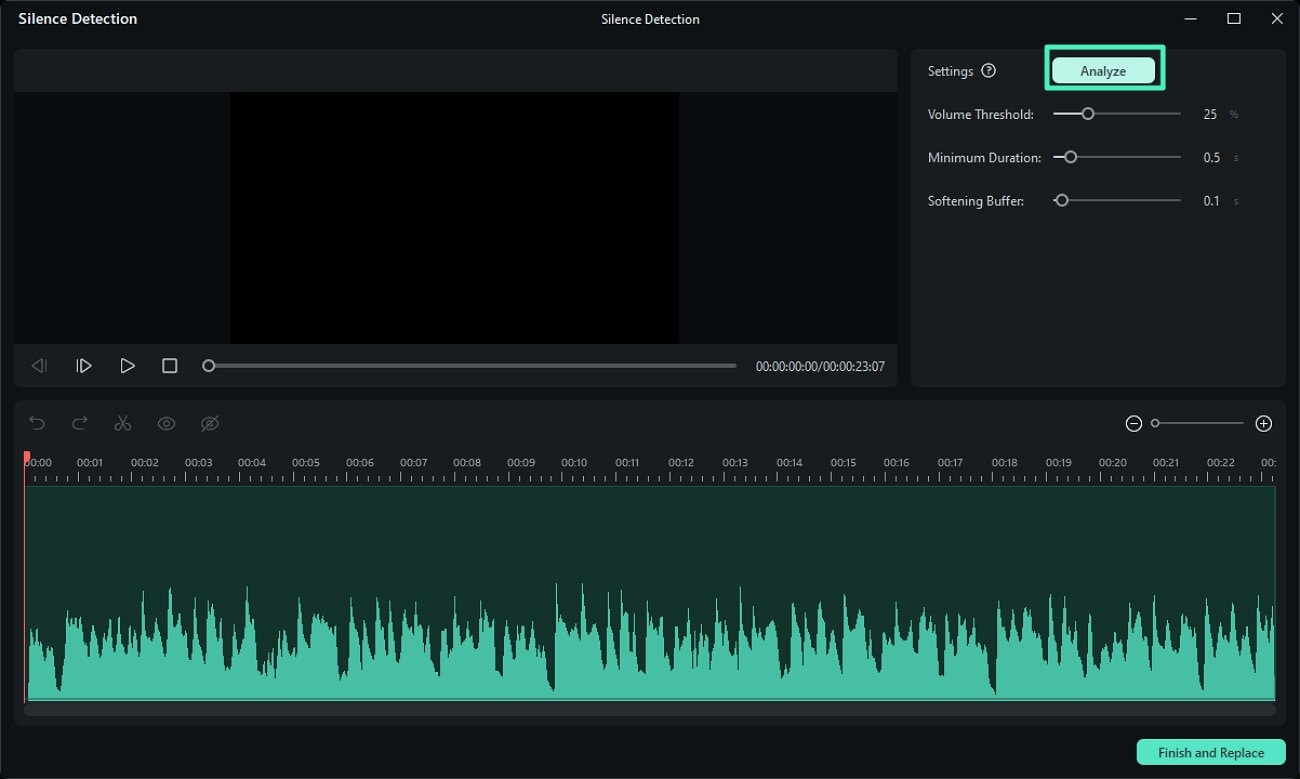
Step 3. Adjust Settings and Analyze
Now, adjust the settings such as volume threshold and minimum duration by dragging the respective sliders. Once done, hit the Analyze button to execute the process.
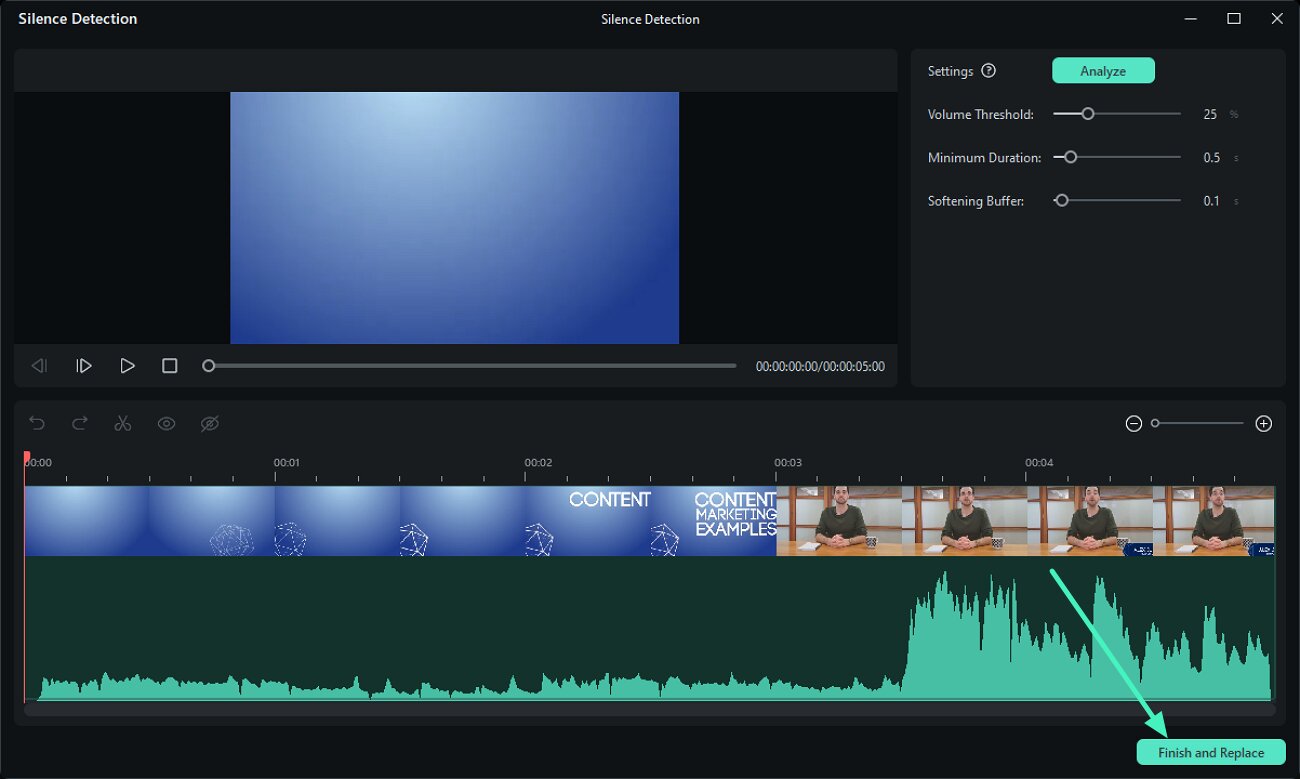
Step 4. Preview Results and Add to Timeline
After the successful silence detection from your video, preview the final results and click on the Finish and Replace button to replace the file.
Step 5. Save Results to Device
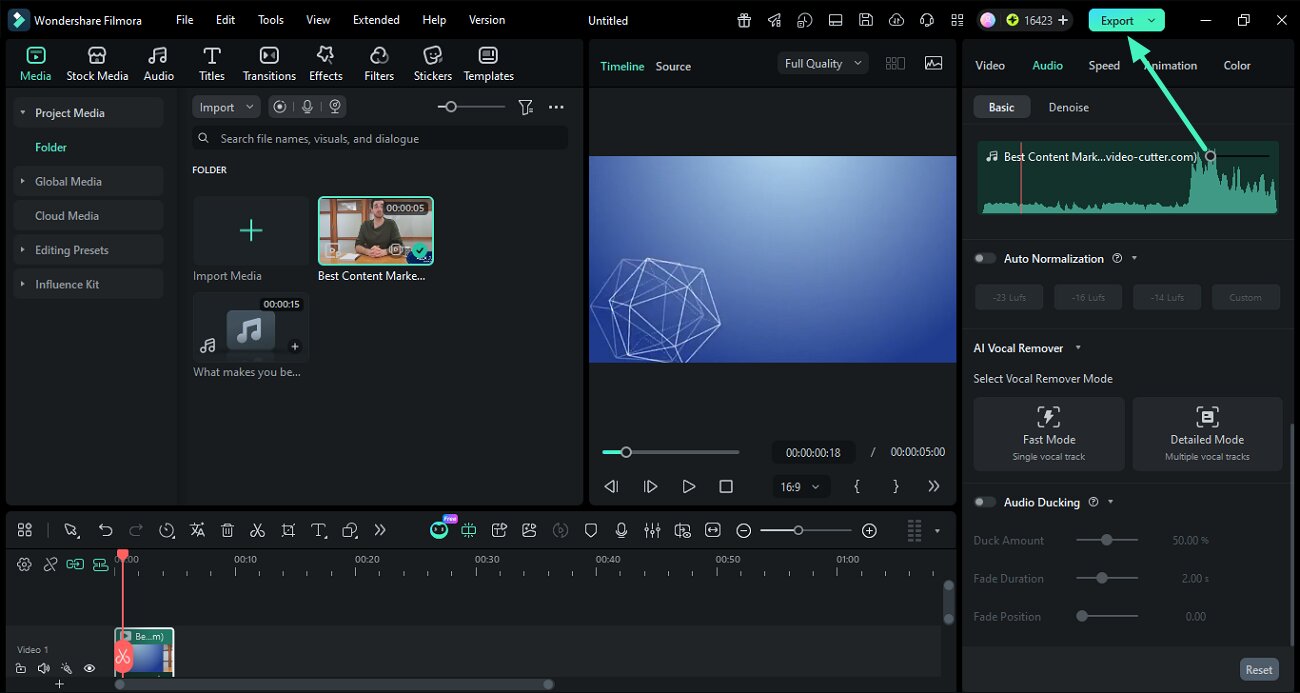
Once the video with the removed silence is within the timeline, you can apply further editing if required. When you are satisfied with the results, press the Export button to save the video.
Related Posts
Featured Articles
International Cat Day 2026: Celebrate Cats with AI Videos and Tips
Celebrate International Cat Day 2026 with creative ideas, AI cat videos, and viral tips to make this feline day unforgettable for cat lovers everywhere.
🐰How to Create the Best Bunny Hop Dance Video with AI
If you are looking to make your Easter bunny dance a lot more festive and exciting, read our easy tutorial to create the best bunny hop dance video.
How To Translate Chinese Video into English
Learn how to translate Chinese videos into English effectively. This comprehensive guide covers top tools, best practices, and FAQs to help you master video translation.
Recommended User Guide
AI Auto Beat Sync for Windows
This is a guide about auto beat-sync in Filmora.
AI Music Generator for Windows
With advanced versions come advanced features, and one of Wondershare Filmora's V13 innovations is AI Music Generation.
AI Vocal Remover for Windows
Keeping in view the interest of the audience and editors' needs, Filmora added the Vocal Remover tool.
