For the Best Results, Use the Latest Version.
-
Preparations
-
Account
-
Get Started & Basic Settings
-
Compatibility & Tech Specs
-
Performance Settings
-
-
Creating Projects
-
Creating New Projects
-
-
Importing & Recording
-
Video Editing for Windows
-
Basic Video Editing
- Enable/Disable Clip in Windows
- Magnetic Timeline for Windows
- Dual Monitor Setup for Video Editing on Windows
- Select All Clips on Timeline for Windows
- Manage Timeline and Tracks on Windows
- Auto Ripple for Windows
- Split & trim video
- Crop & Pan & Zoom Video
- Compositing
- Change Video Speed on Windows
- Playing videos in reverse
- Mark In and Mark Out for Windows
- Markers for Windows
- Group editing
- Customizable Backgrounds for Videos and Images in Windows
- Video snapshot
- Using freeze frame
- Logo Reveal For Windows
- Apply auto enhance
- Applying drop shadow
- Adjustment layer for Windows
- Transforming
- Video Editing Ruler – Windows
-
Advanced Video Editing
- Drawing Tools for Windows | Filmora Guide
- Create Multi-Camera Clip
- Compound Clip for Windows
- Multi-Clip Editing for Windows
- Filmora Motion Blur | Windows
- Filmora Flicker Removal Guide | Windows
- Apply mask to video
- Creating a PIP effect
- Keyframe Graph Editor for Windows
- Add animation keyframing for Windows
- Keyframe Path Curve for Windows
-
AI-Powered Video Editing
- Smart Scene Cut for Windows
- Smart Short Clips for Windows
- AI Face Mosaic for Windows
- Filmora AI Eye Contact- Windows
- AI Video Enhancer for Windows
- AI Text-to-Video for Windows
- Planar Tracking for Windows
- AI Idea to Video for Windows
- Filmora Image to Video for Windows
- Filmora Image to Prompt for Windows
- Instant Cutter Tool for Windows
- AI Extend
- Filmora AI Relight - Windows
- Filmora AI Image Enhancer Guide - Windows
- AI Script to Video Guide for Windows
- AI Text-Based Editing for Windows
- AI Mate Editing for Windows
- Create with instant mode
- ChatGPT Plugin - AI Copywriting
- AI Smart Cutout
- Lens correction on Windows
- Auto reframe video
- AI Portrait Cutout
- Scene detection feature
- AI Smart Masking for Windows
- Make motion tracking
- Video Stabilization for Windows
- AI Video/Photo Object Remover for Windows
- AI Smart Search for Windows
- AI Skin Tone Protection for Windows
- AI Image for Windows
- Chroma key (green screen)
- Super Slow Motion with Optical Flow for Windows
- Video Denoise for Windows
-
-
Audio Editing for Windows
-
Basic Audio Editing
-
Advanced Audio Editing
-
AI-Powered Audio Editing
-
-
Text Editing for Windows
-
Basic Text Editing
-
Advanced Text Editing
-
AI-Powered Text Editing
-
-
Video Customizations
-
Video Effects
-
Audio Effects
-
Transitions
-
Stickers
-
Filters
-
Color Editing
-
Animations
-
Templates
-
Asset Center
-
-
Exporting & Share & Cloud Backup
Advanced Color Adjustment
Wondershare Filmora offers advanced color adjustment tools for precise visual control. Users can fine-tune hues, saturation, and luminance with HSL, adjust brightness and contrast using curves, and balance tones with color wheels. They can enhance dynamic range through HDR, achieving cinematic color grading and professional-quality visuals with greater creative flexibility.
Index
Basic Color Correction
Basic color correction in Filmora helps adjust brightness, contrast, saturation, and white balance to fix overall exposure issues. It provides a quick way to improve clip clarity and achieve a balanced, natural look before applying advanced grading. To learn how to perform basic color adjustment on Filmora, read the steps provided next:
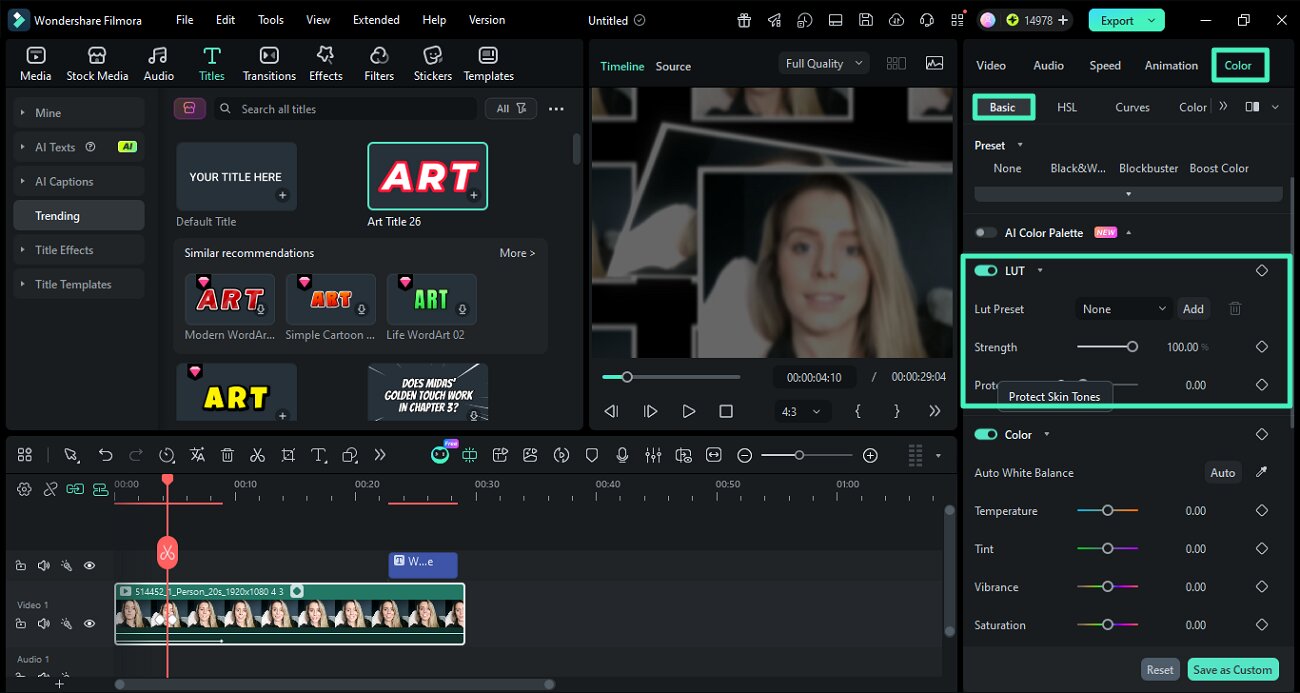
Step 1. Create Project Import Video
To begin, launch Filmora on your device and create a new project. Next, import the video to the tool’s interface and drag it to the editing timeline.
Step 2. Access Color Option Apply Basic Enhancement
Now, head to the properties panel on the right and enable the Color section. Opt for the Basic section and apply your preferred enhancement. You can enable the LUT option to adjust the luminance and other attributes. Furthermore, adjust other factors such as temperature, vibrance, solution, and many more. Once you are satisfied, press Export to save the results.
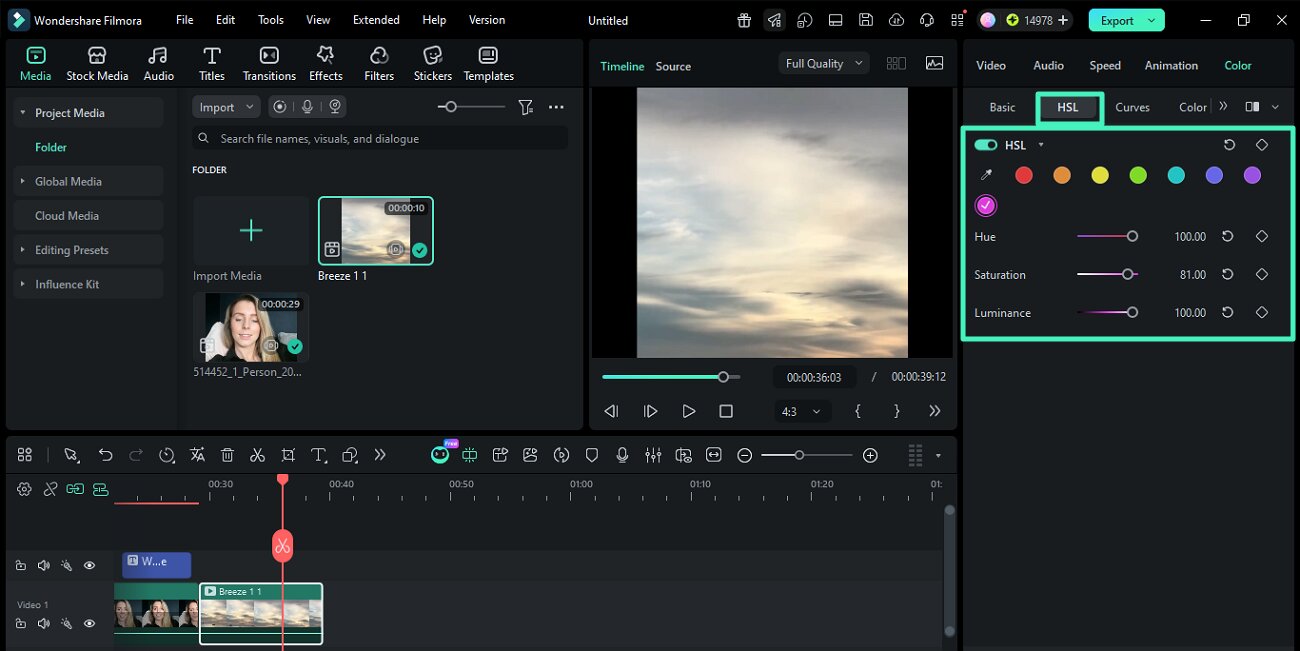
HSL (Hue, Saturation, Luminance)
HSL in Filmora allows precise control over individual colors by adjusting their hue, intensity, and brightness. This helps isolate specific tones, making it easy to enhance skin tones, skies, or backgrounds without affecting the entire frame.
Instructions: Access the HSL section and choose the color from the provided options. Now adjust the Hue, Saturation, and Luminance by dragging their respective sliders.
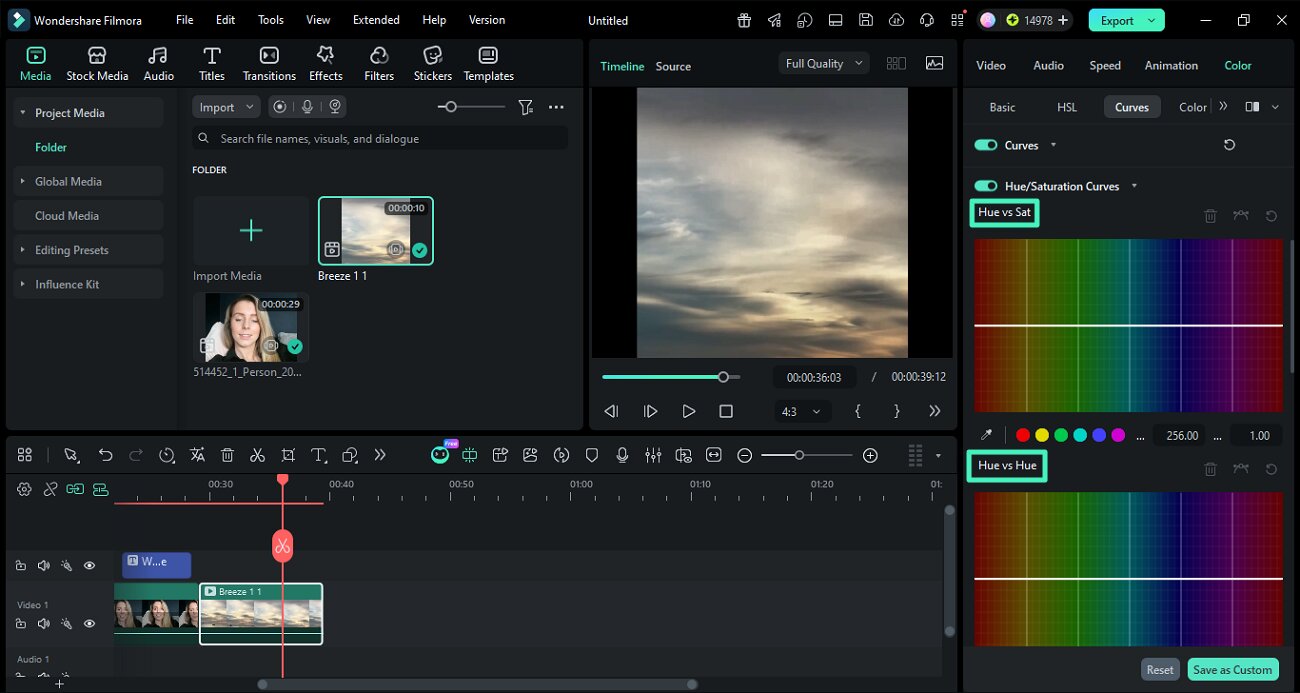
Color Curves
Curves give detailed control over brightness and contrast by manipulating highlights, midtones, and shadows on a graph. They are widely used for cinematic grading, allowing subtle or dramatic tonal adjustments.
Step 1. Choose Color Curves
After importing the video, enable the Curves section under the Color section and choose the required color from Y, R, G, or B. Now, adjust the curve according to your preferences by dragging the cursor.
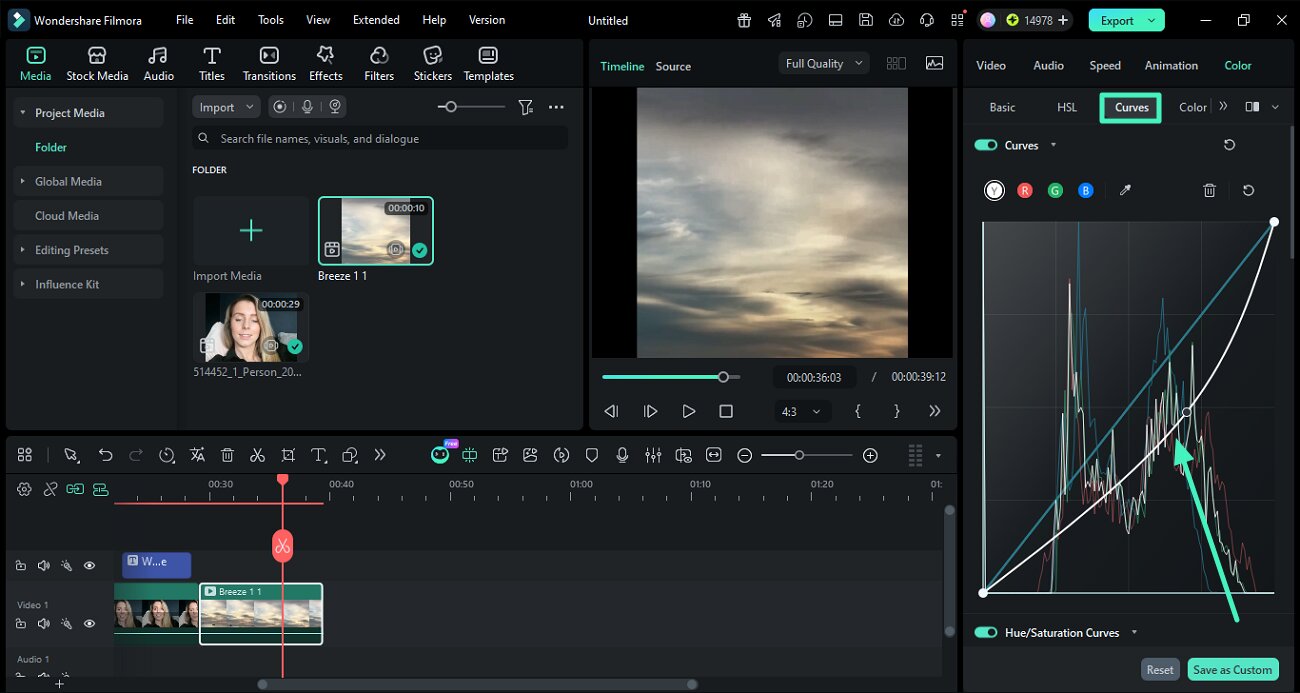
Step 2. Adjust Other Color Curves
Moving forward, scroll through the panel to adjust other curves such as Hue vs Sat, Hue vs Hue, and more. Once done, save the final video to your device.
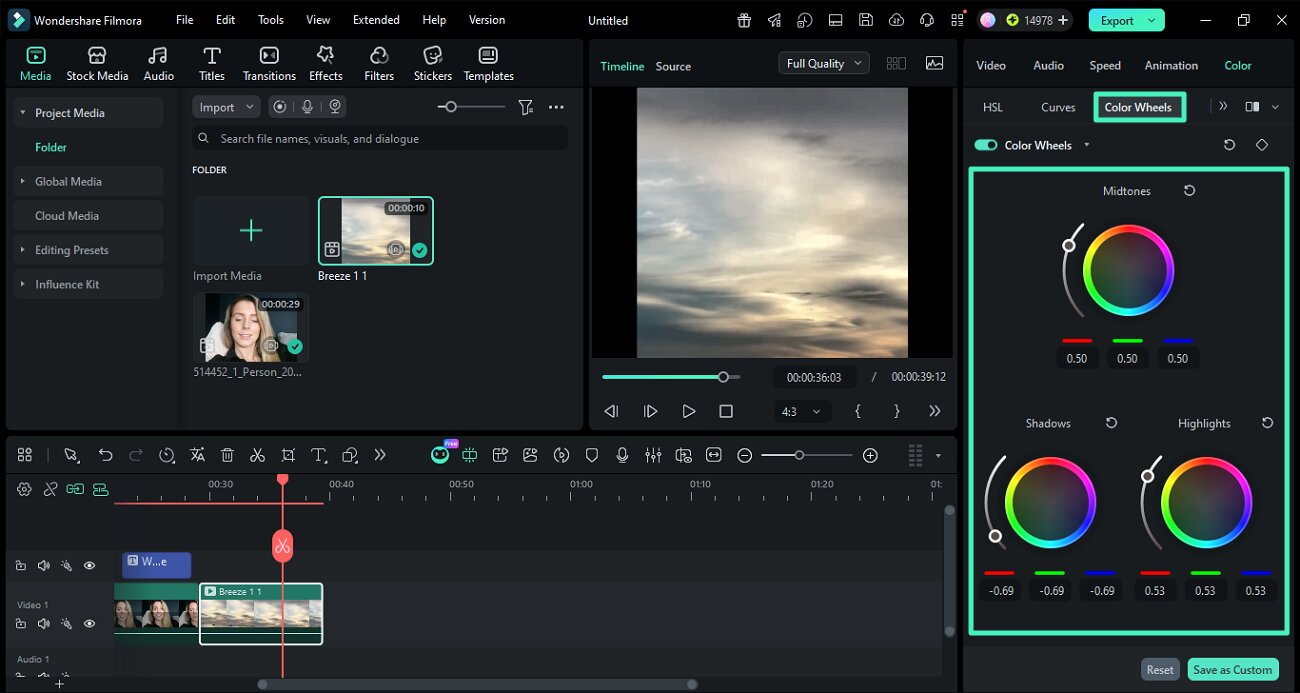
Color Wheels
Color wheels let users adjust color balance in shadows, midtones, and highlights separately. This tool is ideal for adding creative color tints or correcting unwanted color casts in different tonal ranges.
Instructions: After acquiring the Color Wheels section under the Color option, choose the option from the midtones, shadows, and highlight wheels. Drag the wheel and preview the results within the preview window. Save the final results to your computer once the color is adjusted.
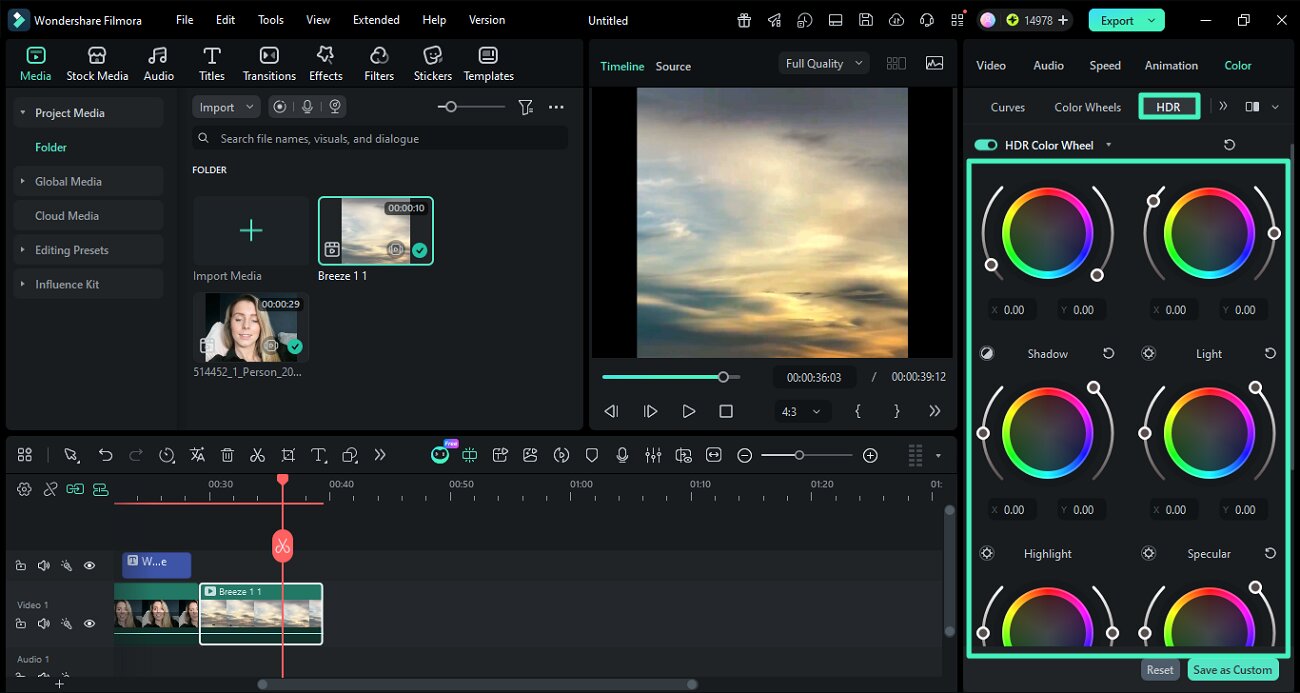
HDR (High Dynamic Range)
HDR enhances the dynamic range of a video by bringing out details in both bright and dark areas. It improves depth, contrast, and realism, especially in scenes with high lighting variation.
Instructions: Once the video is imported, access the HDR option from the properties panel and adjust the Black, Dark, and other wheels by dragging the cursor.
Related Posts
Featured Articles
AI Video to Video Generator: How to Transfer Style to Your Video
AI video-to-video style transfer lets you refresh old footage from a prompt. You can restyle the lighting, textures, and mood while keeping the original motion.
LinkedIn Video Ads: Specs, Examples, and a Step-by-Step Creation Guide
Boost your business with LinkedIn video ads. Learn the specs, see examples, and follow this step-by-step guide. Create campaigns that elevate brand awareness and drive results.
5 Ways | How to Record A Zoom Meeting?
Are you looking for the best way to record meetings on Zoom? Here is a comprehensive guide on the best tips and tools to record in Zoom.
Recommended User Guide
Preset Color Adjustment
Learn how to adjust color, light, LUT in Filmora
Pro Video Scopes
Video Scopes is like a track of color elements during color correction and enhancement, and Filmora's new upgrades include pro video scopes for a professional editing experience.
Color Wheels for Windows
Users can enhance the task using color wheels when performing video editing or graphic designing in Filmora.
