Filmora Windows Panel Layout
Wondershare Filmora is an all-in-one video editing software that helps you create unique and polished videos in minutes. In this guide, we'll help you learn more about the panels that make up the editing workspace and the layout models you can switch between in Filmora for Windows.
Property Panel
The Property Panel shows you all relevant information on your project to display your clip's video, audio, color, and speed properties in the Timeline Panel or Preview Window. This makes all the info readily available so you can make adjustments when editing on the spot.
What More Can Be Done in Property Panel
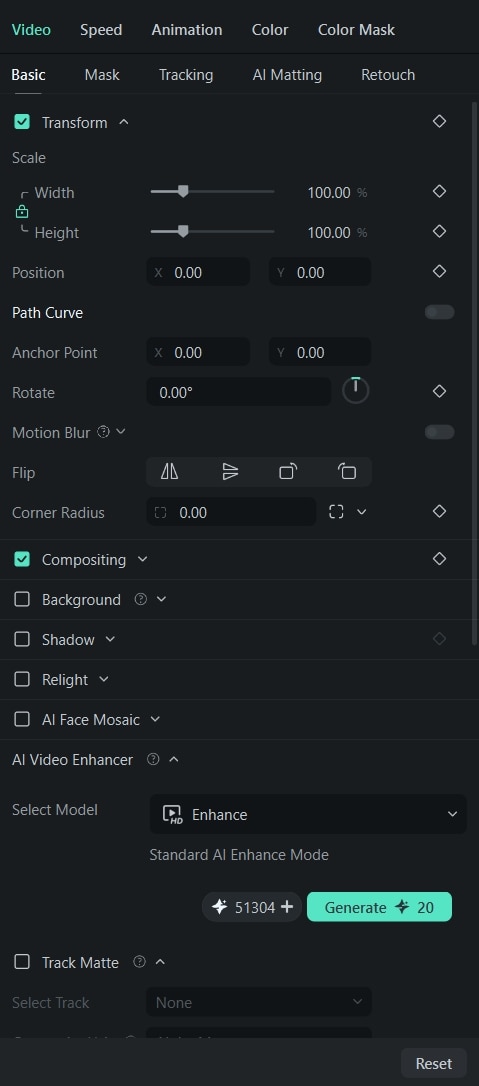
Filmora's Property Panel gives a very homey experience in video editing. While there is a diversity of tabs to go through, with separate video and audio handling, there are other customizable properties which make it worth the experience.
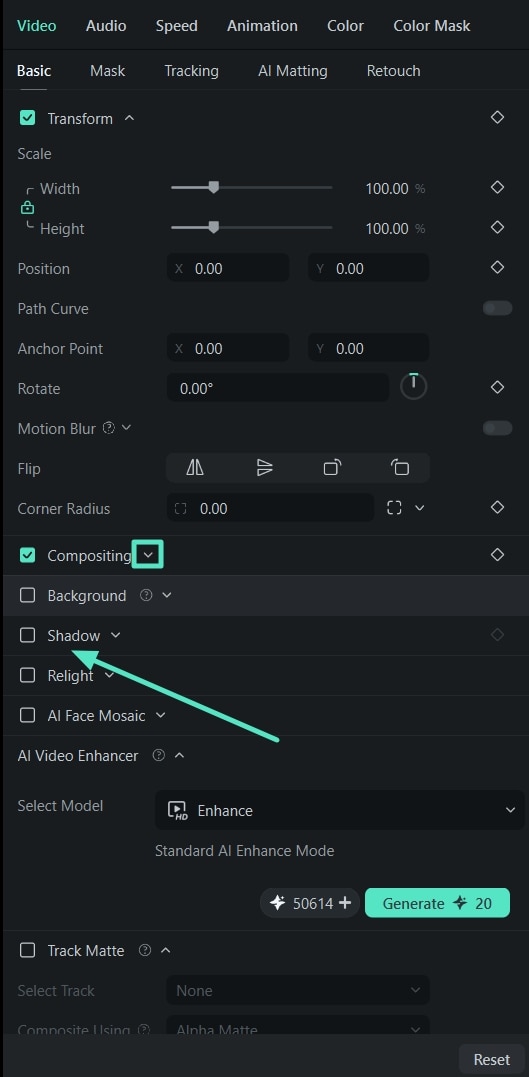
Step 1. Easily adjust the modules within each tab using the arrow-heads across each option. Furthermore, to make changes across a particular module, you also need to enable it and make further changes.
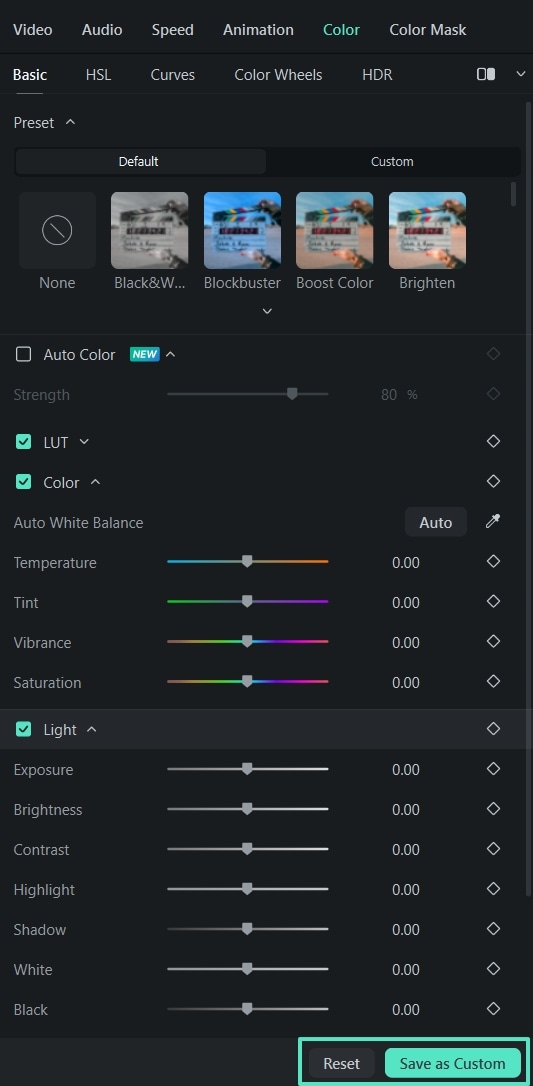
Step 2. With the Save as Custom option appearing on the bottom of the Property Panel, you can easily save a particular setting you've defined across a specific tab. For instance, any changes set within the Color tab can be saved as a separate preset. If you do not like specific edits, you can simply tap Reset to revert back to default settings.
Preview Window (Player Panel)
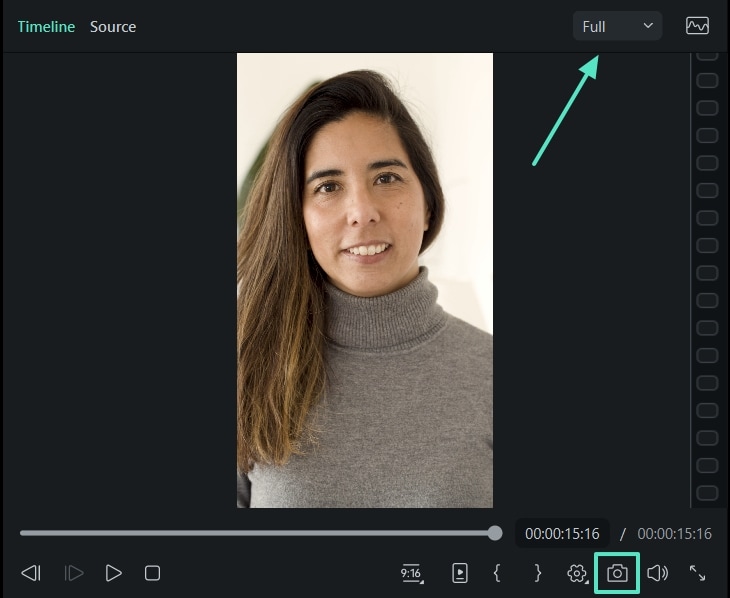
The Player Panel (Preview Window) shows you how the video plays in the Timeline. This is where you can adjust different settings, such as:
- Playback quality and display settings
- Capture a snapshot of the video
- Mark in and Mark out
The Player Panel can also be used as an independent panel or replaced with the default position by simply dragging the panel.
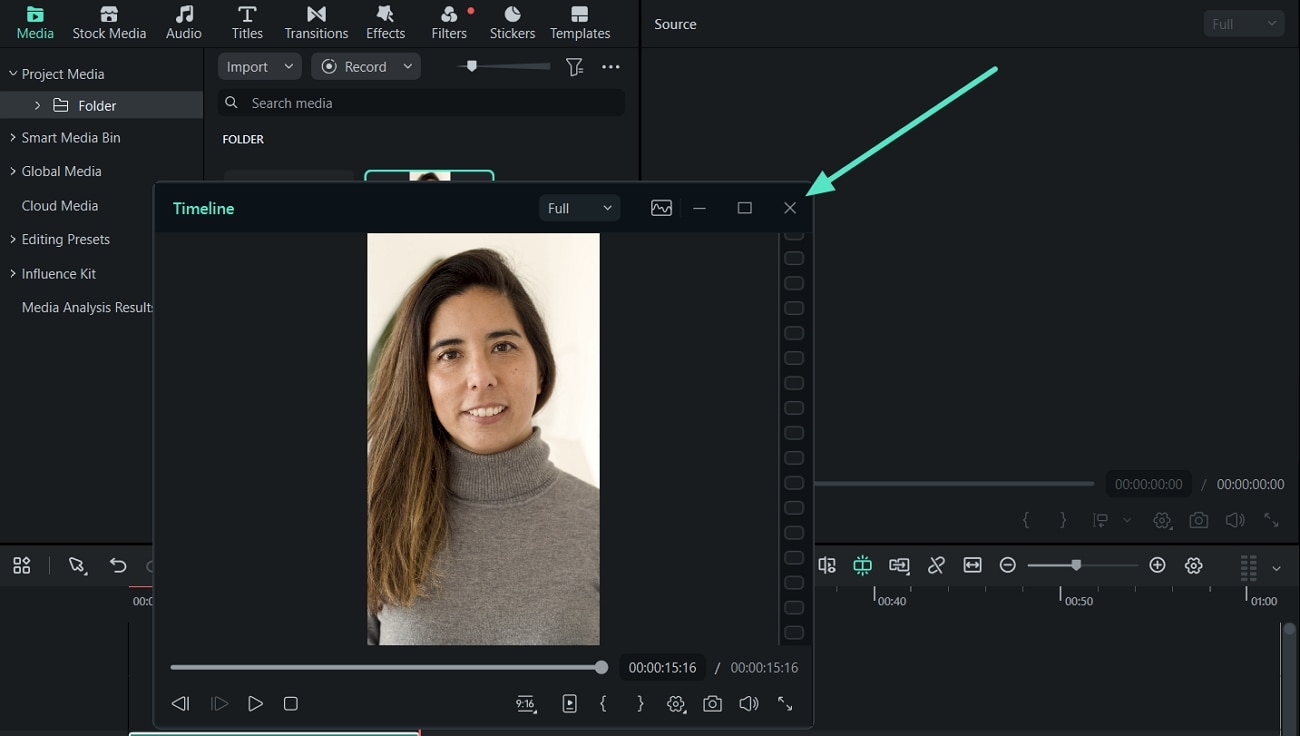
Note: On the top of the preview window lies the quality adjustment settings. The Snapshot button on the bottom takes a full-resolution frame and saves the picture to the Media Library as an image.
Media Panel
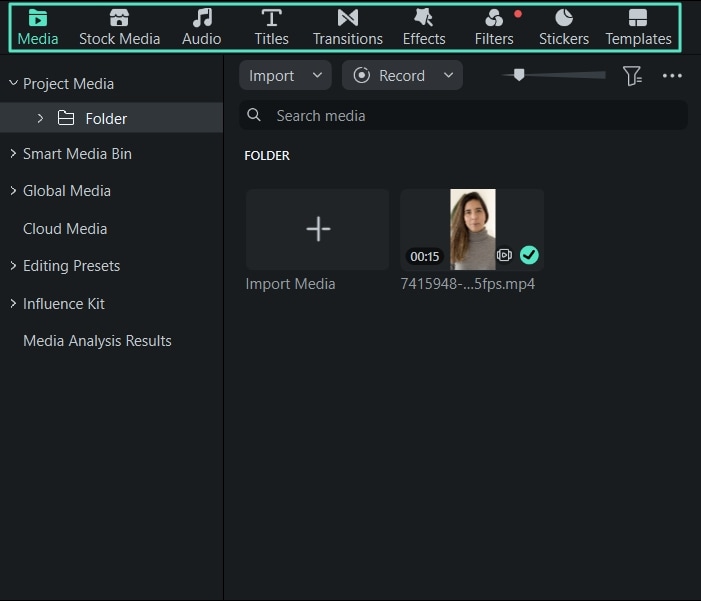
Also called the Media Library, the Media Panel displays your imported source files and provides access to creative resources for your project. Here is a brief introduction to its main functions:
- Media: Import and organize videos, images, audio, and other media files for your project.
- Stock Media: Browse stock videos, photos, AI-generated images, downloaded assets, and other available media resources.
- Audio: Explore music tracks, sound effects, and other audio resources available in Filmora.
- Titles: Browse and apply preset titles, captions, openers, subtitles, and other text elements.
- Transitions: Add transitions between clips to create smoother or more dynamic scene changes.
- Effects: Apply visual effects, filters, overlays, and other creative enhancements to your clips.
- Stickers: Add static or animated stickers and other visual elements to your video.
- Templates: Browse ready-made video templates to create and customize videos more efficiently.
Timeline Panel
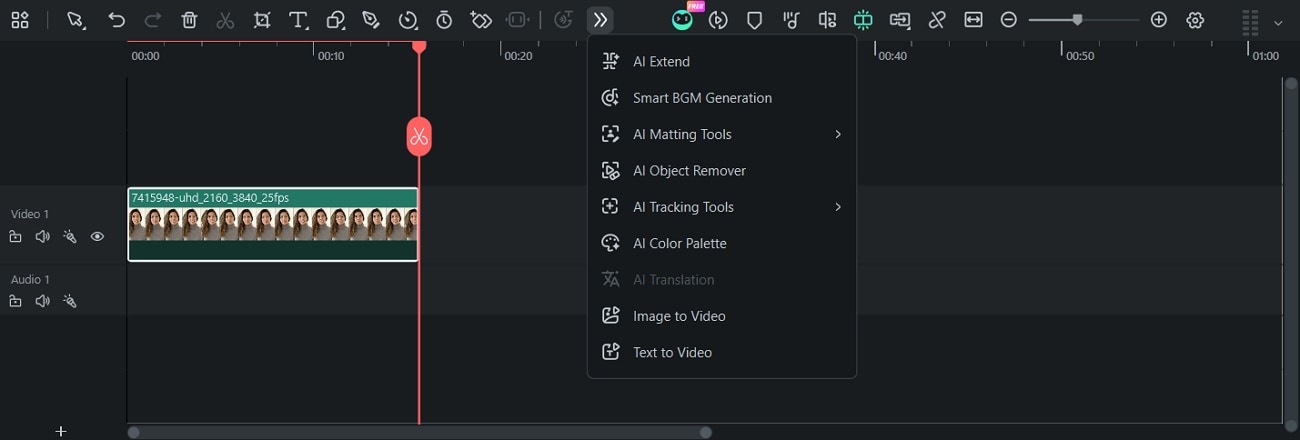
The Timeline Panel serves as the main workspace for arranging, editing, and refining the media in your project. It provides access to essential editing controls and advanced tools for building your final video. From the Timeline Panel, you can:
- Arrange, move, or remove video clips, audio tracks, transitions, and other elements.
- Split video and audio clips into separate sections for precise editing.
- Modify properties such as text, shapes, speed, and clip duration.
- Render sections of the timeline to preview your edits smoothly.
- Place markers at specific points to organize different stages of your edit.
- Record voiceovers and adjust or mix audio tracks within the project.
- Access AI-powered tools such as AI Extend, AI Matting, AI Object Remover, AI Color Palette.
- Use creative AI features, including Image to Video and Text to Video, to generate new content.
- Create Compound Clips to group multiple timeline elements and manage complex projects more efficiently.
Layout Modes
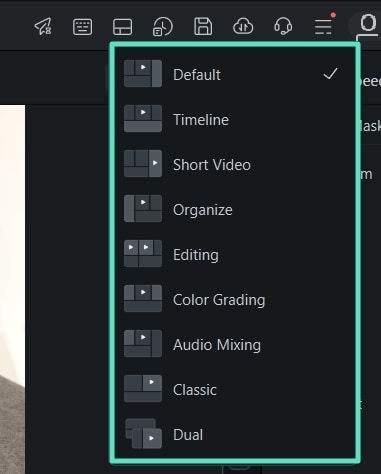
Filmora comes with 9 different professional layout models that help in editing projects. Options such as Default, Organize, Edit, Short Video, Classic, Dual, Timeline, Color Grading, and Audio Mixing change the dynamics for video editors according to their needs.
Dual Layouts
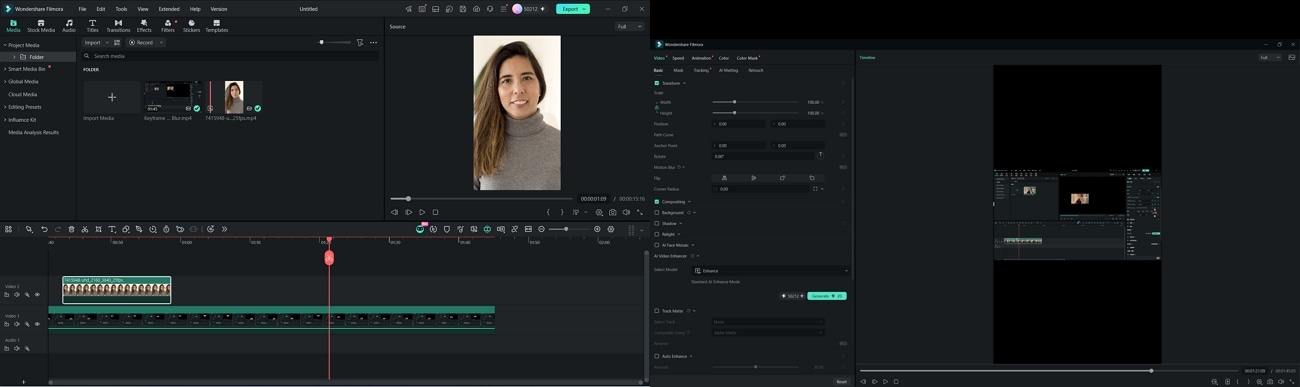
Filmora has introduced new professional workspace layouts, which includes the Dual player preview that operates with 2 monitors in use. This intends to give a better workspace to users to have bigger tasks at hand. While managing more focused footage comparison with Dual professional preview, users can prioritize their controls needed in sound editing and color work.
Add in your editable video across the timeline, while the other clips can remain in the Media tab. Select one to cast it in the Source preview and place the other in the Timeline preview before selecting the Dual layout from the top. With the preview in front, you can now professionally manage more complex video editing tasks with ease.
Audio Mixing Mode
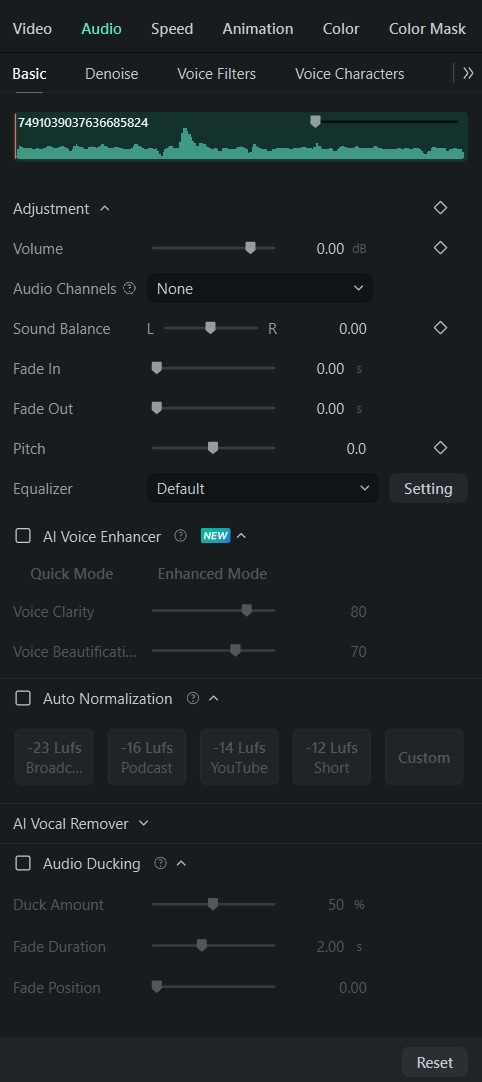
Audio Mixing Mode provides a dedicated workspace for managing and refining the sound in your project. It brings important audio controls into one focused view, including Basic adjustments, Denoise, Voice Filters, and Voice Characters, making it easier to improve dialogue, balance audio, and apply voice related effects.
The Audio tab within the Property Panel now offers a diversity in options, starting from the Basic section to a dedicated Denoise section, along with Voice Filters and Voice Characters.
Color Grading Mode
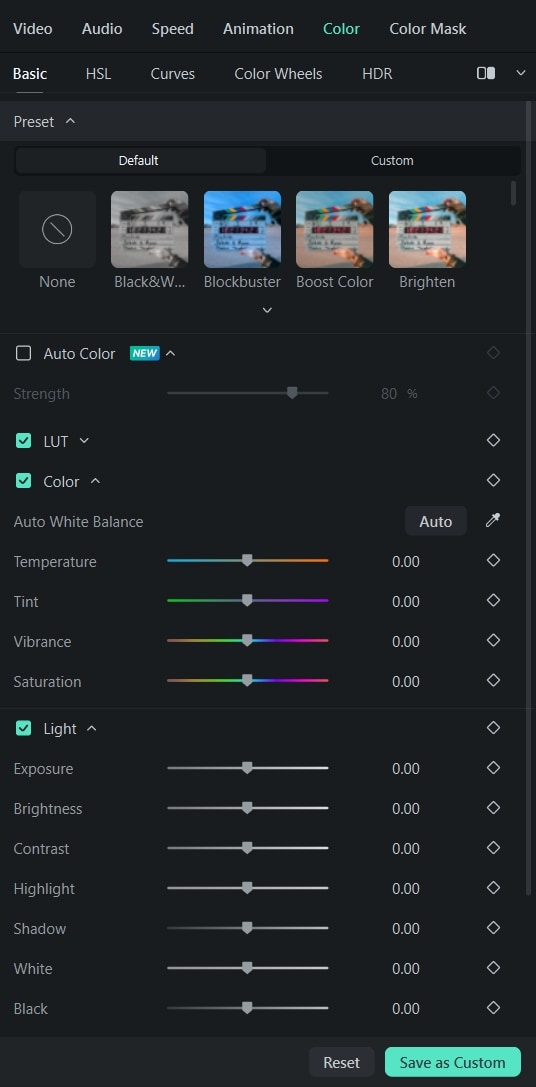
Color Grading Mode provides a focused workspace for improving the overall look and color of your footage. It gives easier access to color adjustment controls, as shown below:
With a new HDR option appearing in the Color tab within the Property Panel, users can now make more progressive color grading on their videos. Not only that, Filmora 16 now offers a separate Color Mask feature to emphasize color grading across a specific area within the footage.
Resizing Panel Groups
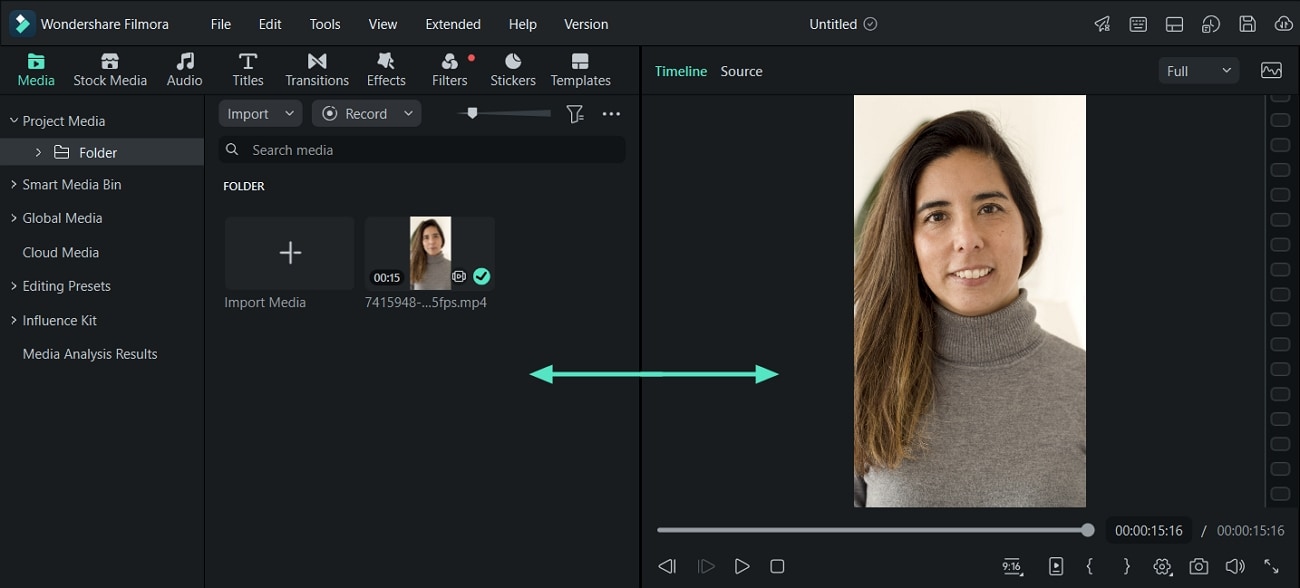
If you want to resize any of the panels, drag the resizing icon at the borders between each panel to adjust to your preferred fit.
Method 1: To resize panels horizontally, position the pointer on the sides until the pointer becomes a left and right arrow.
Method 2: To resize the panels vertically, position the pointer underneath the panels, and then the pointer becomes an up-and-down arrow.
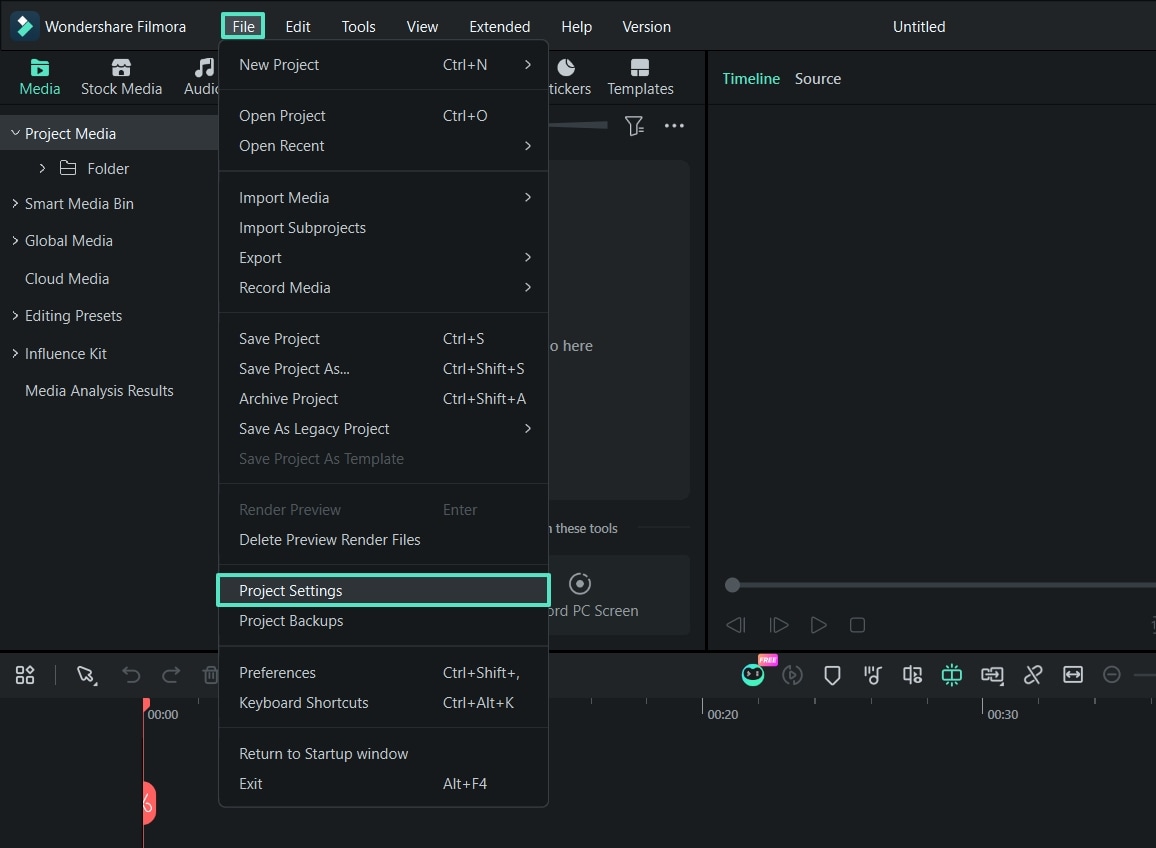
Project Settings
To adjust the basic settings of your Filmora project, open Project Settings from the File menu. This section lets you configure important properties before or during editing.
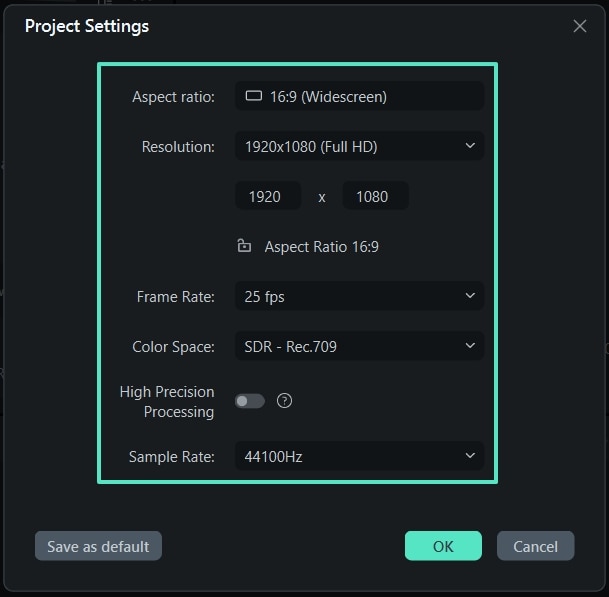
Within the Project Settings window, you can change the Aspect Ratio, Resolution, and Frame Rate according to your project requirements. Additional options let you select the Color Space, enable High Precision Processing, and set the appropriate Sample Rate for the project.
Preferences
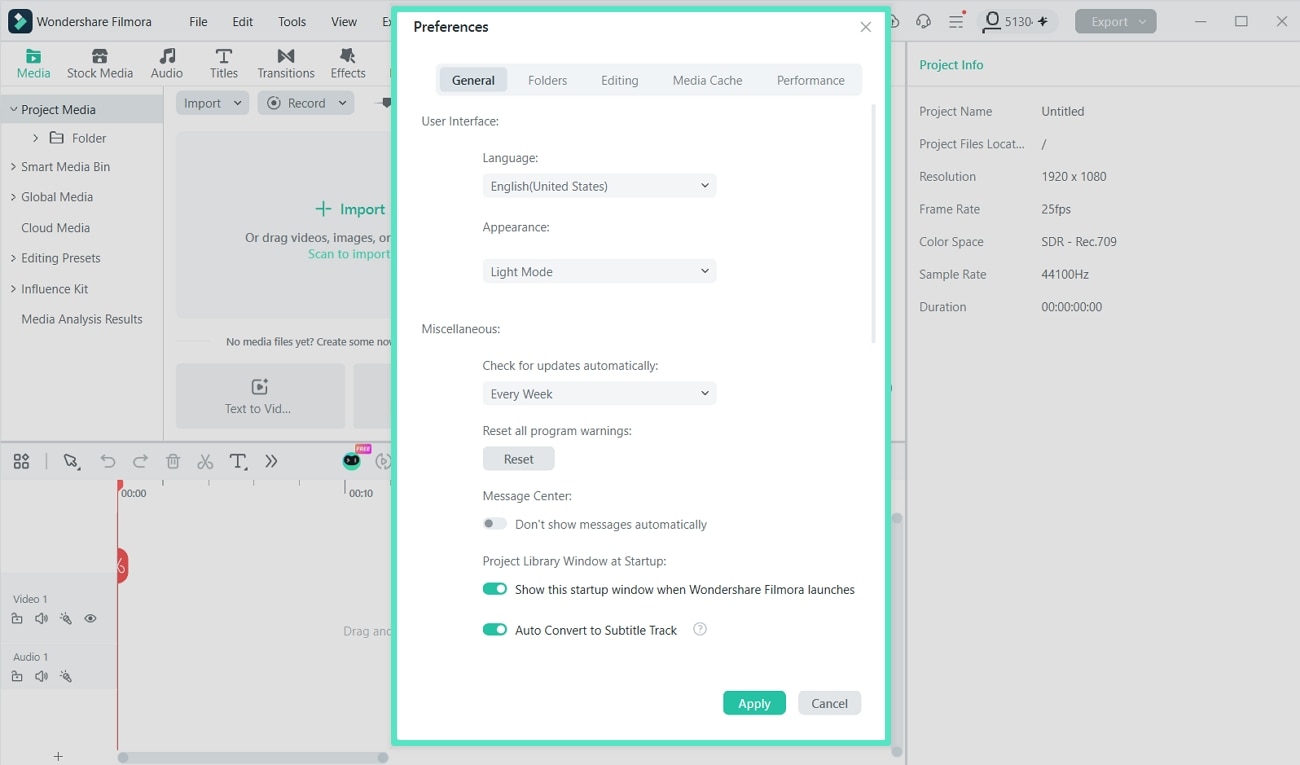
Filmora for Windows provides a range of preference options for customizing the editing environment and overall software behavior. You can personalize the interface, configure performance-related options, and manage other settings based on your workflow.
Instructions. Click File at the top of the interface and select Preferences. Under the General tab, locate the User Interface section and choose Light Mode or Dark Mode according to your preferred viewing experience.
Project Media and Media Info
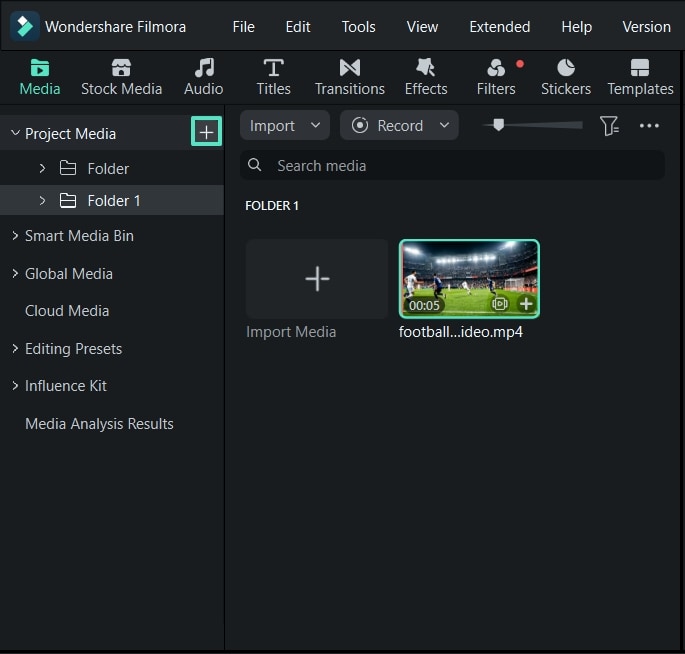
Filmora improves media organization through enhanced Project Media management, allowing users to create folders and subfolders, import folders, move media between folders, and sort project assets more effectively. These tools are especially useful for larger Filmora projects, where footage, audio, graphics, and other assets need to remain easy to identify and manage throughout editing.
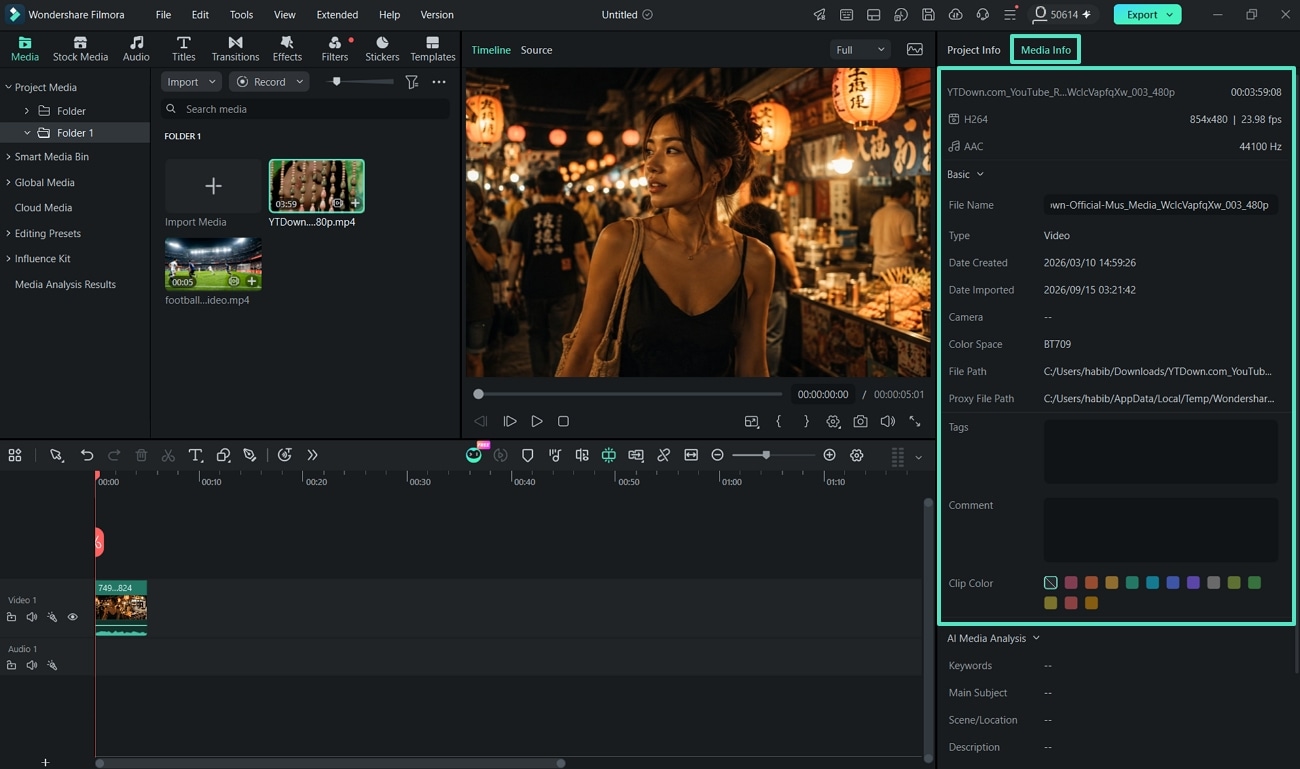
Step 1. When uploading videos across the timeline, if you wish to make dedicated changes to a set of videos, you can easily create folders within a single Filmora project. For that, tap the "+" icon next to Project Media to add a new folder. You can simply drag and drop media from one folder onto another to make navigation easier.
Step 2. To view specific information related to a particular video imported within Filmora, click anywhere across the timeline after choosing a specific media clip. This will open up the Project Info and Media Info sections. On choosing Media Info, you can view all basic and advanced settings of the particular clip. Not only that, but you can also add new Tags, amend the File name, or add new Comments.