For the Best Results, Use the Latest Version.
-
Preparations
-
Account
-
Get Started & Basic Settings
-
Compatibility & Tech Specs
-
Performance Settings
-
-
Creating Projects
-
Creating New Projects
-
-
Importing & Recording
-
Video Editing for Windows
-
Basic Video Editing
- Enable/Disable Clip in Windows
- Magnetic Timeline for Windows
- Drawing Tools fo Windows
- Dual Monitor Setup for Video Editing on Windows
- Select All Clips on Timeline for Windows
- Dual Monitor Setup for Video Editing on Mac
- Manage Timeline and Tracks
- Auto Ripple for Windows
- Split & trim video
- Crop & Pan & Zoom Video
- Compositing
- Change video playback speed
- Playing videos in reverse
- Mark In and Mark Out for Windows
- Markers for Windows
- Group editing
- Customizable Backgrounds for Videos and Images in Windows
- Video snapshot
- Using freeze frame
- Logo Reveal For Windows
- Apply auto enhance
- Applying drop shadow
- Adjustment layer for Windows
- Transforming
- Video Editing Ruler – Windows
-
Advanced Video Editing
-
AI-Powered Video Editing
- Smart Scene Cut for Windows
- Smart Short Clips for Windows
- AI Face Mosaic for Windows
- AI Video Enhancer
- AI Text-to-Video for Windows
- Planar Tracking
- AI Idea to Video for Windows
- Image to Video for Windows
- Instant Cutter Tool for Windows
- AI Extend
- AI Script to Video Guide for Windows
- AI Text-Based Editing for Windows
- AI Mate Editing for Windows
- Create with instant mode
- ChatGPT Plugin - AI Copywriting
- AI Smart Cutout
- Lens correction
- Auto reframe video
- AI Portrait Cutout
- Scene detection feature
- AI Smart Masking for Windows
- Make motion tracking
- Stabilization
- AI Video/Photo Object Remover for Windows
- AI Smart Search for Windows
- AI Skin Tone Protection for Windows
- AI Image for Windows
- Chroma key (green screen)
- Super Slow Motion with Optical Flow for Windows
- Video Denoise for Windows
-
-
Audio Editing for Windows
-
Basic Audio Editing
-
Advanced Audio Editing
-
AI-Powered Audio Editing
-
-
Text Editing for Windows
-
Basic Text Editing
-
Advanced Text Editing
-
AI-Powered Text Editing
-
-
Video Customizations
-
Video Effects
-
Audio Effects
-
Transitions
-
Stickers
-
Filters
-
Color Editing
-
Animations
-
Templates
-
Asset Center
-
-
Exporting & Share & Cloud Backup
Optimized Screen Recording for Windows
Filmora offers a comprehensive functionality for recording the screen of your device by offering multiple capturing options. You can record the entire screen or a specific part of the screen using this efficient tool. Moreover, you can capture the screen with or without the camera and other settings.
The new update has introduced some real-time capturing functions, such as blurring or removing the background while recording. Learn how this screen recorder works in the following section:
Entrances to Record in Filmora
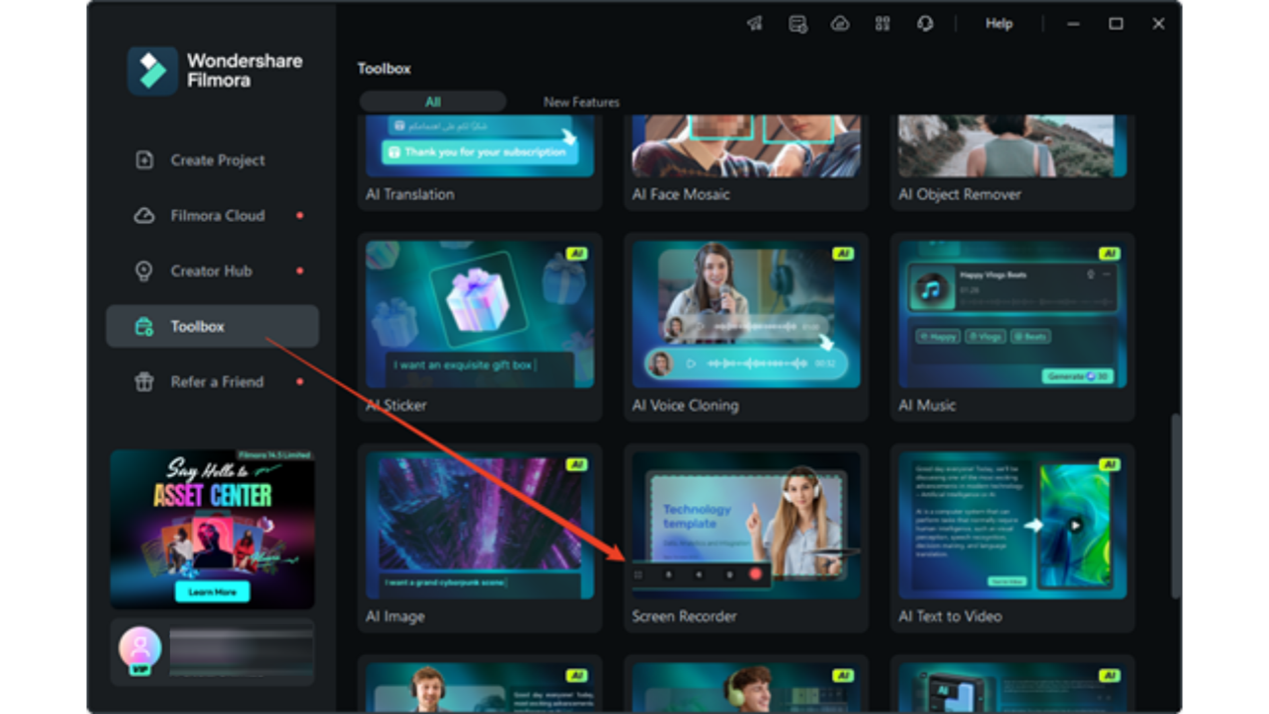
Method 1:
Open Filmora video editing software, you can easily see "Screen Recorder" option in the startup window.
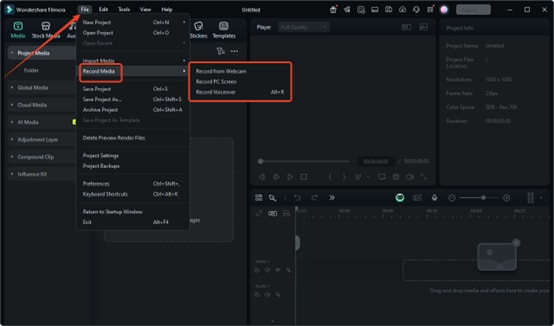
Method 2
Enter the player panel, click "File" > "Record Media", and choose the record option you prefer from "Record from Webcam", "Record PC Screen", or "Record Voiceover".
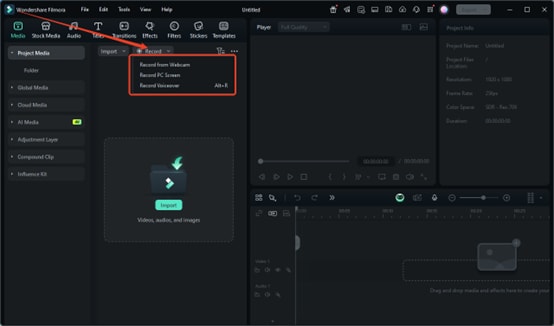
Method 3
On the Search Media bar below the menu bar, click "Record", and three record options will be expanded: Record from Webcam, Record PC Screen, and Record Voiceover.
Steps to Record in Filmora
Step 1: Specify the Screen Resolution for Recording
After selecting the screen recorder from either of the above options, then comes the ratio of screen to record from. Under the "Square" icon, users can choose three resolutions: "Full Screen", "Custom", and "Target Window". In addition, they can adjust the length and width values manually or manipulate the ratio appearing on the screen.

Step 2: Choose the Type of Recording
In Filmora, users can choose from three recording options on the screen recorder window. Users can use "Microphone" for what they are speaking during the recording session. Moreover, they can turn on or off the "System Audio" or "Camera" option.

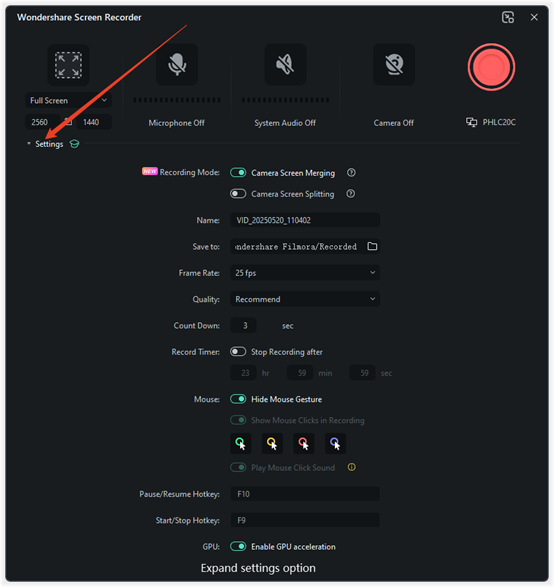
Step 3: Adjust Settings
After this, expand the "Settings" option at the bottom left corner of the recording window and customize the rest of the settings.
Step 4: Press the Record Button to Start Recording
Now press the red recorder button to start screen recording. A countdown will appear, but if you want to skip this part, simply press the "Start Directly" button below the countdown. From the player given below the screen recording, you can "Pause", "Stop", and start "Re-record" with the screen recording.

Step 5. Change Camera Display Options
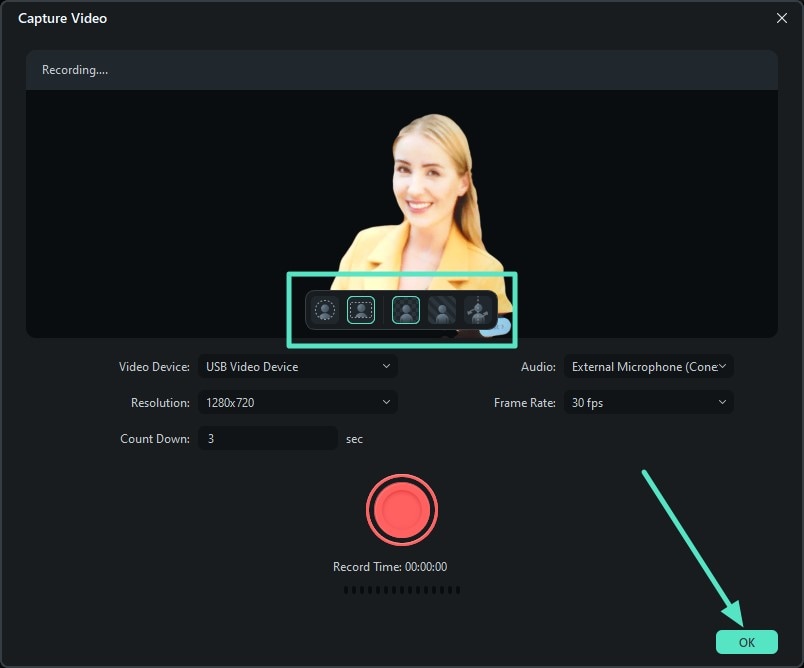
When you select the Camera option from the recording settings, a new window with the camera enabled will be opened. Hover over the camera preview to enable the floating toolbar on the screen. You can choose your required option, like blurring the background or entirely removing the background. Once selected, press the Red recording button to begin the screen recording with the camera.
Related Posts
Featured Articles
How to Animate a Chart in PowerPoint?
Learn how to animate charts in PowerPoint step by step, then see a faster option that turns spreadsheets into animated charts for video.
The Best 8 Places for High-Quality Royalty Free GIFs (Paid and Free)
In search of the best GIF sites that let you download content without copyright claims? Read this article to explore the top 8 royalty-free GIF websites.
When 8-bit Meets Art – How to Create Pixel Art from Your Images?
Learn how to turn your image into pixel art with free online tools and apps. Discover how to turn your images into 8-bit pixel art and add pixel grids for a retro touch today.
