
For the Best Results, Use the Latest Version.
-
Preparations
-
Account
-
Get Started & Basic Settings
-
Compatibility & Tech Specs
-
Performance Settings
-
-
Creating Projects
-
Creating New Projects
-
-
Importing & Recording
-
Video Editing for Windows
-
Basic Video Editing
- Enable/Disable Clip in Windows
- Magnetic Timeline for Windows
- Dual Monitor Setup for Video Editing on Windows
- Select All Clips on Timeline for Windows
- Timeline and Track Management
- Auto Ripple for Windows
- Split & Trim Video
- Crop & Pan & Zoom Video in Filmora for Windows
- Compositing
- Change Video Speed on Windows
- Reverse Video for Windows
- Mark In and Mark Out for Windows
- Markers for Windows
- Group editing
- Customizable Backgrounds for Videos and Images in Windows
- Video Snapshot
- Using Freeze Frame in Filmora for Windows
- Logo Reveal For Windows
- Auto Enhance in Filmora for Windows
- Applying drop shadow
- Adjustment layer for Windows
- Apply Transforming for Windows
- Video Editing Ruler – Windows
-
Advanced Video Editing
- Keyframe Motion Blur for Windows
- Drawing Tools for Windows | Filmora Guide
- Camera Tracking for Windows
- Create Multi-Camera Clip in Filmora for Windows
- Compound Clip for Windows
- Multi-Clip Editing for Windows
- Filmora Motion Blur | Windows
- 360° Video Reframing for Windows
- Track Matte for Windows
- Video Chapters in Filmora on Windows
- Filmora Flicker Removal Guide | Windows
- Create Multi-Screen Videos in Filmora on Windows
- Masking in Filmora on Windows
- Creating a PIP Effect for Windows
- Keyframe Graph Editor for Windows
- Animation Keyframing for Windows
- Keyframe Path Curve
-
AI-Powered Video Editing
- Smart Scene Cut for Windows
- Smart Short Clips for Windows
- AI Face Mosaic for Windows
- Filmora AI Eye Contact- Windows
- AI Video Enhancer for Windows
- AI Text-to-Video for Windows
- Planar Tracking for Windows
- AI Idea to Video for Windows
- AI Media Analysis for Windows
- Filmora Image to Video for Windows
- Filmora Image to Prompt for Windows
- Instant Cutter Tool for Windows
- AI Extend
- Filmora AI Relight - Windows
- Filmora AI Image Enhancer Guide - Windows
- AI Script to Video Guide for Windows
- AI Text-Based Editing for Windows
- AI Mate Editing for Windows
- Instant Mode for Windows
- ChatGPT Plugin - AI Copywriting
- AI Smart Cutout for Windows
- Lens correction on Windows
- Auto Reframe Video for Windows
- AI Portrait Cutout
- Scene Detection for Windows
- AI Smart Masking for Windows
- Motion Tracking on Windows
- Video Stabilization for Windows
- AI Video/Photo Object Remover for Windows
- AI Smart Search for Windows
- AI Skin Tone Protection for Windows
- AI Image for Windows
- Chroma Key (Green Screen) for Windows
- Super Slow Motion with Optical Flow for Windows
- Video Denoise for Windows
-
-
Audio Editing for Windows
-
Basic Audio Editing
-
Advanced Audio Editing
-
AI-Powered Audio Editing
- Auto synchronization
- AI Sound Effects in Filmora for Windows
- Smart BGM Generation on Windows
- AI Voice Enhancer in Filmora
- AI Voice Cloning in Wondershare Filmora
- AI Music Generator for Windows
- Audio To Video
- AI Vocal Remover for Windows
- AI Auto Beat Sync for Windows
- AI Audio Stretch for Windows
- AI Audio Denoise for Windows
- Silence Detection on Windows
-
-
Text Editing for Windows
-
Basic Text Editing
-
Advanced Text Editing
-
AI-Powered Text Editing
-
-
Video Customizations
-
Video Effects
- Filmora VST3 Plugins for Windows
- Filmora OpenFX Plugins for Windows
- Retouch Guide for Windows
- Filmora Pen Tool Tutorial: Motion Paths & Animation Guide
- Animated Charts
- Mocha Filmora - For Windows
- Different Types of Video Effects
- NewBlue FX effects
- Boris FX effects | Filmora Windows Guide
- Body Effects for Windows
- Filmora -Filmstock Asset
-
Audio Effects
-
Transitions
-
Stickers
-
Filters
-
Color Editing
-
Animations
-
Templates
-
Asset Center
-
-
Exporting & Share & Cloud Backup
Export a Video in Filmora Windows
Completed Filmora projects can be exported for storage, device playback, online publishing, or further editing. Videos may also be saved for DVD use, while XML supports transferring project information between workflows. Batch Export and Live Photo provide additional choices for handling multiple clips or short motion content.
How to Export a Video Locally
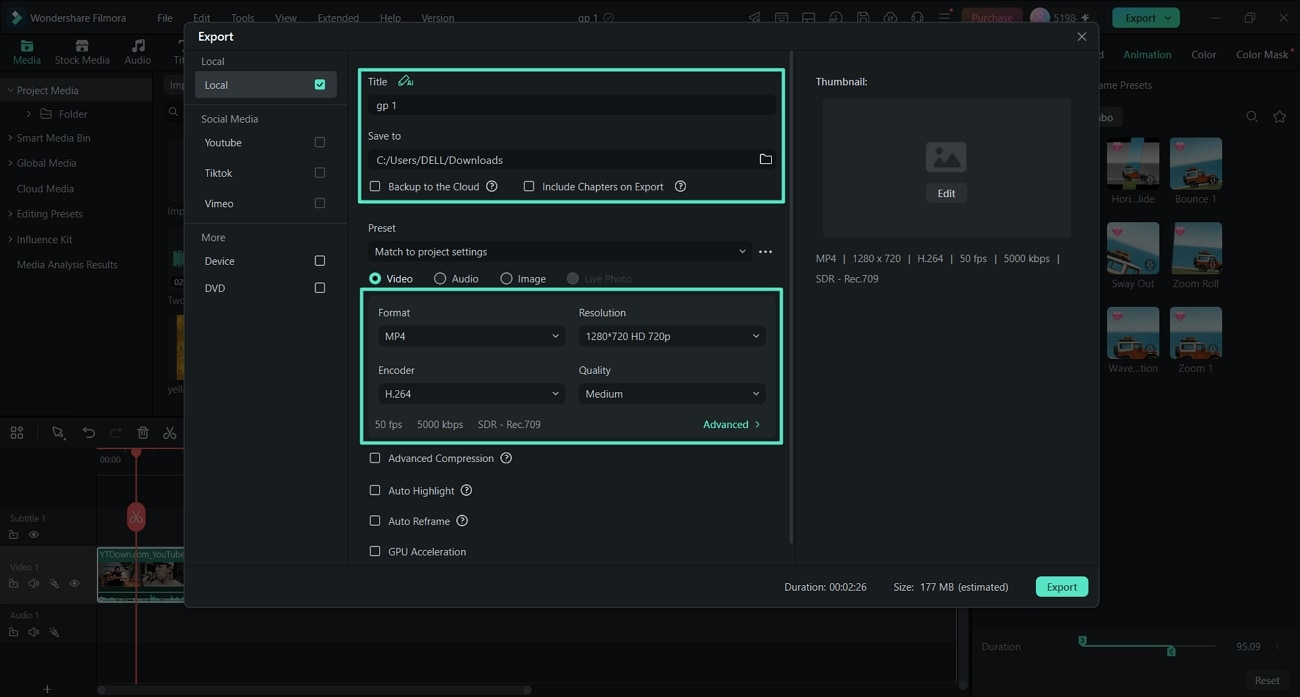
Use the following steps to export your completed video locally using Filmora's available options:
Select the format you want to export in. Rename the video and change the location on your computer where you save it. Check the output resolution, frame rate, size, and duration before you export. Once done, press Export to save the video locally.
Export Video to Device
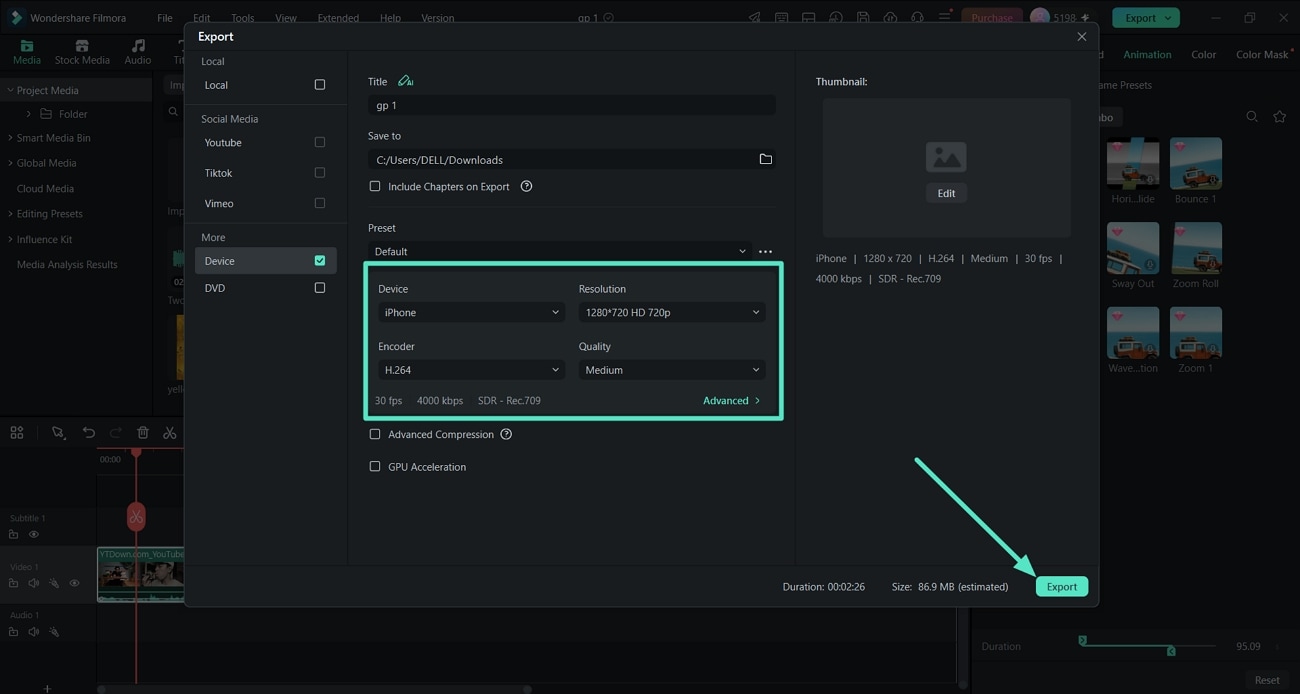
Devices supported by Filmora include iPhone, iPad, Apple TV, Apple TV 4K, iPod, Samsung Galaxy, Smart Phone, Android Generic, Google Pixel, Xbox One, PlayStation 4, PSP, and Smart TV. Save your finished Filmora project locally by following the steps provided below:
In the Device tab, choose a device, such as iPhones, iPads, Apple TVs, Samsung Galaxy phones, PlayStation 4s, and more. Next, choose the Resolution and Quality before pressing Export.
Export to YouTube
The steps below explain how to export your edited video directly to YouTube:
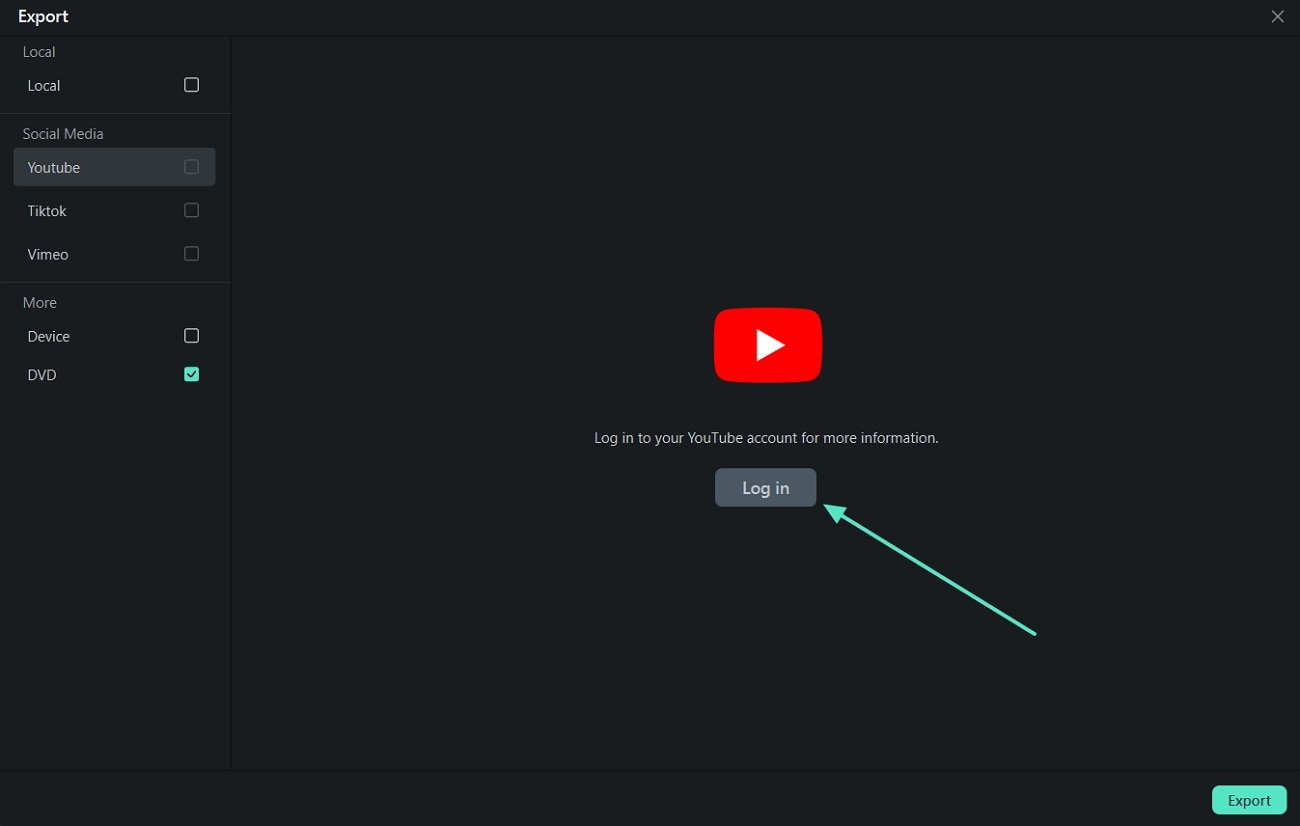
Step 1. Select YouTube to Export
To upload a finished video directly to YouTube, click Export and select YouTube. Press the Log in button.
Step 2. Connect YouTube to Filmora
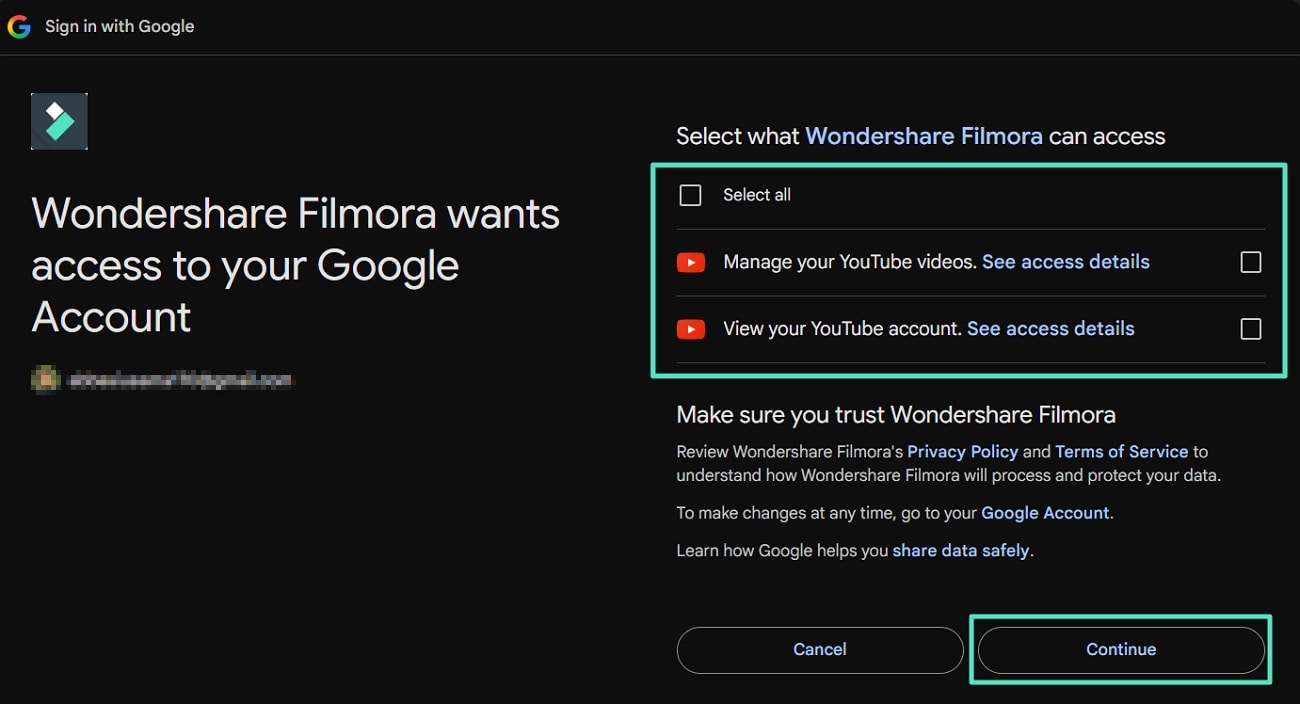
Log in to your YouTube account. Next, select what Filmora can access and click Continue.
Step 3. Input Information For Your Video
Input the title, description, and tags for the video and choose whether to upload the video as public, unlisted, or private.
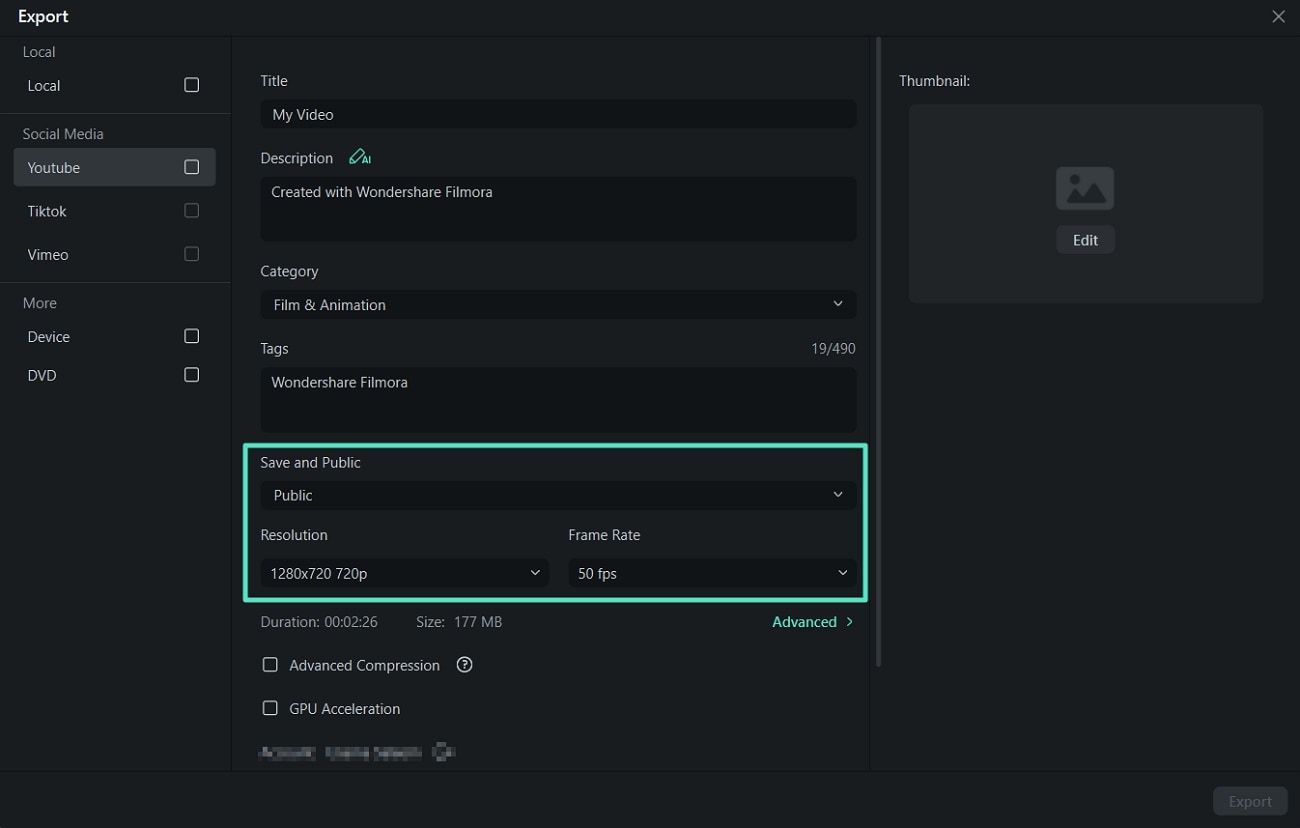
Step 4. Do More Settings
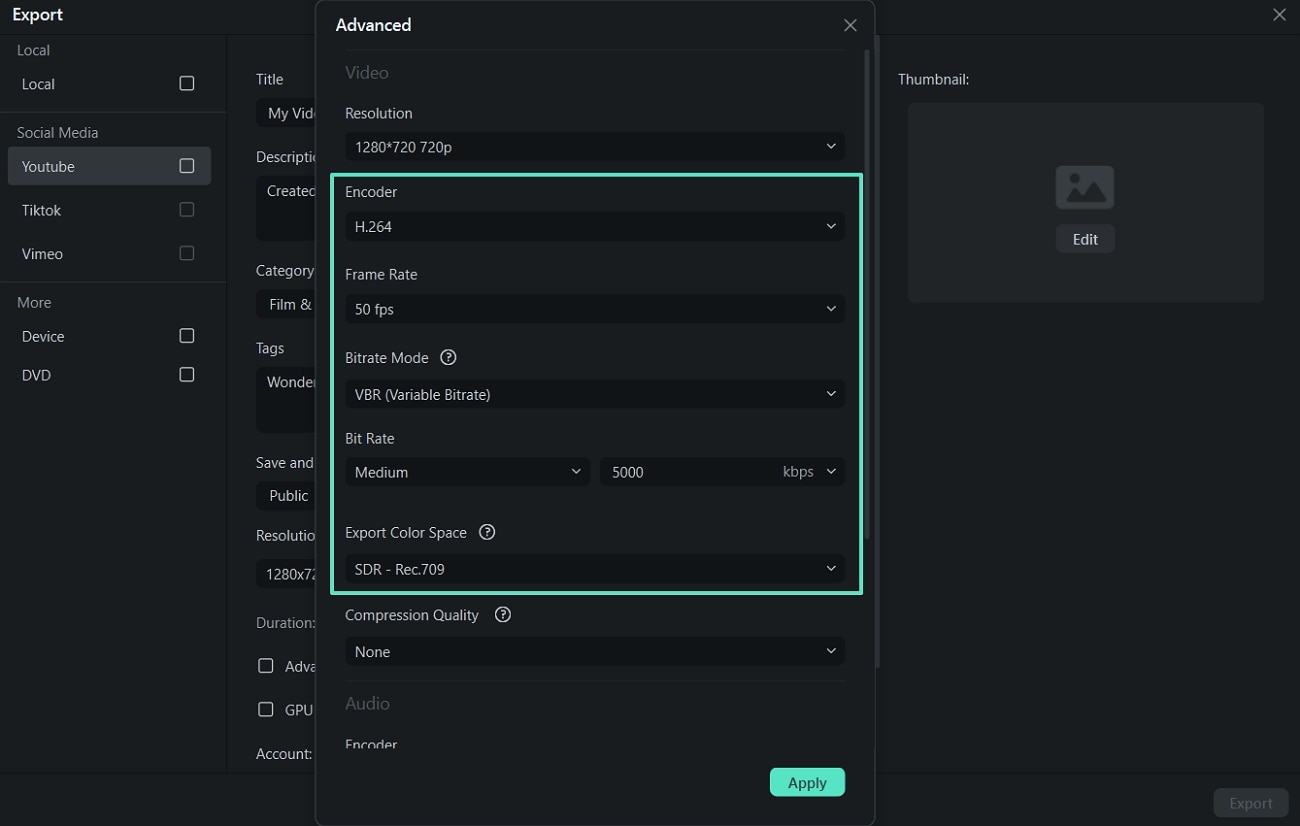
If you want to do more settings, you can click Advanced. When you finish setting, just click OK. After that, click the Export button to export your video directly to your YouTube channel.
Export to TikTok
When you finish editing a video clip in Filmora, you can also export and share it to TikTok directly. Follow the steps below:
Step 1. Select TikTok to Export
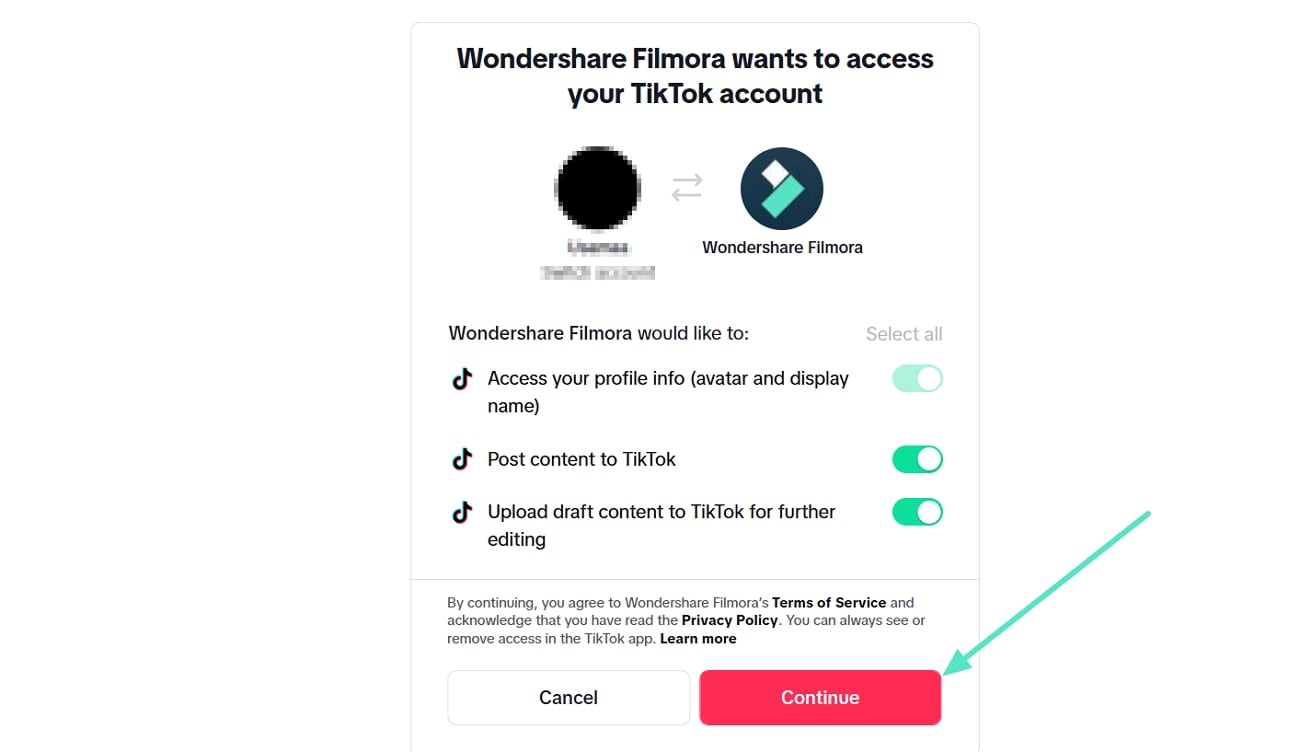
In the TikTok tab, log in to your TikTok account and view the login options. If your profile is already logged in in your browser, just press Continue.
Step 2. Export the Video After Login
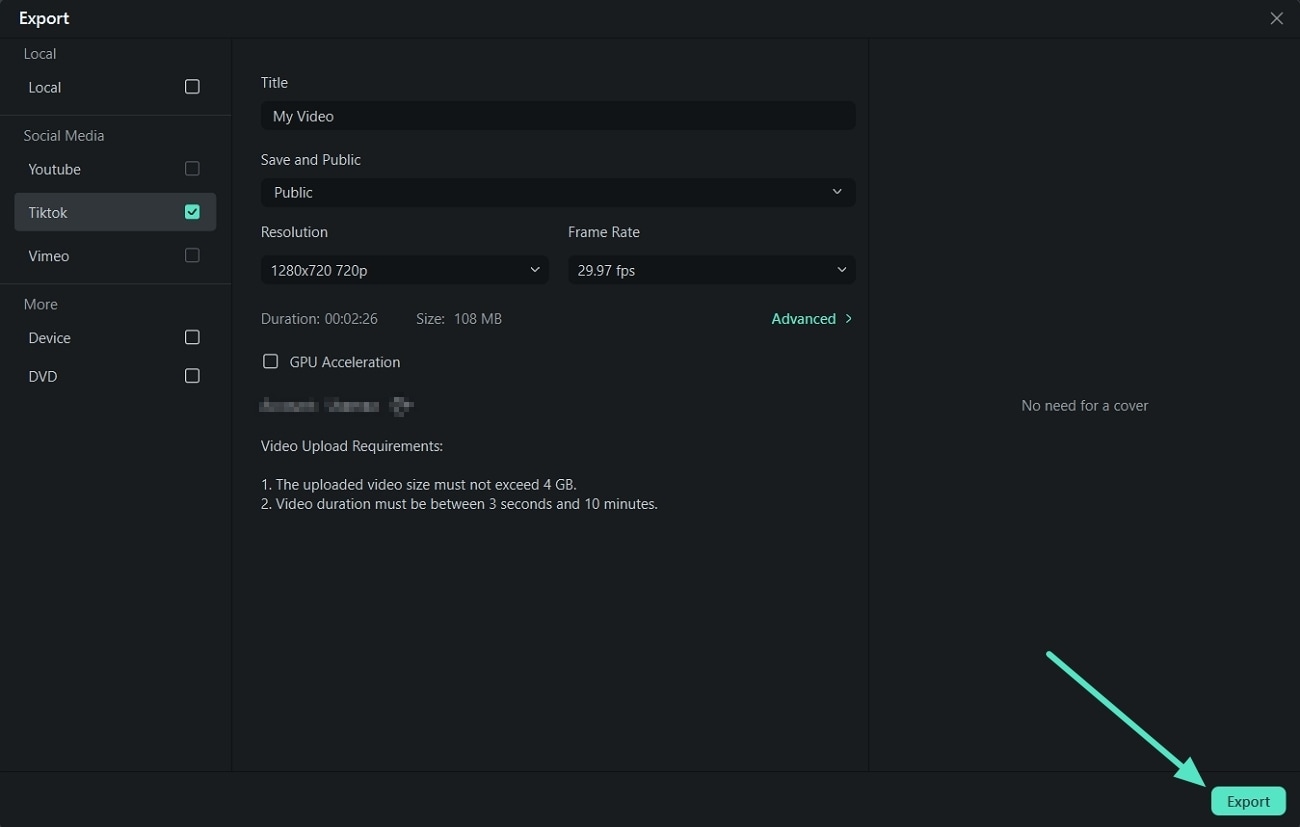
Once done, customize the video and audio settings in Filmora before sharing it with TikTok. Afterward, press the Export button.
Export to Vimeo
Filmora supports exporting your video to Vimeo directly. All you need to do is log in to your Vimeo account and export.
Step 1. Log in to Your Vimeo Account
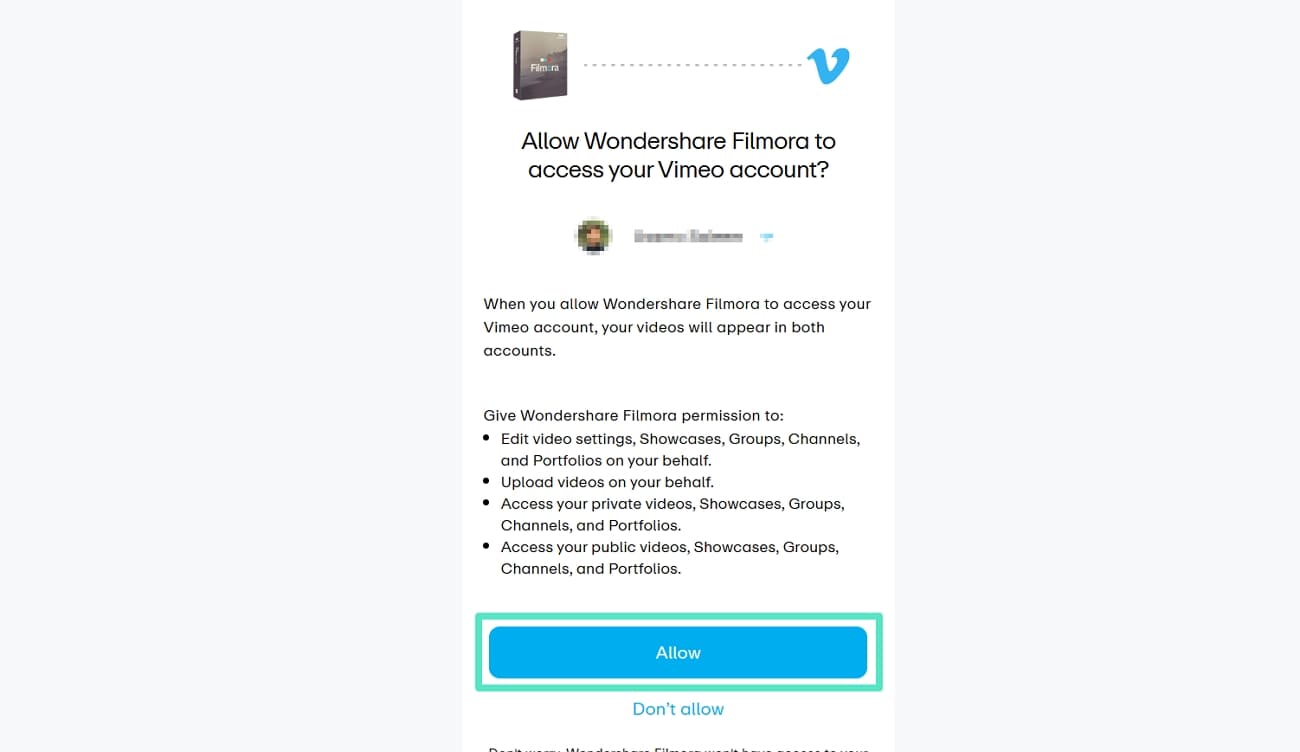
Once you choose the Vimeo tab, log in to your Vimeo account and check your browser to log in to your account. Click Allow to allow Filmora to access your account.
Step 2. Edit Video Information
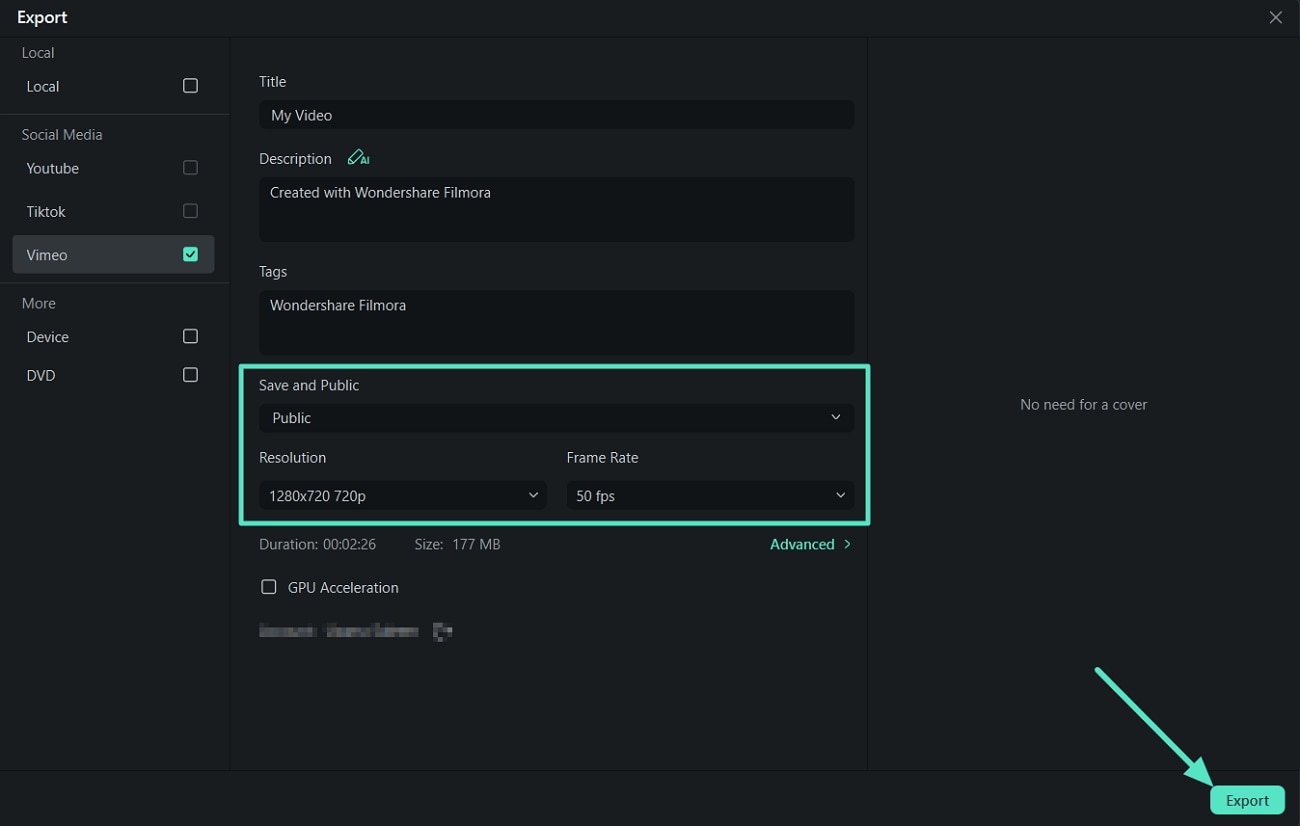
Input the title, description, and tags for the video and choose whether to upload the video as public, unlisted, or private. Once done, press the Export button.
Burn a DVD
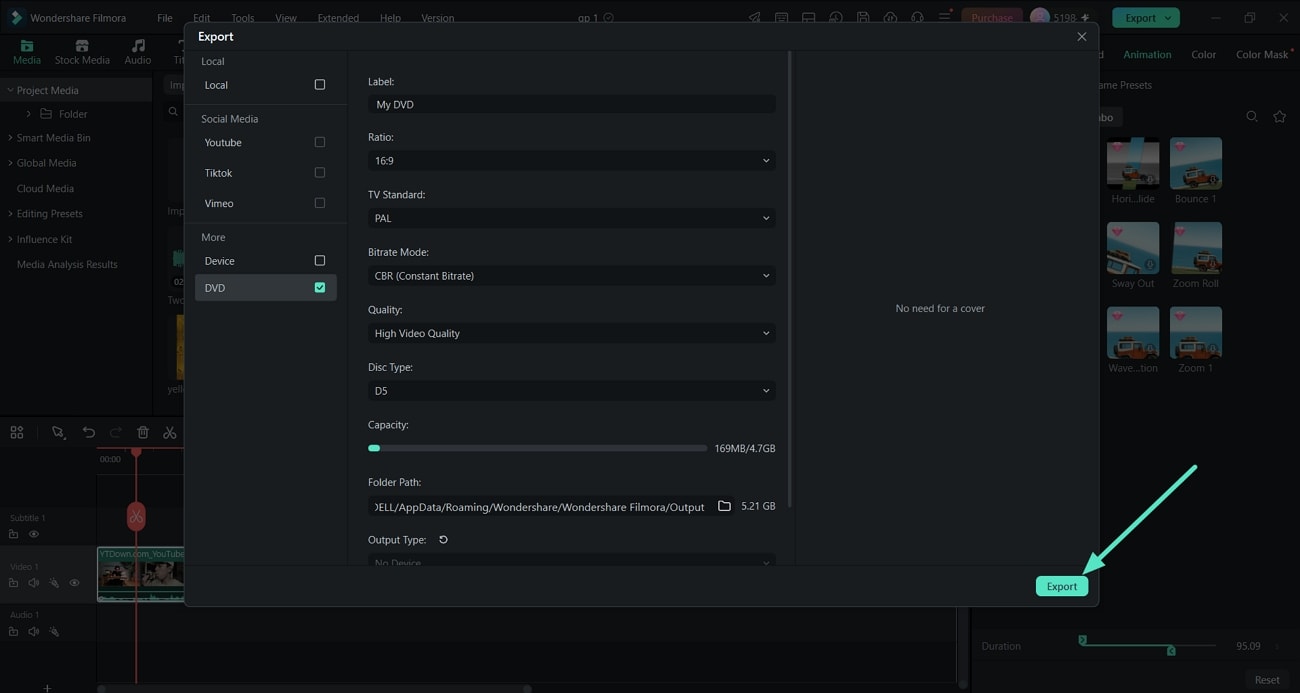
You can burn your video from a DVD. Choose the DVD tab and enter the required settings, such as the aspect ratio and disc type. To convert your video into DVD during exporting it. Then follow the below steps:
Enter the required settings, such as the aspect ratio and disc type. Enter the required settings, such as the aspect ratio and disc type. Click Export and wait for a while.
Batch Export
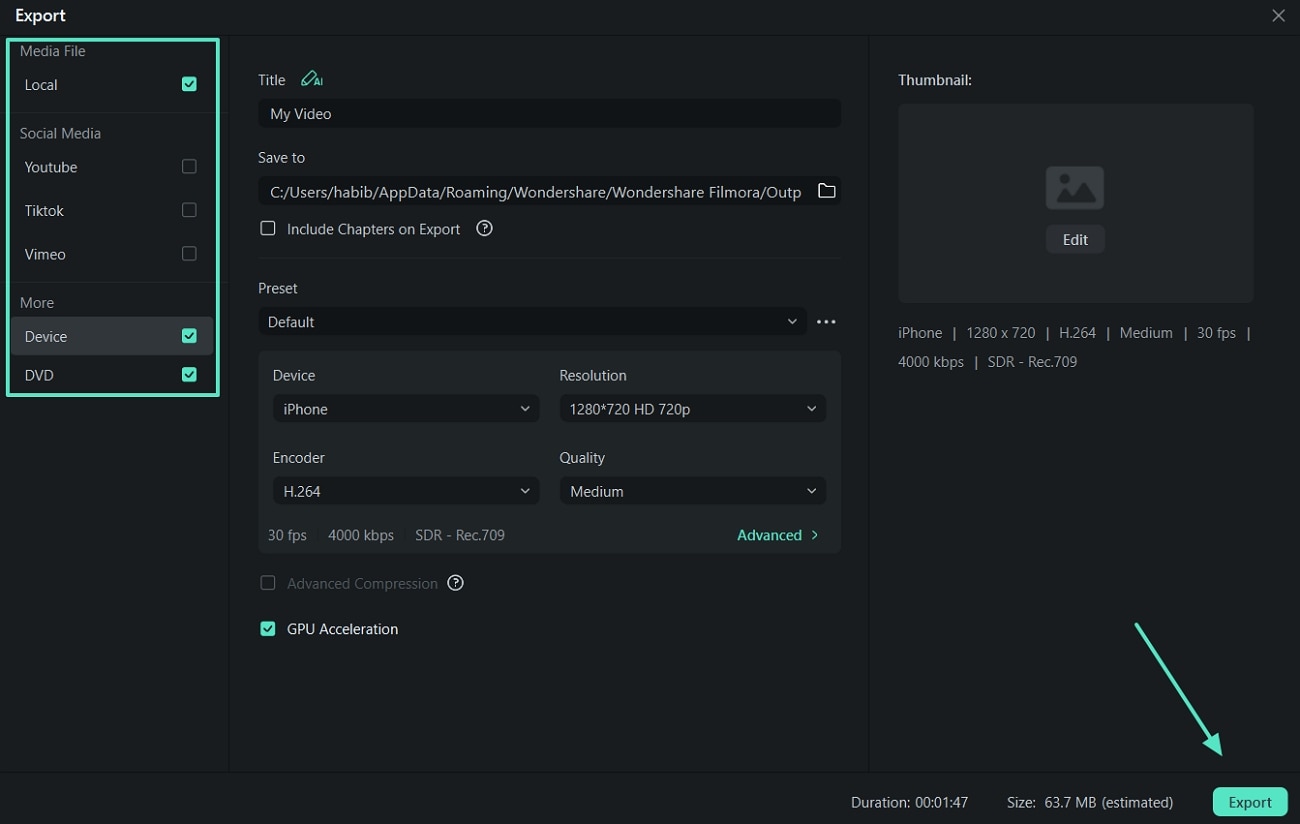
Using Filmora's Batch Export functionality, export multiple files at once by selecting more than one preset from the Export window. This means that an individual video you've edited can be exported for both YouTube and TikTok with this feature.
Step 1. Batch Export Settings in Filmora
Upon selecting the Export button, choose different presets from the available list on the left. With all other settings defined successfully, tap the Export button to perform the batch export operations in Filmora.
Step 2. Preview Progress of Individual Presets
Filmora displays the progress for all selected presets individually across the next window.
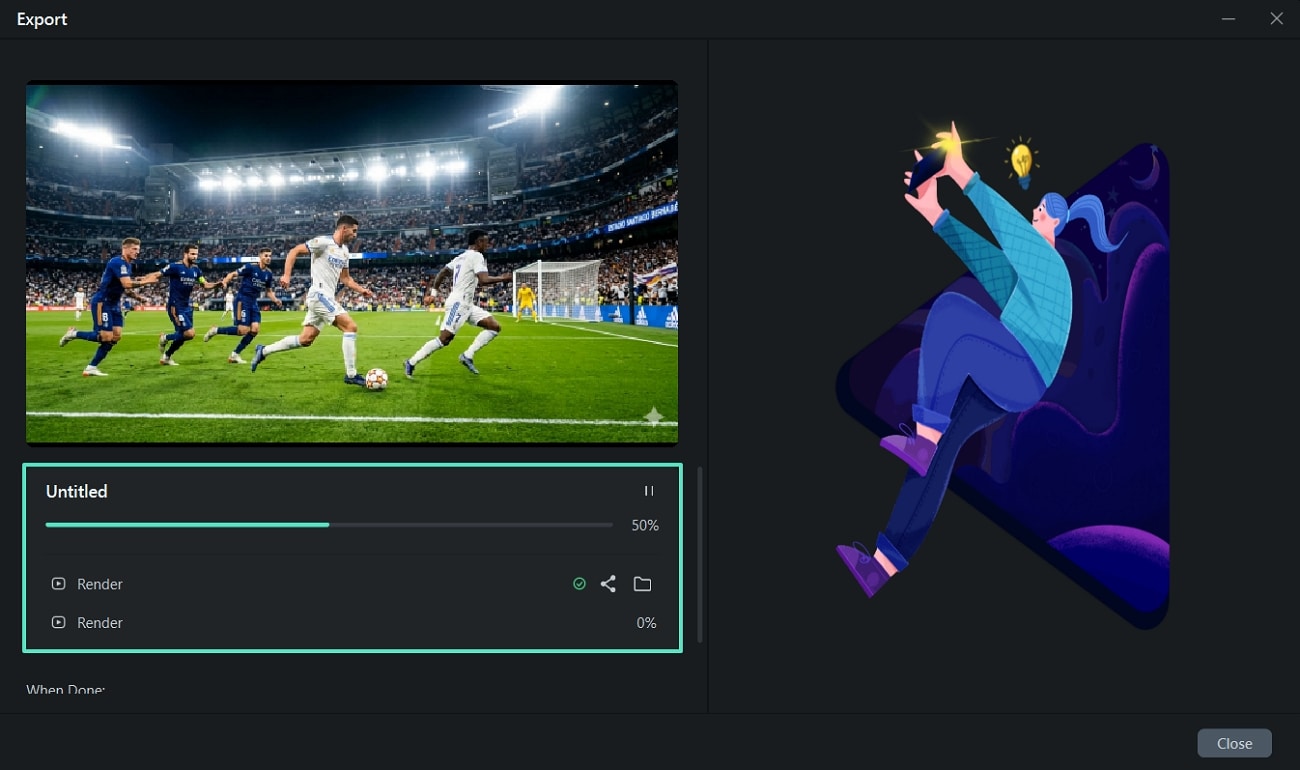
Note: The Batch Export feature calls for certain hardware requirements, which means that it will only appear for those users where this particular entry is available. Not every other user will be able to export their videos in such manner.
Guide to Export a Project as XML
Follow the steps below to export your Filmora project in XML format:
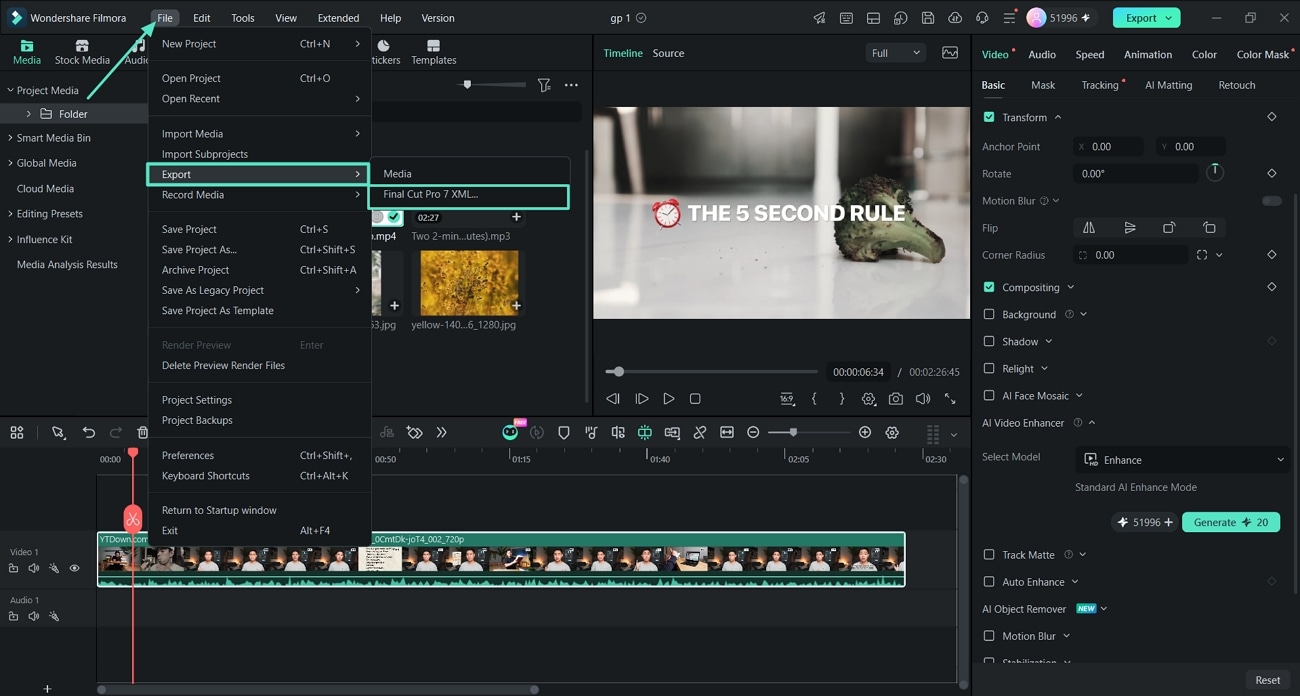
When your project is open in Filmora, press the File option at the top and select the Export option. In the sub-menu, choose Final Cut Pro 7 XML and select the location you want to export to. You can directly import the XML file when needed.
Save Multiple Clips with Batch Export
Provided below are the steps to export multiple videos together using the Batch Export feature in Filmora:
Step 1. Select the Batch Video Clips
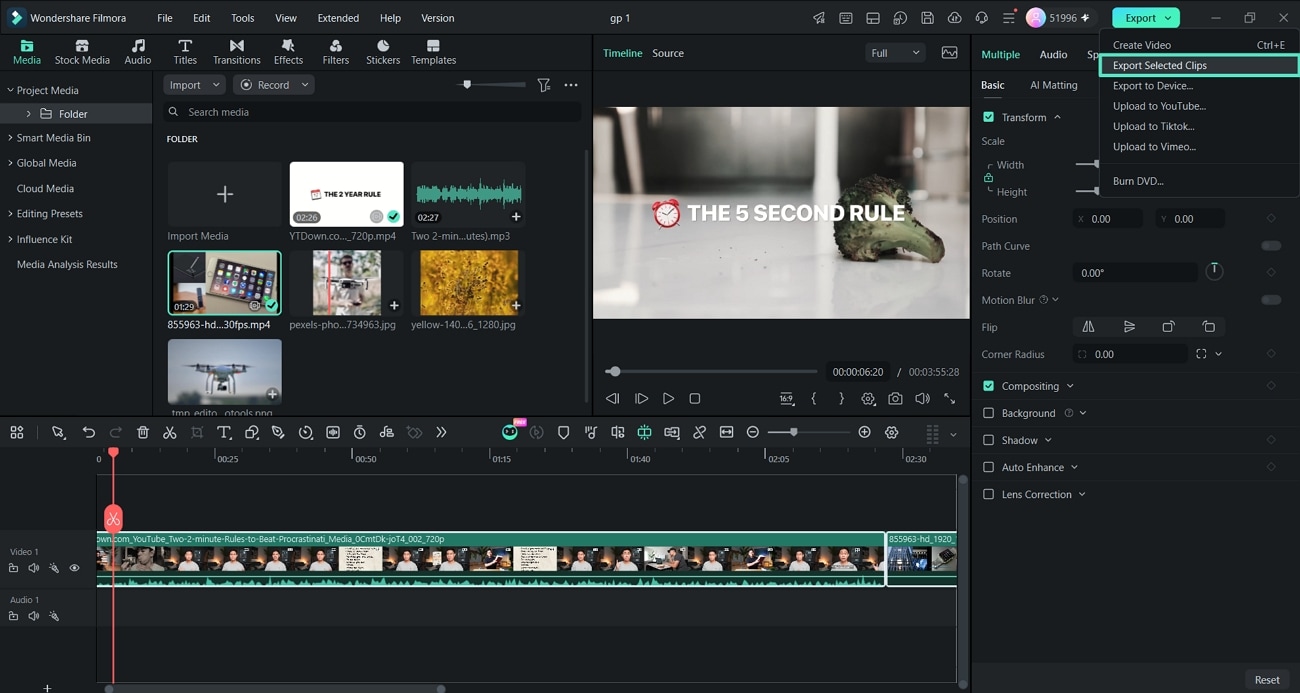
On your Timeline in Filmora, press the Ctrl key and choose the multiple clips you want to export. Then, access Export options and choose Export Selected Clips.
Step 2. Configure Export Settings
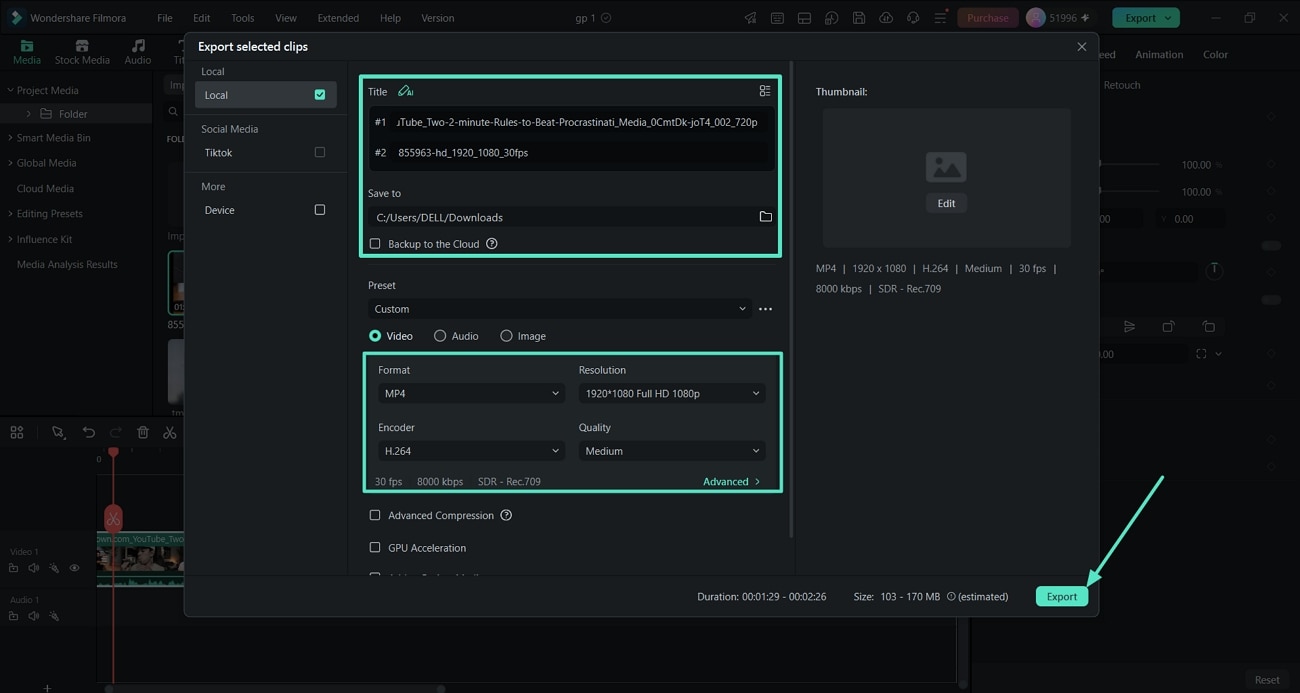
Then, write a title for both clips and choose the Save to location. Afterward, choose the format, resolution, and quality, and press the Export button to save clips separately.
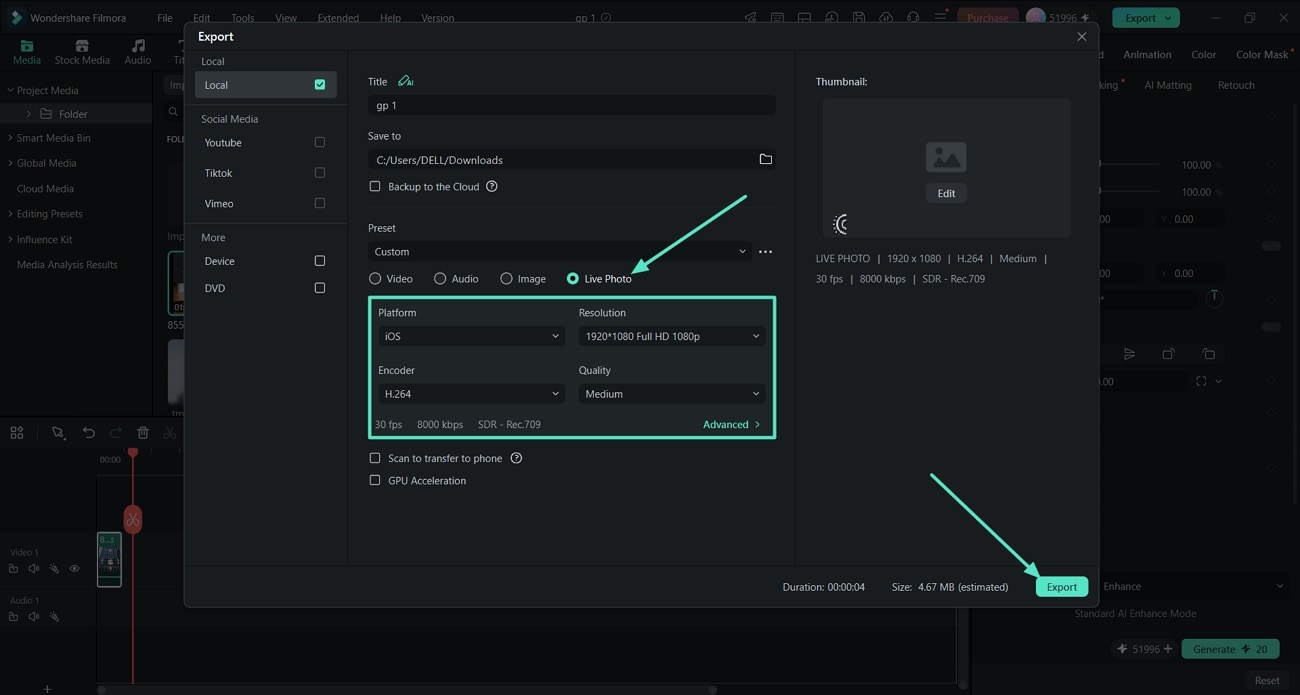
Turn a Video Clip into a Live Photo
Follow the steps provided below to export your edited video as a Live Photo in Filmora:
Trim down your clip to 5 seconds or less and press the Export button at the top right corner. Then, choose Live Photo and select the platform, resolution, and quality. Finally, press Export to save the final output at your selected location.
Related Posts
Featured Articles
What is a Film Dissolve Effect and How to Add it In Filmora
One of the first-ever transition effects used in film is the dissolve transition. Learn its history and how to use it in Filmora.
How To Curve Text in Microsoft Word: A Step-by-Step Guide
Discover how to curve text in Microsoft Word using these simple methods. Both novice and experienced users will find this article to be ideal. Use fashionable text effects to improve your documents.
All You Need to Know About Cinematic Color Grading
Do you want to learn how to apply cinematic color grading to your video project? If so, this article is for you. Click here to read the guide on this procedure.
Recommended User Guide
Auto Highlight
This is a guide about the auto highlight feature in Filmora.
AI Thumbnail Creator
Filmora can generate attractive thumbnails for your videos with AI assistance.
