
For the Best Results, Use the Latest Version.
-
Preparations
-
Account
-
Get Started & Basic Settings
-
Compatibility & Tech Specs
-
Performance Settings
-
-
Creating Projects
-
Creating New Projects
-
-
Importing & Recording
-
Video Editing for Windows
-
Basic Video Editing
- Enable/Disable Clip in Windows
- Magnetic Timeline for Windows
- Dual Monitor Setup for Video Editing on Windows
- Select All Clips on Timeline for Windows
- Timeline and Track Management
- Auto Ripple for Windows
- Split & Trim Video
- Crop & Pan & Zoom Video in Filmora for Windows
- Compositing
- Change Video Speed on Windows
- Reverse Video for Windows
- Mark In and Mark Out for Windows
- Markers for Windows
- Group editing
- Customizable Backgrounds for Videos and Images in Windows
- Video Snapshot
- Using Freeze Frame in Filmora for Windows
- Logo Reveal For Windows
- Auto Enhance in Filmora for Windows
- Applying drop shadow
- Adjustment layer for Windows
- Apply Transforming for Windows
- Video Editing Ruler – Windows
-
Advanced Video Editing
- Keyframe Motion Blur for Windows
- Drawing Tools for Windows | Filmora Guide
- Camera Tracking for Windows
- Create Multi-Camera Clip in Filmora for Windows
- Compound Clip for Windows
- Multi-Clip Editing for Windows
- Filmora Motion Blur | Windows
- 360° Video Reframing for Windows
- Track Matte for Windows
- Video Chapters in Filmora on Windows
- Filmora Flicker Removal Guide | Windows
- Create Multi-Screen Videos in Filmora on Windows
- Masking in Filmora on Windows
- Creating a PIP Effect for Windows
- Keyframe Graph Editor for Windows
- Animation Keyframing for Windows
- Keyframe Path Curve
-
AI-Powered Video Editing
- Smart Scene Cut for Windows
- Smart Short Clips for Windows
- AI Face Mosaic for Windows
- Filmora AI Eye Contact- Windows
- AI Video Enhancer for Windows
- AI Text-to-Video for Windows
- Planar Tracking for Windows
- AI Idea to Video for Windows
- AI Media Analysis for Windows
- Filmora Image to Video for Windows
- Filmora Image to Prompt for Windows
- Instant Cutter Tool for Windows
- AI Extend
- Filmora AI Relight - Windows
- Filmora AI Image Enhancer Guide - Windows
- AI Script to Video Guide for Windows
- AI Text-Based Editing for Windows
- AI Mate Editing for Windows
- Instant Mode for Windows
- ChatGPT Plugin - AI Copywriting
- AI Smart Cutout for Windows
- Lens correction on Windows
- Auto Reframe Video for Windows
- AI Portrait Cutout
- Scene Detection for Windows
- AI Smart Masking for Windows
- Motion Tracking on Windows
- Video Stabilization for Windows
- AI Video/Photo Object Remover for Windows
- AI Smart Search for Windows
- AI Skin Tone Protection for Windows
- AI Image for Windows
- Chroma Key (Green Screen) for Windows
- Super Slow Motion with Optical Flow for Windows
- Video Denoise for Windows
-
-
Audio Editing for Windows
-
Basic Audio Editing
-
Advanced Audio Editing
-
AI-Powered Audio Editing
- Auto synchronization
- AI Sound Effects in Filmora for Windows
- Smart BGM Generation on Windows
- AI Voice Enhancer in Filmora
- AI Voice Cloning in Wondershare Filmora
- AI Music Generator for Windows
- Audio To Video
- AI Vocal Remover for Windows
- AI Auto Beat Sync for Windows
- AI Audio Stretch for Windows
- AI Audio Denoise for Windows
- Silence Detection on Windows
-
-
Text Editing for Windows
-
Basic Text Editing
-
Advanced Text Editing
-
AI-Powered Text Editing
-
-
Video Customizations
-
Video Effects
- Filmora VST3 Plugins for Windows
- Filmora OpenFX Plugins for Windows
- Retouch Guide for Windows
- Filmora Pen Tool Tutorial: Motion Paths & Animation Guide
- Animated Charts
- Mocha Filmora - For Windows
- Different Types of Video Effects
- NewBlue FX effects
- Boris FX effects | Filmora Windows Guide
- Body Effects for Windows
- Filmora -Filmstock Asset
-
Audio Effects
-
Transitions
-
Stickers
-
Filters
-
Color Editing
-
Animations
-
Templates
-
Asset Center
-
-
Exporting & Share & Cloud Backup
Creating a PIP Effect for Windows
Picture-in-picture (PIP) lets you place a smaller video over a main background clip, allowing multiple videos to play on the same screen. It is commonly used for tutorials, gaming videos, product demos, and reaction content where both narration and visuals need to be shown together.
PIP effects can be customized with flexible controls such as resizing, repositioning, blending modes, masks, animations, and border effects. These options help improve visual storytelling and create more engaging, professional-looking videos.
Index
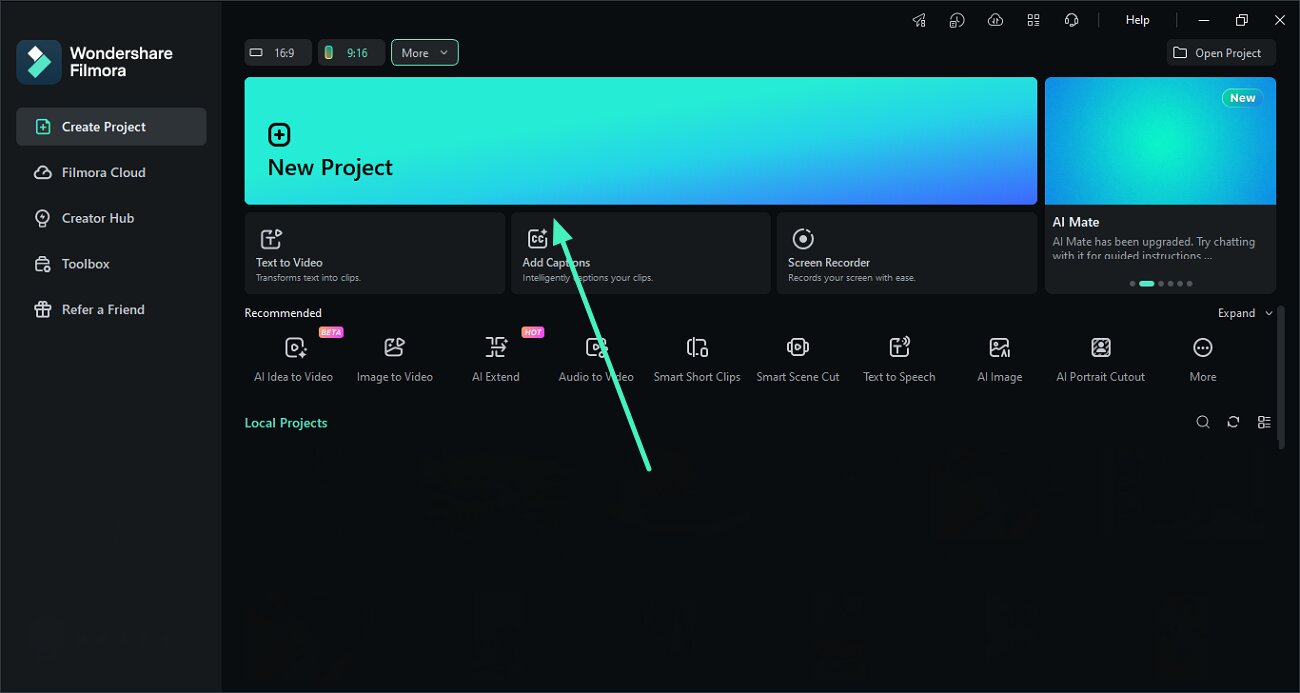
Step 1. Open a New Filmora Project
Launch Filmora on your Windows PC and click New Project from the home screen. Import both your background video and PIP video into the media library.
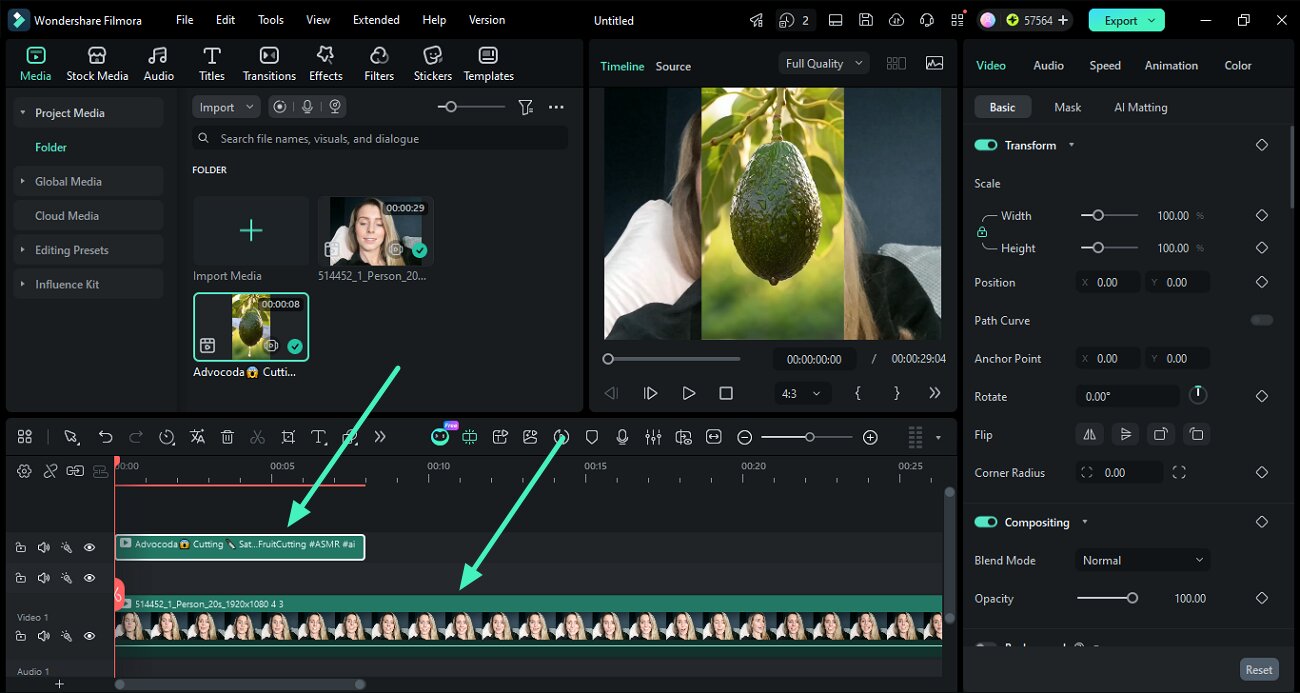
Step 2. Add Videos to Timeline
Drag the background video to Video Track 1 in the timeline. Then drag the PIP video and place it on a track above the background clip.
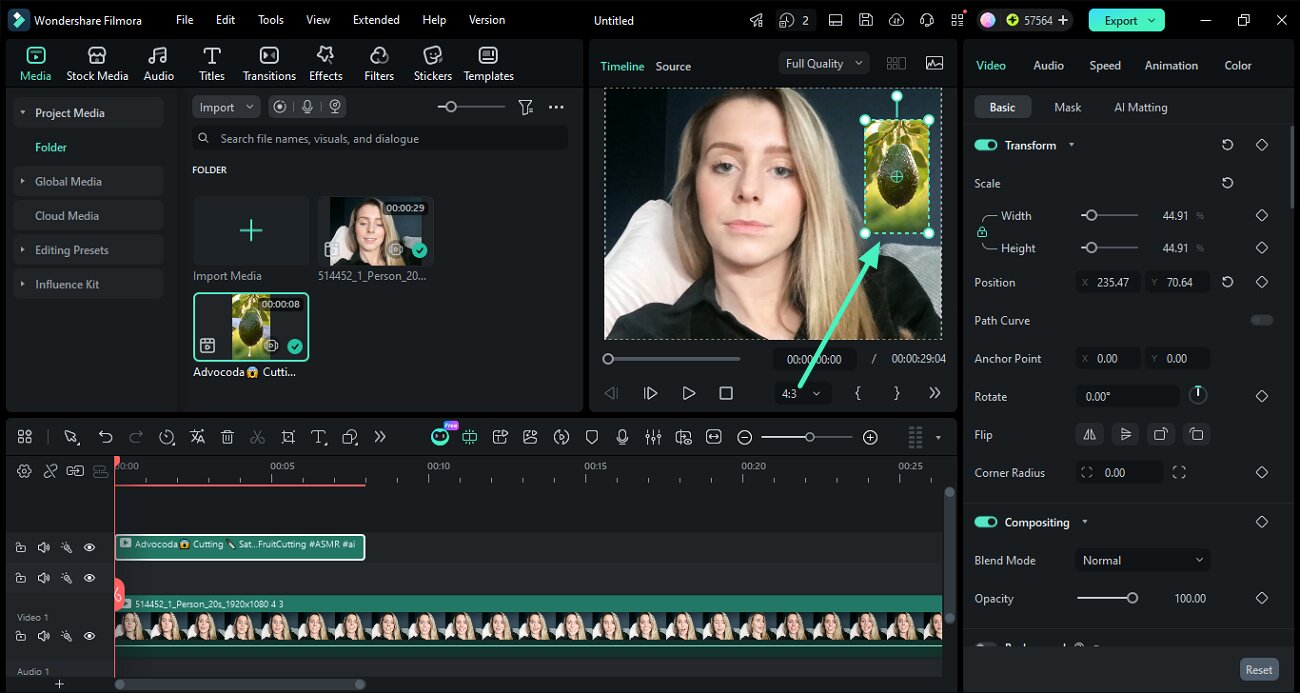
Step 3. Position and Resize PIP Video
Select the PIP clip in the timeline located below. In the preview window, drag the handles to adjust its size and move it to the desired position on the screen.
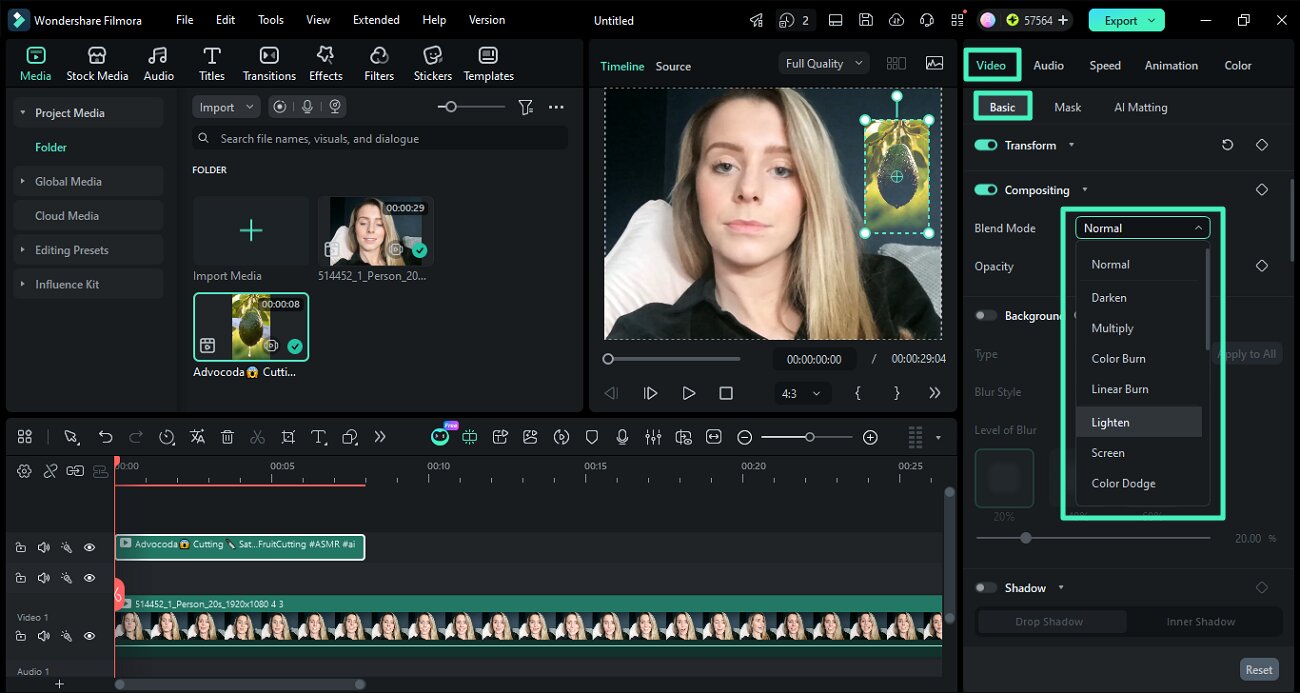
Step 4. Change Blending Mode
Click the PIP clip to open the video settings panel. Go to the Basic tab, scroll to Compositing, and choose a Blend Mode like Multiply, Screen, Darken, or Color Burn. Adjust opacity to refine the look.
Step 5. Apply Mask to PIP Video
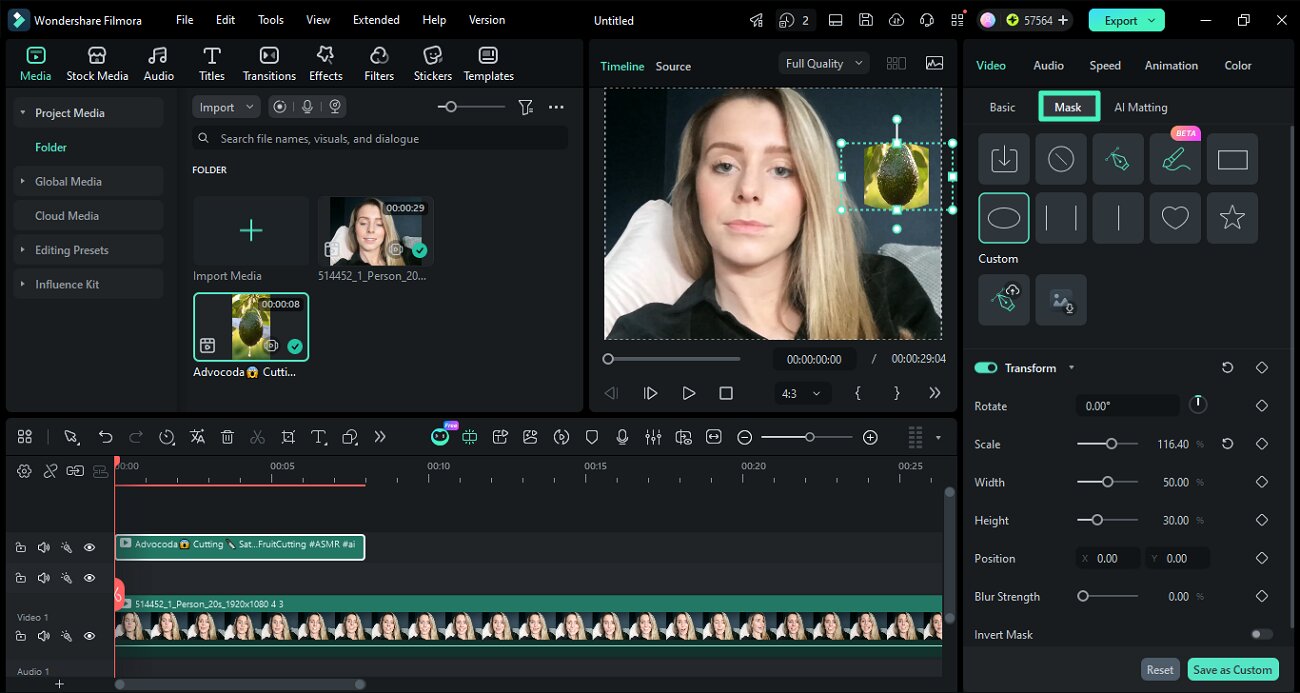
Switch to the Mask tab in the video panel. Choose a preset mask shape and apply it to the PIP clip. You can also import custom masks, and use keyframes for advanced control.
Step 6. Add Animation and Motion
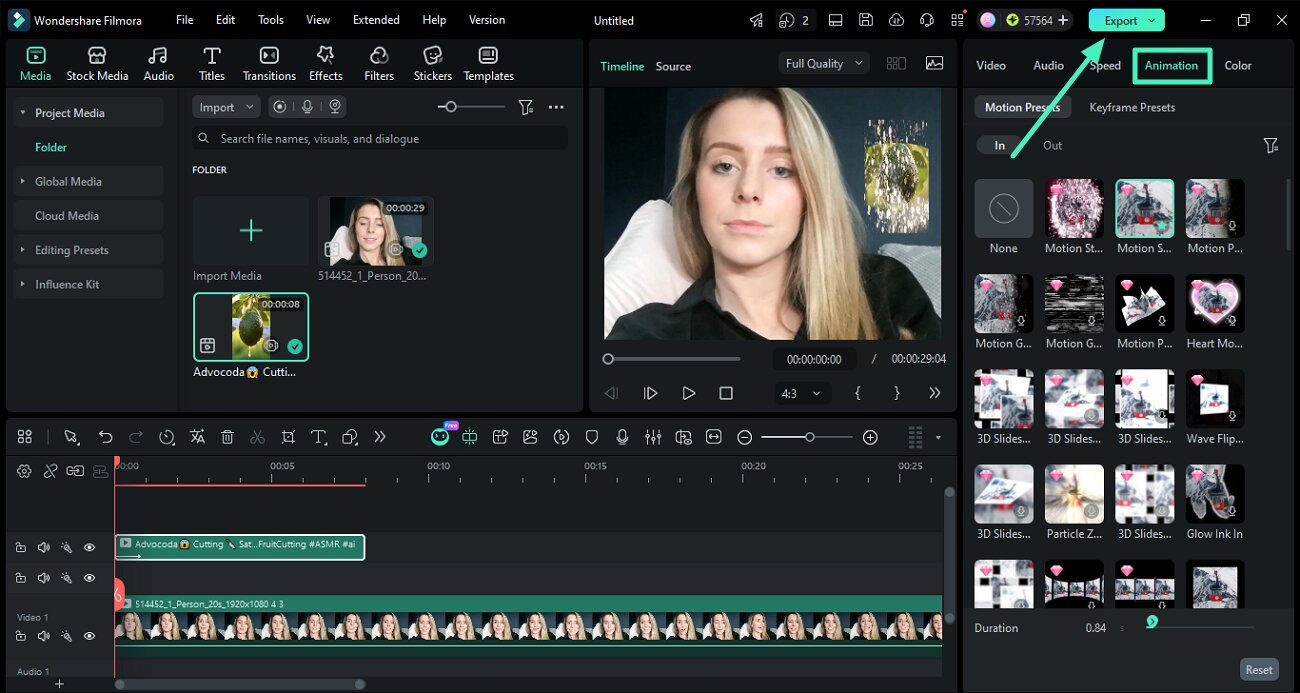
Enable the Animation section from the panel and select a preset animation or motion style, then apply it to preview the effect instantly. Once done, press the Export button to save the results to your device.
Related Posts
Featured Articles
The Ultimate Hailuo AI Prompts Guide: From Beginner to Pro
Learn to write effective Hailuo AI prompts with our complete guide. Master formulas, cinematic techniques & real examples to create professional AI videos. Start now!
How to Apply the Ken Burns Effect in Final Cut Pro + A Much Better Suggestion
The Ken Burns effect is very popular. It is so popular that Final Cut Pro has a special feature named after it. Use it in FCPX and one better alternative.
Latest Update | How to Motion Tracking in Video Editing with Filmora?
Motion tracking in editing can add more flair to all your video content. Learn what it is and how to add text, images, and other effects to your videos.
Recommended User Guide
Create Multi-Screen Videos in Filmora on Windows
Learn how to create Split-Screen videos in FIlmora.
Drawing Tools for Windows | Filmora Guide
This guide tell you how to use Drawing Tools feature in Filmora for Mac.
Track Matte for Windows
Learn how to use Track Matte in Filmora for Windows to reveal and composite video clips with Alpha Matte, Luma Matte, and Reverse options.
