For the Best Results, Use the Latest Version.
-
Preparations
-
Account
-
Get Started & Basic Settings
-
Compatibility & Tech Specs
-
Performance Settings
-
-
Creating Projects
-
Creating New Projects
-
-
Importing & Recording
-
Video Editing for Windows
-
Basic Video Editing
- Enable/Disable Clip in Windows
- Magnetic Timeline for Windows
- Dual Monitor Setup for Video Editing on Windows
- Select All Clips on Timeline for Windows
- Manage Timeline and Tracks on Windows
- Auto Ripple for Windows
- Split & trim video
- Crop & Pan & Zoom Video
- Compositing
- Change Video Speed on Windows
- Playing videos in reverse
- Mark In and Mark Out for Windows
- Markers for Windows
- Group editing
- Customizable Backgrounds for Videos and Images in Windows
- Video snapshot
- Using freeze frame
- Logo Reveal For Windows
- Auto Enhance in Filmora for Windows
- Applying drop shadow
- Adjustment layer for Windows
- Apply Transforming for Windows
- Video Editing Ruler – Windows
-
Advanced Video Editing
- Drawing Tools for Windows | Filmora Guide
- Create Multi-Camera Clip
- Compound Clip for Windows
- Multi-Clip Editing for Windows
- Filmora Motion Blur | Windows
- Filmora Flicker Removal Guide | Windows
- Apply mask to video
- Creating a PIP effect
- Keyframe Graph Editor for Windows
- Add animation keyframing for Windows
- Keyframe Path Curve for Windows
-
AI-Powered Video Editing
- Smart Scene Cut for Windows
- Smart Short Clips for Windows
- AI Face Mosaic for Windows
- Filmora AI Eye Contact- Windows
- AI Video Enhancer for Windows
- AI Text-to-Video for Windows
- Planar Tracking for Windows
- AI Idea to Video for Windows
- Filmora Image to Video for Windows
- Filmora Image to Prompt for Windows
- Instant Cutter Tool for Windows
- AI Extend
- Filmora AI Relight - Windows
- Filmora AI Image Enhancer Guide - Windows
- AI Script to Video Guide for Windows
- AI Text-Based Editing for Windows
- AI Mate Editing for Windows
- Create with instant mode
- ChatGPT Plugin - AI Copywriting
- AI Smart Cutout for Windows
- Lens correction on Windows
- Auto Reframe Video for Windows
- AI Portrait Cutout
- Scene detection feature
- AI Smart Masking for Windows
- Make motion tracking
- Video Stabilization for Windows
- AI Video/Photo Object Remover for Windows
- AI Smart Search for Windows
- AI Skin Tone Protection for Windows
- AI Image for Windows
- Chroma key (green screen)
- Super Slow Motion with Optical Flow for Windows
- Video Denoise for Windows
-
-
Audio Editing for Windows
-
Basic Audio Editing
-
Advanced Audio Editing
-
AI-Powered Audio Editing
- Auto synchronization
- AI Sound Effect
- Smart BGM Generation
- AI Voice Enhancer
- How to Execute AI Voice Cloning in Wondershare Filmora?
- AI Music Generator for Windows
- Audio To Video
- AI Vocal Remover for Windows
- AI Auto Beat Sync for Windows
- AI Audio Stretch for Windows
- AI Audio Denoise for Windows
- Silence detection
-
-
Text Editing for Windows
-
Basic Text Editing
-
Advanced Text Editing
-
AI-Powered Text Editing
-
-
Video Customizations
-
Video Effects
-
Audio Effects
-
Transitions
-
Stickers
-
Filters
-
Color Editing
-
Animations
-
Templates
-
Asset Center
-
-
Exporting & Share & Cloud Backup
Chroma Key
The Chroma Key feature in Wondershare Filmora allows users on Windows to remove and replace green screen backgrounds with ease. It helps create professional-looking scenes by layering subjects over any custom background. With simple controls for color selection, edge adjustment, and transparency, users can achieve clean and realistic results. This feature is ideal for filmmaking, YouTube videos, and creative storytelling projects.
Index
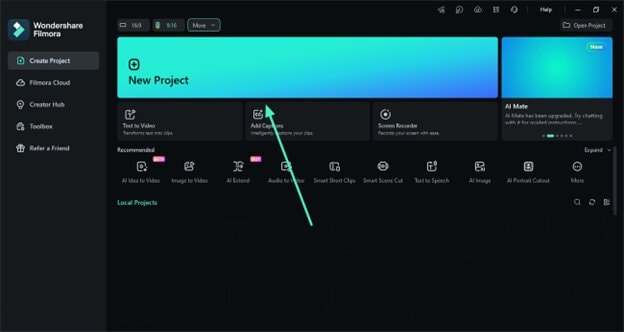
Step 1. Create a New Project and Import Footage
Begin by opening Filmora and selecting the New Project option from the main screen. Next, bring your green screen video into the media library and place it on the editing timeline to start working.
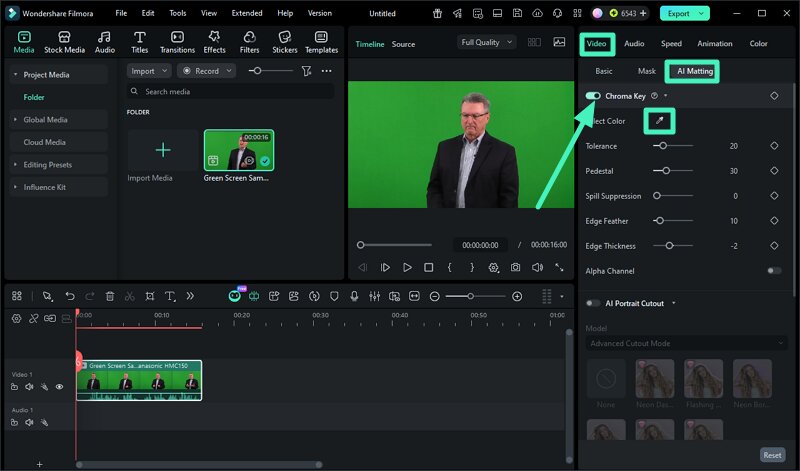
Step 2. Activate Chroma Key and Remove Background
Select the video clip and go to the right-side settings panel. Enable AI Matting under the video options, then switch on the Chroma Key tool. Use the color picker to click on the green background, which will instantly remove it from the scene.
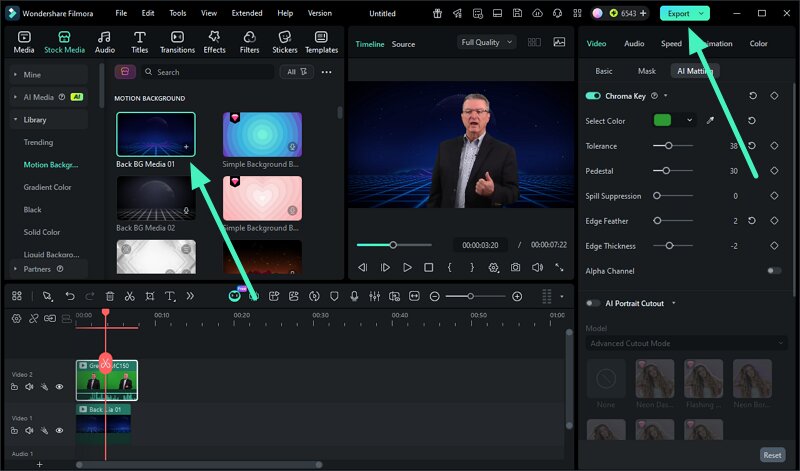
Step 3. Add New Background and Export Final Video
Once the background is removed, insert a new image or video from stock media or upload your own. Adjust positioning and blending for a natural look. Finally, click Export to save your completed project.
Attributes You Can Adjust using Chroma Key
- Alpha Channel: Controls the transparency of the keyed background to blend subjects smoothly with the new layer.
- Spill Suppression: Reduces unwanted green or background color spill on the subject for a cleaner look.
- Edge Feather and Thickness: Softens or sharpens the edges of the subject to make the cutout appear more natural.
- Tolerance: Adjusts how much of the selected color range is removed from the background.
- Pedestal: Refines dark areas and improves contrast for better separation between subject and background.
Related Posts
Featured Articles
Create a Hype Video That Hits Hard with Free Music & AI Tools
Want to energize your audience, build excitement, and leave a strong impression? With Filmora’s AI tools and free music, creating a hype video has never been easier.
How to Make Fried Rice Video | Quick Guide to Shoot & Edit Your Video
Quickly learn how to make fried rice video with easy step-by-step recipes and discover how to film, edit, and share your own cooking video.
Exploring Scene Edit Detection of Premiere Pro
Learn how to identify cut points using Scene Edit Detection in Premiere Pro. Then, explore the best alternative—Wondershare Filmora—to effortlessly identify video cut points.
Recommended User Guide
Create with instant mode
No editing skill is needed for using an Instant Mode to create a video. Just add the media you want to show, and Filmora will make a video for you at once. (This feature is only for Windows)
Make motion tracking
The Motion Tracker tool lets you track movement in your video and have objects like elements, videos, images, and text follow that movement.
AI Face Mosaic for Windows
The AI Face Mosaic feature is an advanced tool designed to automatically recognize and protect faces in videos or images. Utilizing intelligent mosaic to track and cover faces in real-time, ensuring that privacy is safeguarded regardless of face movement within the frame.
