For the Best Results, Use the Latest Version.
-
Preparations
-
Account
-
Get Started & Basic Settings
-
Compatibility & Tech Specs
-
Performance Settings
-
-
Creating Projects
-
Creating New Projects
-
-
Importing & Recording
-
Video Editing for Windows
-
Basic Video Editing
- Enable/Disable Clip in Windows
- Magnetic Timeline for Windows
- Drawing Tools fo Windows
- Dual Monitor Setup for Video Editing on Windows
- Select All Clips on Timeline for Windows
- Dual Monitor Setup for Video Editing on Mac
- Manage Timeline and Tracks
- Auto Ripple for Windows
- Split & trim video
- Crop & Pan & Zoom Video
- Compositing
- Change video playback speed
- Playing videos in reverse
- Mark In and Mark Out for Windows
- Markers for Windows
- Group editing
- Customizable Backgrounds for Videos and Images in Windows
- Video snapshot
- Using freeze frame
- Logo Reveal For Windows
- Apply auto enhance
- Applying drop shadow
- Adjustment layer for Windows
- Transforming
- Video Editing Ruler – Windows
-
Advanced Video Editing
-
AI-Powered Video Editing
- Smart Scene Cut for Windows
- Smart Short Clips for Windows
- AI Face Mosaic for Windows
- AI Video Enhancer
- AI Text-to-Video for Windows
- Planar Tracking
- AI Idea to Video for Windows
- Image to Video for Windows
- Instant Cutter Tool for Windows
- AI Extend
- AI Script to Video Guide for Windows
- AI Text-Based Editing for Windows
- AI Mate Editing for Windows
- Create with instant mode
- ChatGPT Plugin - AI Copywriting
- AI Smart Cutout
- Lens correction
- Auto reframe video
- AI Portrait Cutout
- Scene detection feature
- AI Smart Masking for Windows
- Make motion tracking
- Stabilization
- AI Video/Photo Object Remover for Windows
- AI Smart Search for Windows
- AI Skin Tone Protection for Windows
- AI Image for Windows
- Chroma key (green screen)
- Super Slow Motion with Optical Flow for Windows
- Video Denoise for Windows
-
-
Audio Editing for Windows
-
Basic Audio Editing
-
Advanced Audio Editing
-
AI-Powered Audio Editing
-
-
Text Editing for Windows
-
Basic Text Editing
-
Advanced Text Editing
-
AI-Powered Text Editing
-
-
Video Customizations
-
Video Effects
-
Audio Effects
-
Transitions
-
Stickers
-
Filters
-
Color Editing
-
Animations
-
Templates
-
Asset Center
-
-
Exporting & Share & Cloud Backup
Scene Detection
Scene Detection is an advanced editing feature offered in Filmora, which can be used to automatically split a film into basic temporal segments by detecting the transitions between shots in a video. It will greatly facilitate your job if you don't want to edit your video frame by frame but would rather quickly edit some short clips in a large piece of video. The steps below will show you how to do auto scene detection with Filmora.
Open Scene Detection Window
Import media files to Filmora. You can either click the import button to bring up a pop-up window to choose files stored in your local computer, or you can just drag and drop the files to the interface.
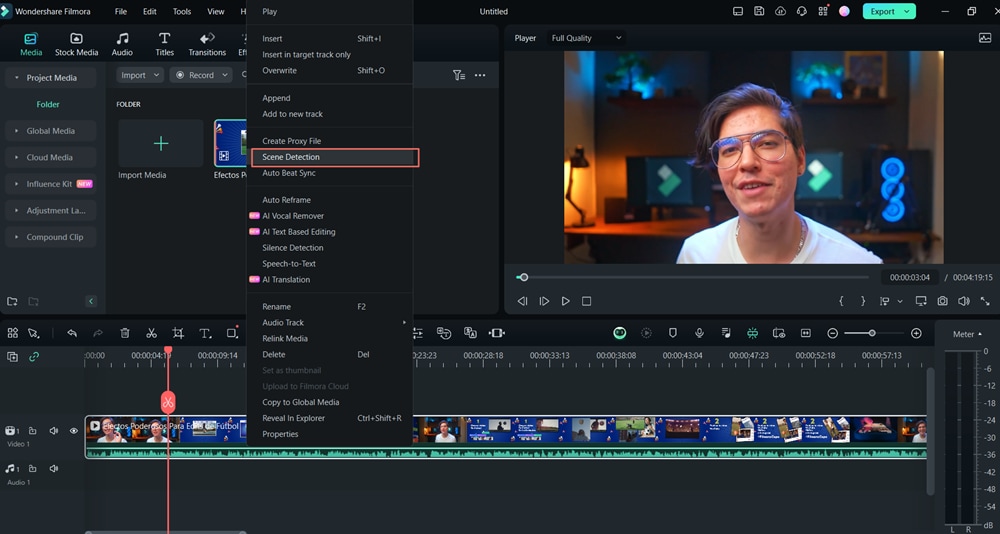
Once the video clip is imported, right-click the imported video and select the Scene Detection option. Or select the imported video, and then go to Tools>Scene Detection.

Detect All the Scenes Automatically
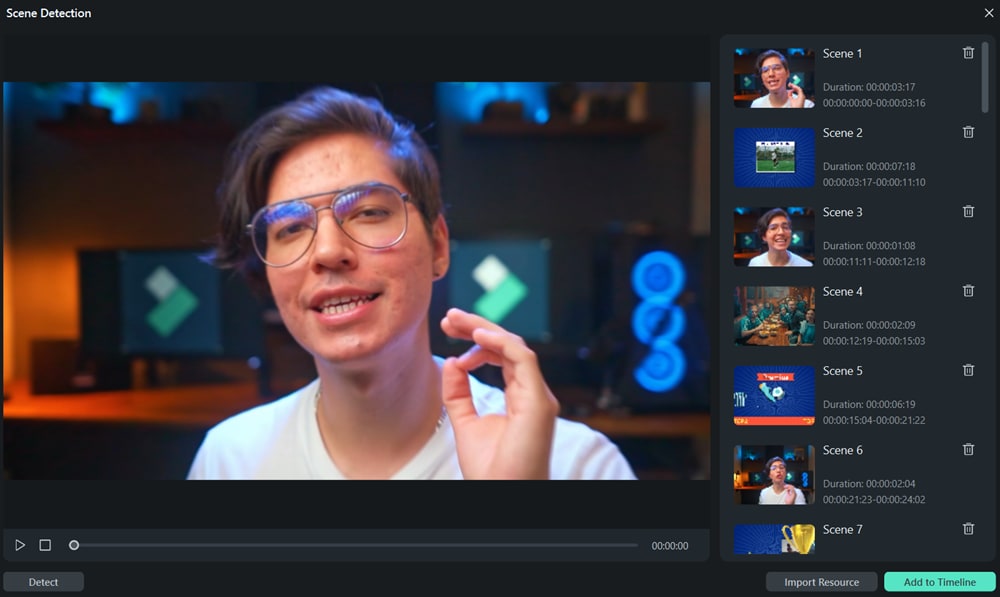
In the pop-up window, simply click Detect, the original file will be separated into smaller segments in seconds. You can double-click on the segments to preview. If you are satisfied, click Add to Timeline, all segments will then be moved to the video track on the timeline. Note: If you're using Filmora 9 or 10, click here to learn how to do scene detection.

Related Posts
Featured Articles
Best Jazz AI Music Generators for Creators in 2025
Create rich soundscapes with AI jazz music generator platforms. From chords to full jazz tracks, find the best AI tools for musicians and editors.
How to Convert 2D Images into 3D Animations?
Are you curious about converting static 2D images to 3D animation videos? Check our best three methods to animate static images with AI image to video, 3D animation, and zoom effects.
How To Create A Short Animated Video with High Engagement and Quality
Got an idea you want to turn into an animated video but don’t know how to go about it? Discover the easiest way to create a short animated video with high engagement and quality within minutes.
Recommended User Guide
AI Skin Tone Protection for Windows
Flawless skin has become the ultimate symbol of perfection, and hence, keeping that in mind, Wondershare Filmora has come up with the perfect feature.
AI Text-to-Video for Windows
Wondershare Filmora is an AI-supported desktop tool designed to assist in video editing to its core. Its new V13 upgrade includes many video editing features, and one of them is AI Text-to-Video.
AI Script to Video Guide for Windows
Here is the guide on how to use the AI Script to Video feature on Windows.
