
For the Best Results, Use the Latest Version.
-
Preparations
-
Account
-
Get Started & Basic Settings
-
Compatibility & Tech Specs
-
Performance Settings
-
-
Creating Projects
-
Creating New Projects
-
-
Importing & Recording
-
Video Editing for Windows
-
Basic Video Editing
- Enable/Disable Clip in Windows
- Magnetic Timeline for Windows
- Dual Monitor Setup for Video Editing on Windows
- Select All Clips on Timeline for Windows
- Timeline and Track Management
- Auto Ripple for Windows
- Split & Trim Video
- Crop & Pan & Zoom Video in Filmora for Windows
- Compositing
- Change Video Speed on Windows
- Reverse Video for Windows
- Mark In and Mark Out for Windows
- Markers for Windows
- Group editing
- Customizable Backgrounds for Videos and Images in Windows
- Video Snapshot
- Using Freeze Frame in Filmora for Windows
- Logo Reveal For Windows
- Auto Enhance in Filmora for Windows
- Applying drop shadow
- Adjustment layer for Windows
- Apply Transforming for Windows
- Video Editing Ruler – Windows
-
Advanced Video Editing
- Keyframe Motion Blur for Windows
- Drawing Tools for Windows | Filmora Guide
- Camera Tracking for Windows
- Create Multi-Camera Clip in Filmora for Windows
- Compound Clip for Windows
- Multi-Clip Editing for Windows
- Filmora Motion Blur | Windows
- 360° Video Reframing for Windows
- Track Matte for Windows
- Video Chapters in Filmora on Windows
- Filmora Flicker Removal Guide | Windows
- Create Multi-Screen Videos in Filmora on Windows
- Masking in Filmora on Windows
- Creating a PIP Effect for Windows
- Keyframe Graph Editor for Windows
- Animation Keyframing for Windows
- Keyframe Path Curve
-
AI-Powered Video Editing
- Smart Scene Cut for Windows
- Smart Short Clips for Windows
- AI Face Mosaic for Windows
- Filmora AI Eye Contact- Windows
- AI Video Enhancer for Windows
- AI Text-to-Video for Windows
- Planar Tracking for Windows
- AI Idea to Video for Windows
- AI Media Analysis for Windows
- Filmora Image to Video for Windows
- Filmora Image to Prompt for Windows
- Instant Cutter Tool for Windows
- AI Extend
- Filmora AI Relight - Windows
- Filmora AI Image Enhancer Guide - Windows
- AI Script to Video Guide for Windows
- AI Text-Based Editing for Windows
- AI Mate Editing for Windows
- Instant Mode for Windows
- ChatGPT Plugin - AI Copywriting
- AI Smart Cutout for Windows
- Lens correction on Windows
- Auto Reframe Video for Windows
- AI Portrait Cutout
- Scene Detection for Windows
- AI Smart Masking for Windows
- Motion Tracking on Windows
- Video Stabilization for Windows
- AI Video/Photo Object Remover for Windows
- AI Smart Search for Windows
- AI Skin Tone Protection for Windows
- AI Image for Windows
- Chroma Key (Green Screen) for Windows
- Super Slow Motion with Optical Flow for Windows
- Video Denoise for Windows
-
-
Audio Editing for Windows
-
Basic Audio Editing
-
Advanced Audio Editing
-
AI-Powered Audio Editing
- Auto synchronization
- AI Sound Effects in Filmora for Windows
- Smart BGM Generation on Windows
- AI Voice Enhancer in Filmora
- AI Voice Cloning in Wondershare Filmora
- AI Music Generator for Windows
- Audio To Video
- AI Vocal Remover for Windows
- AI Auto Beat Sync for Windows
- AI Audio Stretch for Windows
- AI Audio Denoise for Windows
- Silence Detection on Windows
-
-
Text Editing for Windows
-
Basic Text Editing
-
Advanced Text Editing
-
AI-Powered Text Editing
-
-
Video Customizations
-
Video Effects
- Filmora VST3 Plugins for Windows
- Filmora OpenFX Plugins for Windows
- Retouch Guide for Windows
- Filmora Pen Tool Tutorial: Motion Paths & Animation Guide
- Animated Charts
- Mocha Filmora - For Windows
- Different Types of Video Effects
- NewBlue FX effects
- Boris FX effects | Filmora Windows Guide
- Body Effects for Windows
- Filmora -Filmstock Asset
-
Audio Effects
-
Transitions
-
Stickers
-
Filters
-
Color Editing
-
Animations
-
Templates
-
Asset Center
-
-
Exporting & Share & Cloud Backup
How to Create Multi-Screen Videos in Filmora
Whether you're creating comparison videos, before-and-after edits, gaming highlights, or social media content, multi-screen layouts let you display multiple clips in one frame for a more dynamic viewing experience. Filmora provides two easy ways to create them: Split Screen Templates for ready-to-use layouts and the Multi Frame Effect for more flexible, customized compositions. Follow the methods below to get started.
Method 1: Use Multi Frame Effect
Provided next are the easy steps to use the multi-frame effect on your videos within Filmora:
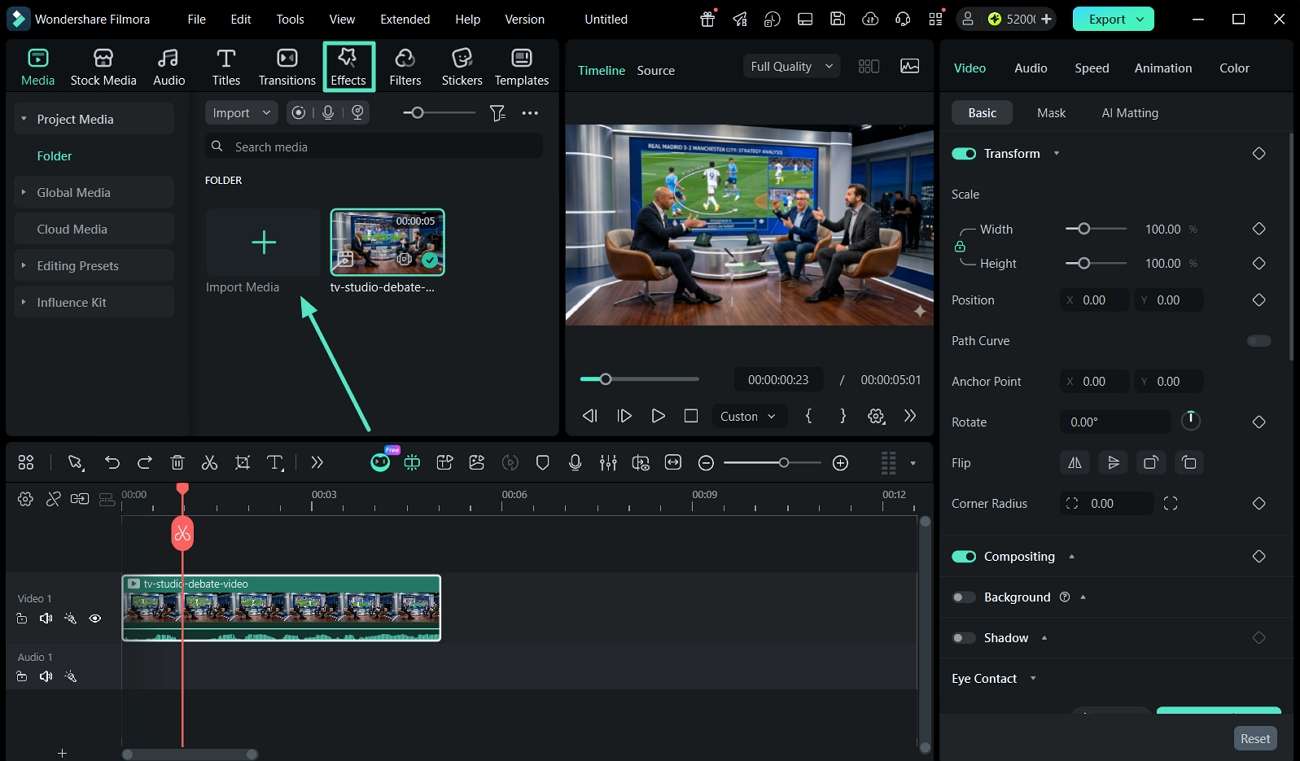
Step 1. Create New Project and Start Editing
After launching Filmora, select the Create Project button and continue to import your video using the Import button. Once the video is imported, lead into the Effects tab from the top panel.
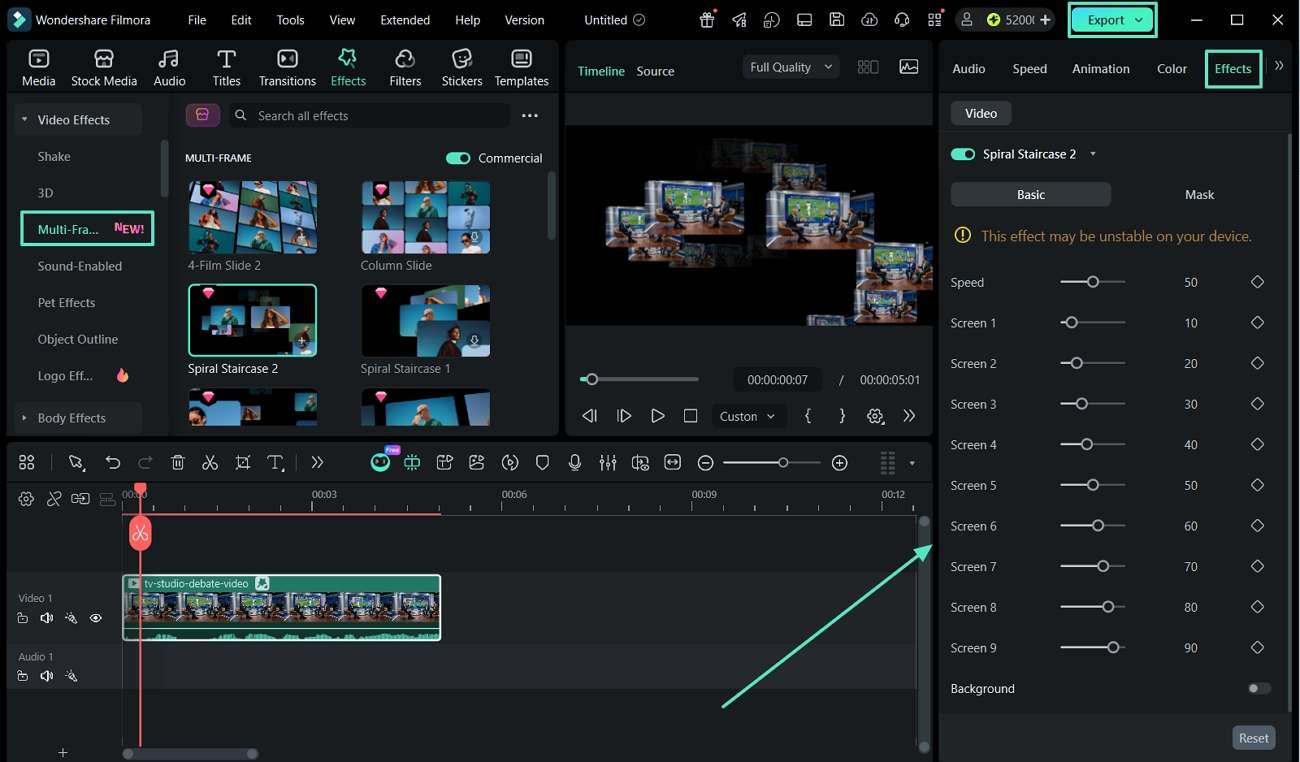
Step 2. Add Multi-Frame Effect and Export
Lead into the Multi-Frame section from the left panel and choose an appropriate effect from the list. Navigate to the Effects menu on the right panel to change the settings of the effects, if needed. Once applied, look for the Export button on the top-right to successfully export the final results.
Method 2: Use Split Screen Templates
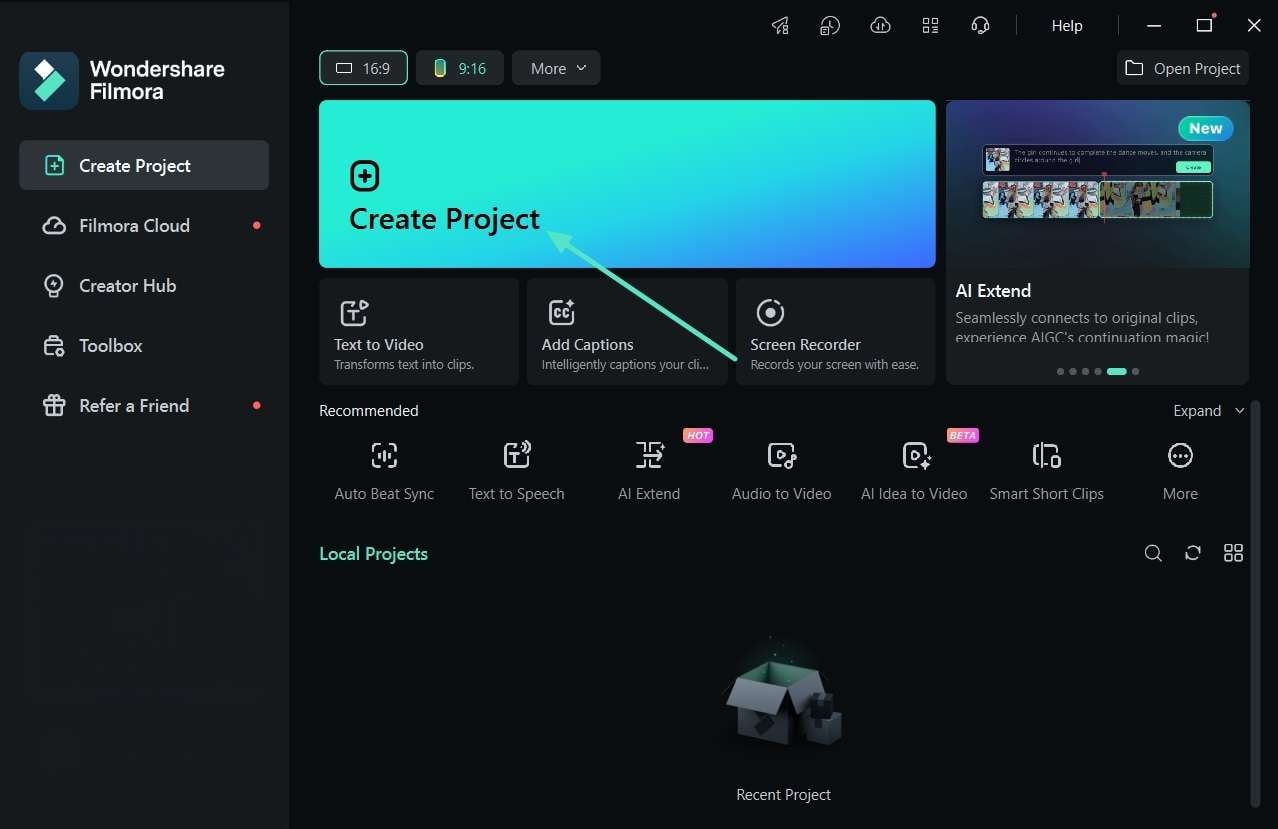
Step 1. Create a New Project on Filmora
Once you open Filmora on Windows, press Create Project to start a new video project.
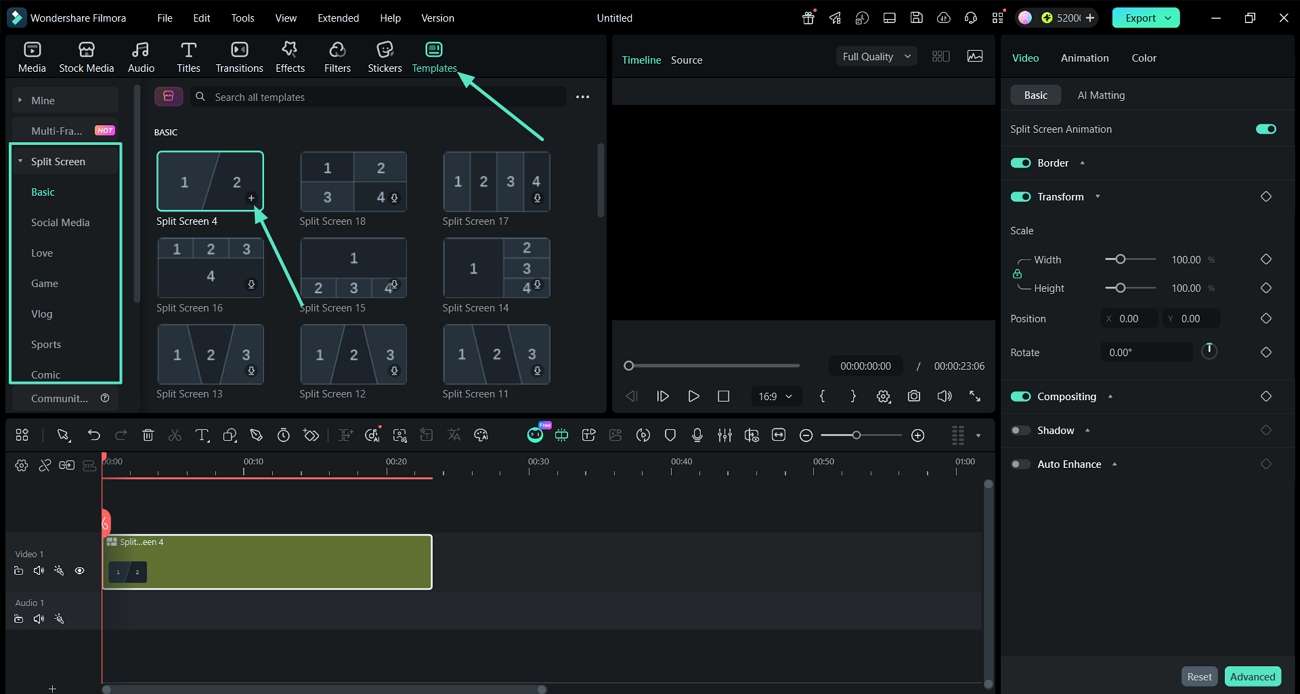
Step 2. Choose a Split Screen Template
After that, press the Template tab and expand the Split Screen section. Next, choose a category and pick a split screen template from the given options. Press the + icon to use the template.
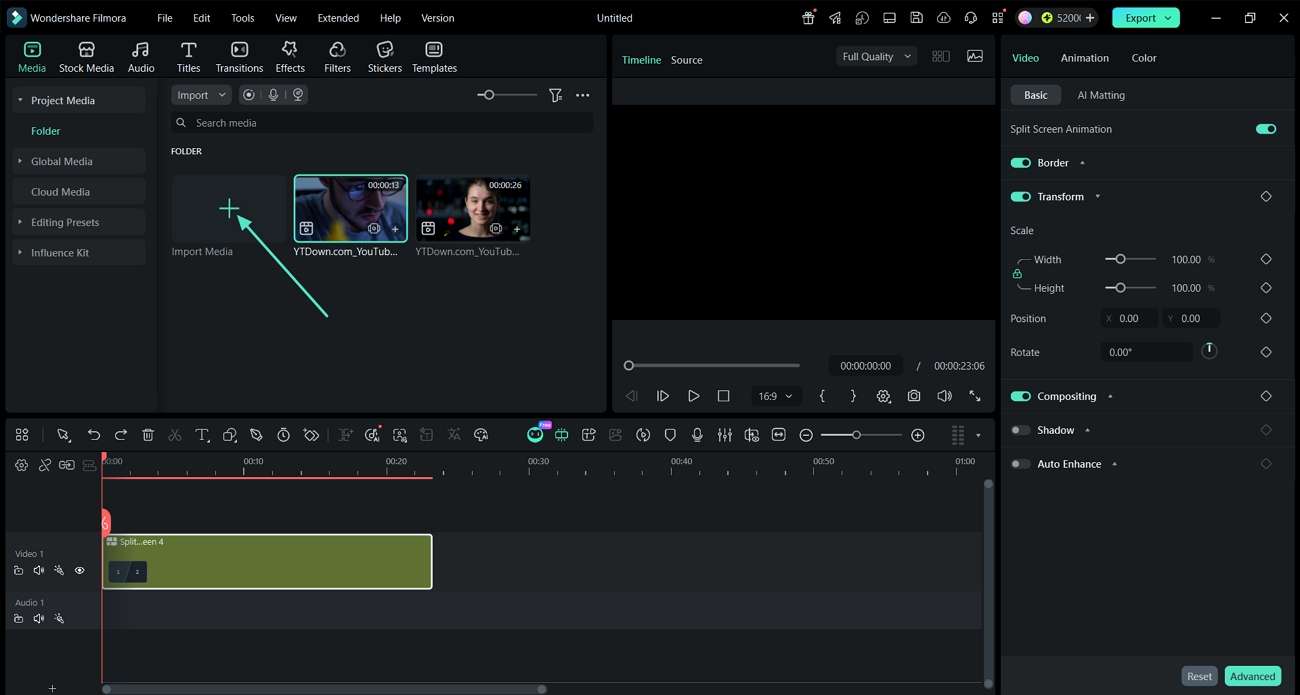
Step 3. Import Clips for Split Screen Video
Next, click the Media tab and press the Import button to import video clips that you want to add to the split screen template.
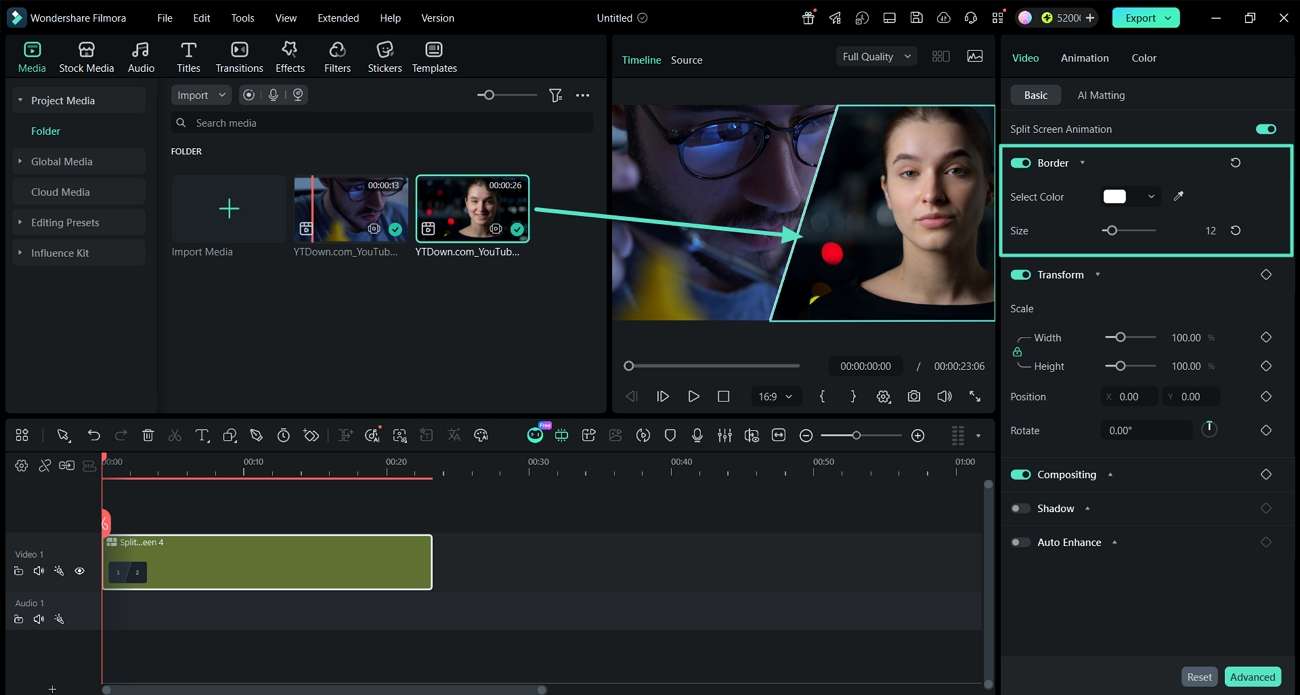
Step 4. Place The Clips on Different Split Screen Windows
After that, drag your videos onto the split screen windows in the preview section. Next, move to the right side panel, enable the Border, and adjust the size of the border if needed.
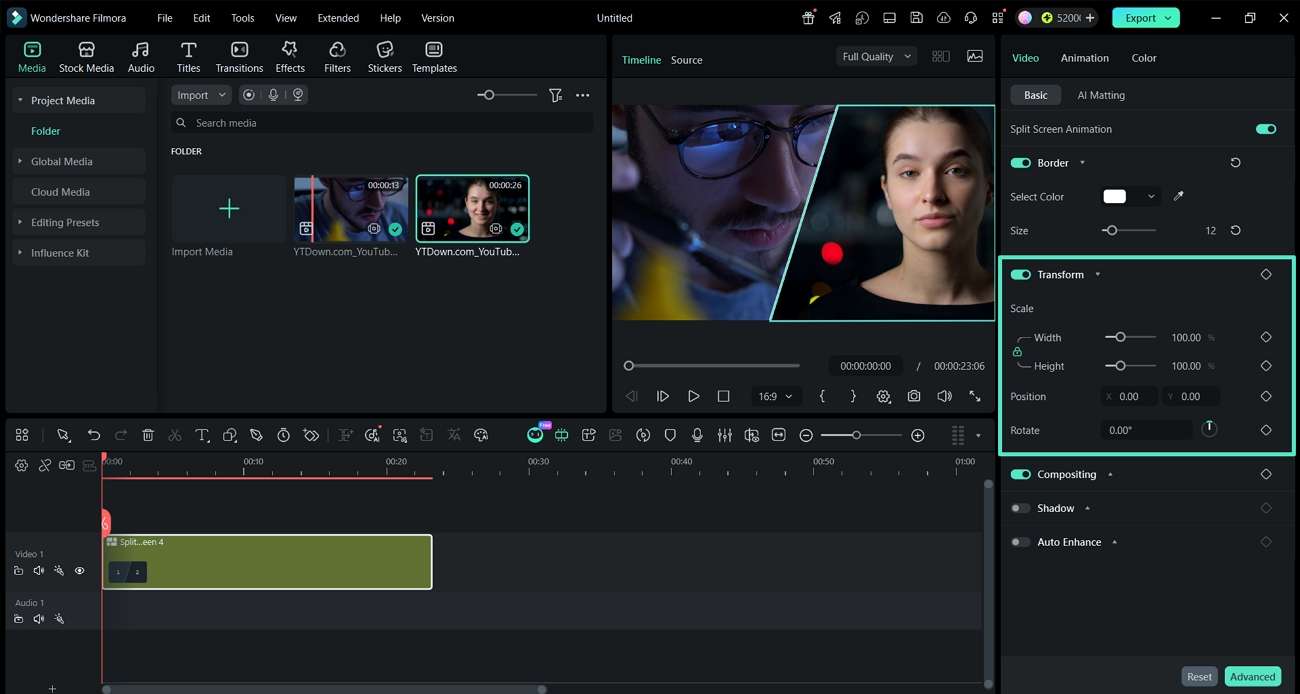
Step 5. Adjust the Size and Position of the Video
Now, under the Transform option, adjust the width, height, and position of the video as per your preferences.
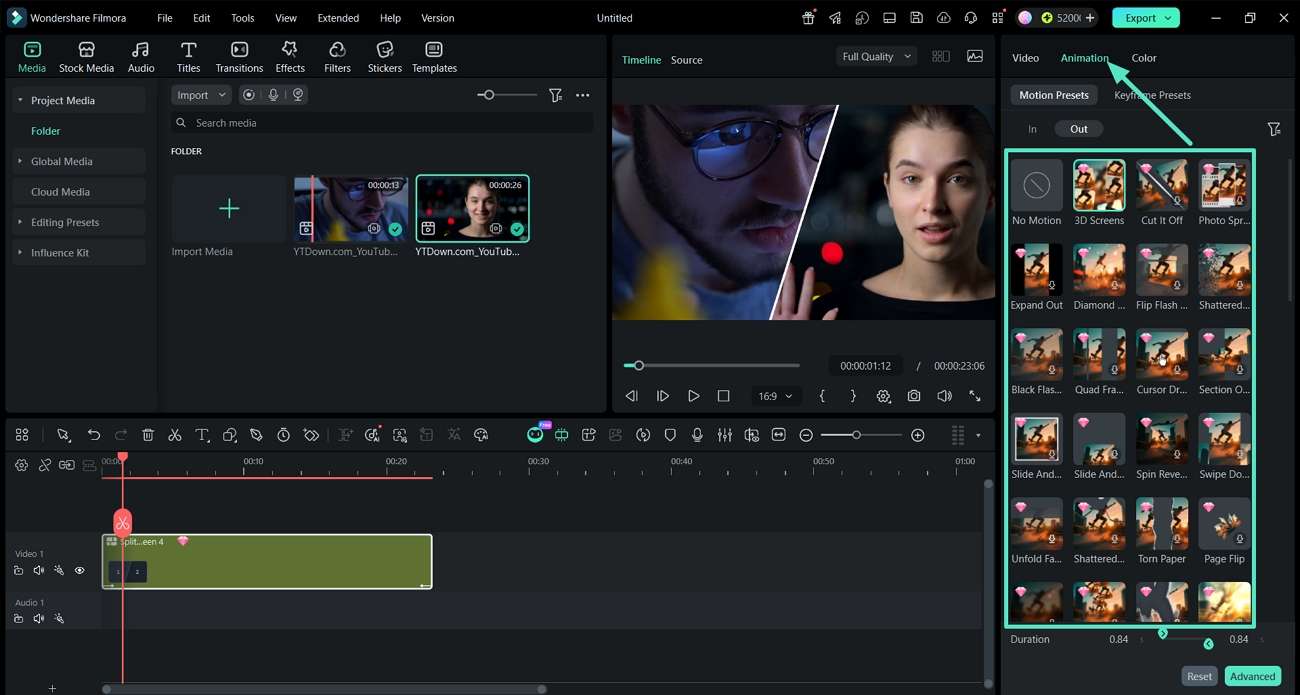
Step 6. Animate Your Video
Press the Animation tab in the right side panel and choose animations for In and Out frames.
Step 7. Adjust The Colors of the Video
After that, choose the Color tab and adjust the sliders under the Color and Light tab. You can also use presets for one-click color adjustment.
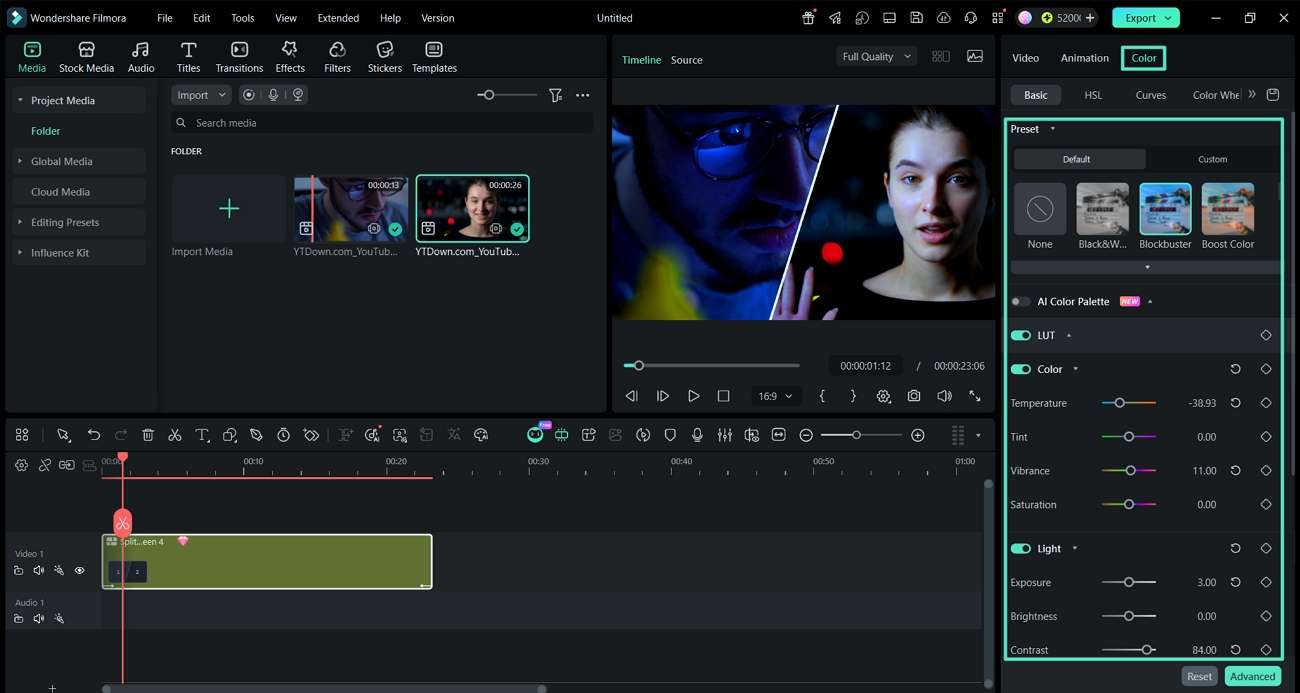
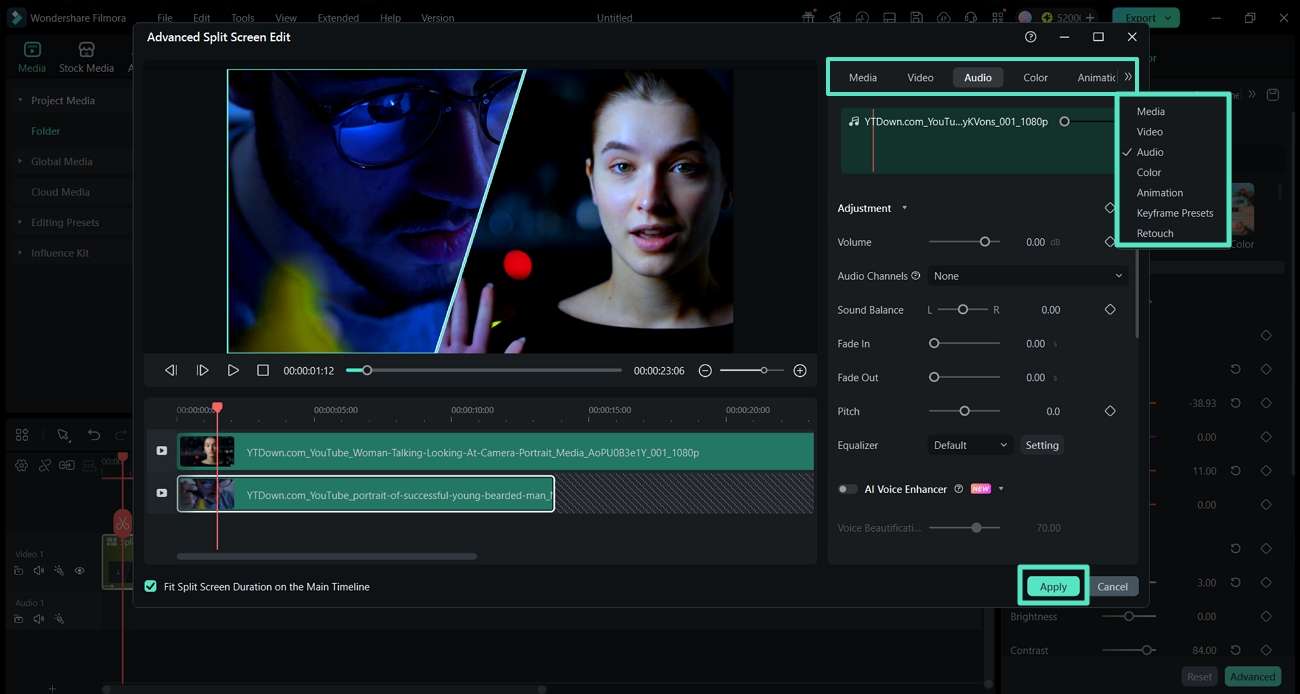
Step 8. Edit Single Clip in Split Screen
If you want to edit just a single clip, choose the specific video in the preview panel and press the Edit option. In the Advanced Split Screen Edit section, choose your video and use the tabs above to edit a single clip. Once done, press Apply to confirm all changes to your videos.
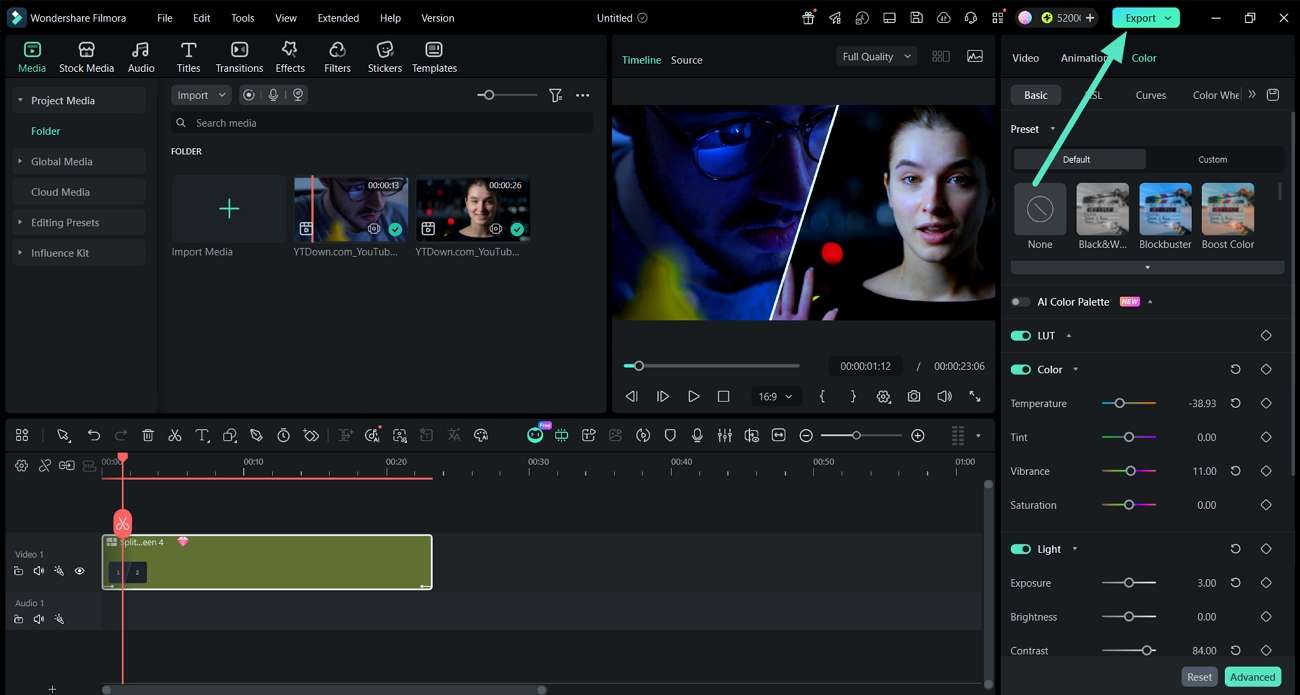
Step 9. Save The Final Clip
After all adjustments are done, press the Export option and choose the targeted resolution to save the final video.
Related Posts
Featured Articles
[Top Tools] Translate Song Lyrics With High-Quality Outputs
Are you looking for ways to generate songs in multiple languages? Read this article to learn the best way to conveniently translate song lyrics.
An In-Depth Guide to Translating Videos and Subtitles Using Veed.IO
Translate your videos quickly with the VEED.IO translate video feature. Engage customers by utilizing their native languages. Download Now!
A Step-by-Step Guide to Translating Videos from English to Tamil
Overcome language barriers with video translation! This guide offers step-by-step instructions to convert English videos to Tamil using advanced tools to connect with Tamil-speaking audiences.
Recommended User Guide
Animation Keyframing for Windows
Learn how to use animation keyframing in Filmora for Windows to animate movement, scale, rotation, opacity, and other properties.
Drawing Tools for Windows | Filmora Guide
This guide tell you how to use Drawing Tools feature in Filmora for Mac.
Camera Tracking for Windows
Learn how to use Camera Tracking in Filmora for Windows to track camera movement, create tracking points, and make 3D text and other elements follow your scene.
